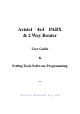
Aristel 4x4 PABX & 2 Way Router User Guide & Setting Tools Software Programming V3.
Telephone Router Setting User Guide Contents 1. Introduction…………………………………………………… 4 2. Power Setting…………………………………………………. 5 2.1 Music on Hold ………..………………………………… 5 3. Main Functions……………………………………………….. 6 3.1 Internal Call……………………………………………… 6 3.2 Incoming call……………………………………………… 6 3.3 Call Pick-up………………………………………………. 6 3.4 Outgoing Call…………………………………………….. 6 3.5 Call Transfer ……………………………………………... 7 3.6 Call Forwarding …………………………………………. 8 3.7 Hot Line………………………………………………….. 8 4.
Telephone Router Setting User Guide 7. Main Parameters ……………………………………………… 17 7.1 Introduction ……………………………………………… 18 7.2 Main Basic Parameters ………………………………….. 19 7.3 Extension Setting ……………………………………….. 20 7.4 Trunk Setting ……………………………………… …. 20 7.5 Send Data to device ……………………………………… 20 7.6 Read Data ………………………………………………… 20 7.7 Device Version …………………………………………… 20 8. Router Numbers ………………………………………………. 21 9. Replace Dial Numbers ……………………………………….. 24 10. Query Version ………………………………………………… 26 11.
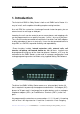
Telephone Router Setting User Guide 1. Introduction The Aristel 4x4 PABX & 2Way Router is both a mini PABX and a Router. It is easy to install, and is capable of handling complex routing functions. As a mini PBX, the system has 4 exchange line and 4 extension ports, plus an external music or message on hold port. Incoming line calls can be routed to one or more phones and outgoing calls can be programmed to use specific line ports ( trunks ) by use of dial plans.
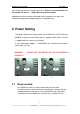
Telephone Router Setting User Guide calls from any extension can pick up any line. There is no need to dial 9 or 0 for outside line access. Simply dial the external number. Additional trunk lines can be terminated on the respective Line ports and activated through phone programming or PC programming. 2. Power Setting The power requirements of the device are AC230V±10% or AC110V±10% 50/60HZ. In the base of the device there is a power select switch. The 4x4 is supplied with the switch set to 230 volt.
Telephone Router Setting User Guide 3.Main functions and Operation 3.1 Internal Call Pick up the handset, dial * followed by the extension number. Example: Your Extension number is 11, and you want to call Extension 14. Pick up the handset of Extension 11 and dial *14. Extension 14 rings, and it displays “8811”. The additional number “88” is a prefix, indicating it is a direct call. For a transferred call the prefix is “0088” 3.2 Incoming call If there is an incoming call, the called extension will ring.
Telephone Router Setting User Guide 3.5 Call Transfer An established call can be transferred to another internal extension. There are two types of call transfer, (i) Blind transfer (ii) Consultation and transfer. Blind transfer (Unannounced transfer): 1. Assume A, an outside party called an internal extension, B. While A and B are talking B decides to transfer the call to another extension , called C. 2. To transfer the call, B presses flash/recall.
Telephone Router Setting User Guide Note a) If error tone “Du, Du” is heard after pressing flash/recall, it indicates the system is busy. You can press flash/recall again to go back to the called party. b) While transferring a call, if you dial an invalid number, the system sounds 3 short error tones. During that time you can again dial another number for transferring. c) While transferring a call, and the called phone is busy, the system will sound a 15 sec error tone.
Telephone Router Setting User Guide For Example to set up a Hot Line from Ext 12 to Ext 13, from Ext12 1. * # * 0000 - hear a beep Enter into programming mode 2. 732*13 - Hear one beep In this case 2 represents Extension 12 . Hot Line destination is 13 3. 712# - Hear one beep Enable Hot Line 4. Hangup. To cancel Hot Line for Ext12, go off hook from Ext12 and enter the following: 1. *#*0000 - hear one beep Enter programming mode 2. 702# Cancel Hotline on Ext 2, i.
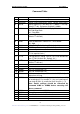
Telephone Router Setting User Guide Command Table No Command 1 0000# 2 09XXXX# 3 10TT# 4 11N# 5 11TT# 6 12N# 7 8 9 10 12ab# 14X# 15TT# 16TT# 11 17TT# 12 18TT# 13 14 15 16 17 2000# 2010# 200M# 201M# 60M# 18 60MN# 19 20 21 22 23 61M# 61MN# 700# 70N# 710# Description Initialize all parameters. Setting Code Password as “XXXX”. Default: XXXX=0000 Setting a pause “p” unit delay as TT*100ms (TT=01-20). Default: TT=08 . Unit pause at default is 800ms Ring-Back on Call Transfer No Reply.
Telephone Router Setting 24 25 26 71N# 72TT# 73Nxxxx… +Hang Up 27 28 82TT# 900# 29 30 90L# 9Nxxxx# User Guide Turn On extension N hot line function Hot Line Delay Time (TT=01-99, Default: TT=04 sec.) Setting hot line number for extension N (N=1-4). The max length of the hot line number is 30. If the length less than 30, it regard “Hang up” as end. If you input two “*” in the hot number, the system regard two “*” as one unit delay. For example, input “73186**75786337898”, then hang up.
Telephone Router Setting 5. User Guide System Programming by a phone - Case Study 1 Out of the box Aristel PABX/Router has the following main default capabilities. 1. 2. 3. 4. 5. 6. 7. Line 1 rings at Tele 1 only (That is extension 11 only) Line 2 rings at Tele 2 only Line 3 rings at Tele 3 only Line 4 rings at Tele 4 only. All 4 lines are activated. Out going calls can take up any one trunk, selected in a cyclic order. Call transfer, call pick up etc. work as described earlier.
Telephone Router Setting User Guide Implementation Install Aristel SLT70 phones. Use only two wire line cords. Terminate Lines on Line 1 and Line 2. Use only two wire line termination.
Telephone Router Setting User Guide Press DSS 4 button Enter *# 8 # Select DSS key 4 Assign the key as Call Forward Cancel key Confirm End programming Press cfm button Go on hook By the above programming, DSS1 is assigned as Call Forward key to Tele 14 DSS2 is assigned as Call Forward key to Mobile Phone : 0428888888 DSS4 is assigned as Call Forward Cancel key. You may label the keys accordingly.
Telephone Router Setting User Guide V 1.9.2.10 Summary Most of the extension and line features can be programmed from any telephone. However, some of the advanced routing features can only be set by the PC Setting Tool Software. The Setting Tool Software is used for setting parameters of Aristel 4x4 PABX & 2Way Router using a serial RS232 cable that is supplied with the equipment. The supplied RS232 cable is a non standard serial cable and no other cable should be used for programming the router.
Telephone Router Setting User Guide 6.2 Setting [Comm Set]: If you want to set parameters with PC software, at first, you should connect the device to PC serial port with data cable. Then set the serial communication port and baud rate. “Send Data To Device”: Send all parameters data to the telephone router. All parameters must be sent to the telephone router, if you want the data you had modified become effective. 6.3 Read Device Data [Read Main Parameters]: Read main parameters from telephone router.
Telephone Router Setting User Guide 7. Main parameters 17 Aristel Networks Pty Ltd 4x4 PABX/Router User Guide and Setting Tool Programming Rev 3.
Telephone Router Setting User Guide 7.1 Introduction In the Main Parameters grid, only the slots in white can be edited. At first, introduce the line grouping function. The telephone router has 4 Trunk lines . These trunk lines can be classified in 2, 3 or 4 groups. "0" is common group. "2" is special group 2. "1" is special group 1. "3" is special group 3. For example, [Trunk 1 belongs to Trunk Group 0] indicates that the first external line belongs to “Common Group”.
Telephone Router Setting User Guide 7.2 Main Basic Parameters Call Pick-up Function Key (Default: 9) This function key is for “Call Pick-up”. For example, there is a call, and the Extension 11 is ringing. You can pick up the call from extension 13 by dialing *9. Ring Interval Time (Unit 100ms, Default 5 sec.) Ring Time for Internal(Inner) Call (Default 30 sec.) This is internal call ring time. Called extension stops ringing when this time expires. Call Transfer Time (Default: 20 Sec.
Telephone Router Setting User Guide trunk lines can be made to disconnect. 7.3 Extension settings PortID: The extension port ID, from 0 to 3. ExtNumber: The extension number, for example: 11,12,13,14. The length of extension number cannot more than “Extension Number Length”. Notice: The first number of any extension number cannot be set to 9, the Call Pick-up Function Key number” HotLine: Whether this extension is hot line or not. HotNumber: Hot number.
Telephone Router Setting User Guide 8. Router Numbers Click title to sort 21 Aristel Networks Pty Ltd 4x4 PABX/Router User Guide and Setting Tool Programming Rev 3.
Telephone Router Setting User Guide In this screen matching are made between dialed numbers and the trunk groups. It can add, edit or delete router number records. A maximum of 1200 records can be added. [ID] is only a series No. It has no other function. [GroupID] is trunk group ID. The value is 1-3. For example with above data, in the first line, “Router number” set as “0”, “GroupID “ set as 1.
Telephone Router Setting User Guide Delete Router Number method: 1. Delete one record of router number. At first select a record, then click [Delete] button. 2. Delete a batch of seriate records of router number. Multiple lines selection: move the mouse to the position of the beginning of the line, press the left button of the mouse, drag the mouse. The selected multiple lines will be displayed with deep color. At first, make multiple line selection, then, click [Delete] button.
Telephone Router Setting User Guide 9. Replace Dial Numbers 24 Aristel Networks Pty Ltd 4x4 PABX/Router User Guide and Setting Tool Programming Rev 3.
Telephone Router Setting User Guide [ID] is only a series No. It has no other function. [GroupID] is trunk group. The value is 0-3. [Dial Option]: It has 5 options. 1. [Add Prefix Number Before All]: If Dial Option had been set this way, the system will add a prefix when a target number is detected.
Telephone Router Setting User Guide TargetNumber: 17909 Then, if a customer dialed number “12386337898”, and if the number “123” belonged to special group 1, then The system will dial out phone number “1231790986337898”. 5. [Delete And Add Number]: Only [Dial Option] had been set as this option, the corresponding [DeleteLen] is valid. For example: GroupID: 1 Source Number: 00 TargetNumber: 17909 DeleteLen: 5 If a customer dialed number “0075786337898”, the digit string begin with 00.
Telephone Router Setting User Guide parameters. You can use PC Software [Import All] to import all the backup data and “Send Data to Device”. In this way, you can recover all the parameters as you set previously. You can also send the parameters data to your remote clients in the above method. 12. Product Specification Power Supply: AC230V±10% 50/60HZ & AC110V±10% Power consumption: ≤15W Ringing Current: AC70V±10% 50HZ Environment temperature: 0-40℃ Humidity: 10%-90% 13.
Telephone Router Setting User Guide Installation and programming. 1. Install Aristel PABX 4x4 &Two Way Router at suitable place and power on. Check red LED flashing. 2. Terminate lines 1 and 2. 3. Connect AN1001 GSM dialer to Line 4 4. Install Aristel Multiphones SLT70 on the Tele ports 1, 3 and 4 5. Connect Engenus SN902 long range phone as Tele 2 6. Connect the Com port of the PABX to the PC com port using the cable provided. 7. Power on PC 8.
Telephone Router Setting User Guide 13.1 Main Parameters Setting (a) 29 Aristel Networks Pty Ltd 4x4 PABX/Router User Guide and Setting Tool Programming Rev 3.
Telephone Router Setting User Guide Main Parameters Setting (b) 30 Aristel Networks Pty Ltd 4x4 PABX/Router User Guide and Setting Tool Programming Rev 3.
Telephone Router Setting User Guide Main Parameters Setting (c) 31 Aristel Networks Pty Ltd 4x4 PABX/Router User Guide and Setting Tool Programming Rev 3.
Telephone Router Setting User Guide 13.2 Router Numbers 32 Aristel Networks Pty Ltd 4x4 PABX/Router User Guide and Setting Tool Programming Rev 3.
Telephone Router Setting 13.3 User Guide Replace Dial Numbers 33 Aristel Networks Pty Ltd 4x4 PABX/Router User Guide and Setting Tool Programming Rev 3.
Telephone Router Setting User Guide 14. Call forward programming SLT phones How to Call forward Tel 3 to Tel 2 (Engenius) Lift the handset of Tel 13 and dial * # 8 * 1 2 You will hear a confirmation beep. Hang up. You can store this dial string as a speed dial number on one of the DSS keys of SLT70.(Refer to para. 5.
Telephone Router Setting User Guide NOTES 35 Aristel Networks Pty Ltd 4x4 PABX/Router User Guide and Setting Tool Programming Rev 3.
Telephone Router Setting User Guide Illustration showing systems connectivity and routing capabilities of Aristel 4 X 4 PABX and 2-Way Router Aristel Networks Pty Ltd, Melbourne www.aristel.com.au 36 Aristel Networks Pty Ltd 4x4 PABX/Router User Guide and Setting Tool Programming Rev 3.