Operating Instructions COOKER AND OVEN Contents GB English,1 Warning, 2 Installation, 3-9 Positioning and levelling Mounting a Power Supply Cable Electrical connection Gas connection Adapting to different types of gas Post Installation Checks Technical specifications Table of characteristics Description of the appliance, 10 Overall view Control panel Start-up and use, 11-14 A6TMC2 C (X) AUS Using the hob Using the oven Using the cooking timer Cooking modes Oven cooking advice table Precautions and tips
WARNING GB WARNING: The appliance and its accessible parts become hot during use. Do not close the glass cover (if present) when the gas burners or electric hotplates are still hot. Care should be taken to avoid touching heating elements. Children less than 8 years of age shall be kept away unless continuously supervised. WARNING: Ensure that the appliance is switched off before replacing the lamp to avoid the possibility of electric shock.
Installation This appliance must be installed by an authorised person in accordance with this instruction manual AS/NZS 5601.1 – Gas installations (installation and pipe sizing), local gas fitting regulations, local electrical regulations, Building Code of Australia and any other government authority. ! Before operating your new appliance please read this instruction booklet carefully. It contains important information concerning the safe installation and operation of the appliance.
! After prolonged use of the appliance, it is advisable to open a window or increase the speed of any fans used. ! The liquefied petroleum gases are heavier than air and collect by the floor, therefore all rooms containing LPG cylinders must have openings leading outside so that any leaked gas can escape easily. LPG cylinders, therefore, whether partially or completely full, must not be installed or stored in rooms or storage areas that are below ground level (cellars, etc.).
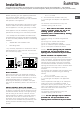
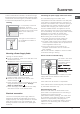
a washer should be used. Concrete wall requires the screw of at least 8mm of diameter, and 60mm of length. Ensure that the chain is fixed to the rear wall of the cooker and to the wall, as shown in figure, so that after installation it is tensioned and parallel to the ground level. Levelling If it is necessary to level the appliance, screw the adjustable feet into the places provided on each corner of the base of the cooker (see figure).
GB ! The manufacturer declines any liability should these safety measures not be observed. Gas connection ! This appliance is suitable for use with either a flexible connection or rigid copper connection. Check The Gas Type WARNING: Before installation, check that the gas type (natural gas or LPG/Universal of the cooker is suitable for the gas type available to the installation. It is extremely dangerous to use the wrong gas type with any appliance, as fire or serious injury can result.
Duplicate Data Plate Where the data plate is obscured by cabinetry when the cooker is in the installed position, place a duplicate data plate on a surface of the cabinetry adjacent to the cooker. ! Should the gas pressure used be different (or vary slightly) from the recommended pressure, a suitable pressure regulator must be fitted to the inlet hose in accordance with current national regulations relating to “regulators for channelled gas”.
Post Installation Checks Perform post installation checks and ensure proper and safe operation before leaving. Test all burners individually and in combination. GB Leak Check • Ensure all gas control knobs are in the Off position. • Ensure the gas supply is switched on. • Spray a solution of soapy water onto all gas joints as well as the full length of any flexible hoses. UNDER NO CIRCUMSTANCES USE A NAKED FLAME IN CHECKING FOR LEAKS.
Technical specifications GB The product was tested in accordance with AS4551 standard Gas Consumption Natural Gas (1.0 kPa) Injector Gas Input Diameter 0.85 mm 3.5 MJ/h 1.10 mm 6.0 MJ/h 1.25 mm 8.2 MJ/h 1.19 mm(x2) 13.5 MJ/h 31.2 MJ/h Auxiliary Burner Semi Rapid Burner Rapid Burner Wok Burner Total ULPG (2.75 kPa) Injector Gas Input Diameter 0.55 mm 3.7 MJ/h 0.65 mm 5.5 MJ/h 0.80 mm 8.5 MJ/h 0.70 mm (x2) 13.0 MJ/h 30.
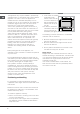
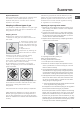
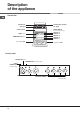
Description of the appliance GB Overall view Gas burner Hob grid Containment surface for spills GUIDE RAILS for the sliding racks position 5 position 4 position 3 position 2 position 1 Control panel GRILL rack DRIPPING PAN rack Adjustable foot Adjustable foot Control panel SELECTOR knob THERMOSTAT indicator light OVEN OPERATION indicator light THERMOSTAT knob 10 COOKING TIMER knob Hob BURNER control knobs
Start-up and use Using the hob Lighting the burners For each BURNER knob there is a complete ring showing the strength of the flame for the relevant burner. To light one of the burners on the hob: 1. Bring a flame or gas lighter close to the burner. 2. Press the BURNER knob and turn it in an anticlockwise direction so that it is pointing to the maximum flame setting . 3. Adjust the intensity of the flame to the desired level by turning the BURNER knob in an anticlockwise direction.
GB ! Never put objects directly on the bottom of the oven; this will avoid the enamel coating being damaged. 1. Select the desired cooking mode by turning the SELECTOR knob. 2. Select the recommended temperature for the cooking mode or the desired temperature by turning the THERMOSTAT knob. A list detailing cooking modes and suggested cooking temperatures can be found in the relevant table (see Oven cooking advice table).
GRILL mode The central part of the top heating element is switched on. The high and direct temperature of the grill is recommended for food that requires a high surface temperature (veal and beef steaks, fillet steak and entrecôte). This cooking mode uses a limited amount of energy and is ideal for grilling small dishes. Place the food in the centre of the rack, as it will not be cooked properly if it is placed in the corners.
GB Oven cooking advice table Cooking modes Foods Duck Roast veal or beef Traditional Pork roast Oven Biscuits (short pastry) Tarts Tarts Fruit cakes Plum cake Sponge cake Baking Stuffed pancakes (on 2 racks) Small cakes (on 2 racks) Mode Cheese puffs (on 2 racks) Cream puffs (on 3 racks) Biscuits (on 3 racks) Meringues (on 3 racks) Frozen food Pizza Courgette and prawn pie Country style spinach pie Turnovers Lasagne Golden Rolls Fast Chicken morsels cooking Pre-cooked food Golden chicken wings Fresh Foo
Precautions and tips ! This appliance has been designed and manufactured in compliance with international safety standards. The following warnings are provided for safety reasons and must be read carefully. General Appliance Warnings • • • • • • • • • • • • • Read the recommendations in this instruction booklet carefully, as they give important advice regarding safe installation, use and maintenance. Keep this booklet in a safe place for further reference when required.
GB • Use dry utensil holders. Wet pot holders can build up steam. Do not use towels or other large pieces of cloth to pick up cooking utensils, as these may touch the heating element and catch fire. • Do not allow pot handles to overhang other burners that are in use, as this will cause scorching of the handle, and potential handling burns. • Always make sure that pan handles are turned towards the centre of the hob in order to avoid accidental burns. Maintenance Warnings • DO NOT MODIFY THIS APPLIANCE.
Care and maintenance Switching the appliance off Disconnect your appliance from the electricity supply before carrying out any work on it. DO NOT TOUCH HOT SURFACES. ALLOW COOKTOP AND ALL OVEN SURFACES TO COOL COMPLETELY BEFORE CLEANING Cleaning the appliance ! Never use steam cleaners or pressure cleaners on the appliance. • The stainless steel or enamel-coated external parts and the rubber seals may be cleaned using a sponge that has been soaked in lukewarm water and neutral soap.
cold and wipe off with a clean, dry cloth. The enamel could dull if cleaned while still hot. GB Stainless steel and chromed parts • Stainless steel can be marked by hard water that has been left on the surface for a long time, or by aggressive detergents containing phosphorus. After cleaning, rinse and dry any remaining drops of water. • Use commercial products designed for cleaning stainless steel and chromed steel, and follow the maker’s instructions. Care should be taken when cleaning around graphics.
6.Replace the glass. Steam-Assisted Oven Cleaning WARNING! Oven must not be operated with inner door glass removed! This method of cleaning is recommended especially after cooking very fatty (roasted)meats. WARNING! When reassembling the inner door glass insert the glass panel correctly so that the text written on the panel is not reversed and can be easily legible.
07/2013 - 195116247.