Operating Instructions COOKER AND OVEN Contents AU English, 1 Warning, 2 Installation, 3 Positioning and levelling Electrical connection Technical data Description of the appliance, 5 Overall view Control panel Start-up and use, 6 Starting the oven Using the cooking timer Cooking advice, 9 A6VMH60/ AUS Oven cooking advice table Using the glass ceramic hob, 10 Switching the cooking zones on and off Cooking zones Precautions and tips, 11 General safety Disposal Respecting and conserving the environmen
WARNING AU During use the appliance becomes hot. Care should be taken to avoid touching heating elements inside the oven. WARNING: Ensure that the appliance is switched off before replacing the lamp to avoid the possibility of electric shock. ! When you place the rack inside, make sure that the stop is directed upwards and in the back of the cavity . WARNING: Unattended cooking on a hob with fat or oil can be dangerous and may result in fire.
Installation Levelling ! Before operating your new appliance please read this instruction booklet carefully. It contains important information concerning the safe installation and operation of the appliance. ! Please keep these operating instructions for future reference. Make sure that the instructions are kept with the appliance if it is sold, given away or moved. ! The appliance must be installed by a qualified professional according to the instructions provided.
never reaches at any point a temperature 50°C higher than the room temperature. The cable must be routed away from the rear vents. AU HOT PARTS ! The manufacturer declines any liability should these safety measures not be observed. We recommend cleaning the oven before using it for the first time, following the instructions provided in the "Care and maintenance" section.
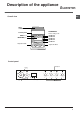
Description of the appliance AU Overall view Glass ceramic hob GUIDE RAILS for the sliding racks position 5 position 4 position 3 position 2 position 1 Control panel GRILL rack DRIPPING pan Adjustable foot Adjustable foot Control panel ACTIVE HOTPLATE indicator light THERMOSTAT indicator light SELECTOR knob THERMOSTAT knob Electronic programmer ELECTRIC HOTPLATE control knobs 5
Start-up and use AU the oven door. The appliance may emit a slightly unpleasant odour caused by protective substances used during the manufacturing process burning away. Cooking modes ! A temperature value can be set for all cooking modes between 60°C and Max, except for the following modes ! Never put objects directly on the bottom of the oven; this will avoid the enamel coating being damaged. 1. Select the desired cooking mode by turning the SELECTOR knob. 2.
GRILL mode The central part of the top heating element is switched on. The high and direct temperature of the grill is recommended for food that requires a high surface temperature (veal and beef steaks, fillet steak and entrecôte). This cooking mode uses a limited amount of energy and is ideal for grilling small dishes. Place the food in the centre of the rack, as it will not be cooked properly if it is placed in the corners.
AU Planning cooking with the electronic programmer Setting the clock After the appliance has been connected to the power supply, or after a blackout, the display will automatically reset to 0:00 and begin to blink. To set the time: 1. Press the COOKING TIME button and the COOKING END TIME simultaneously. 2. Within 4 seconds of having pressed these buttons, set the exact time by pressing the and buttons. The button advances the hours and the button decreases the hours.
Oven cooking advice table Cooking modes Foods Duck Roast veal or beef Traditional Pork roast Oven Biscuits (short pastry) Tarts Tarts Fruit cakes Plum cake Sponge cake Baking Stuffed pancakes (on 2 racks) Small cakes (on 2 racks) Mode Cheese puffs (on 2 racks) Cream puffs (on 3 racks) Biscuits (on 3 racks) Meringues (on 3 racks) Frozen food Pizza Courgette and prawn pie Country style spinach pie Turnovers Lasagne Golden Rolls Fast Chicken morsels cooking Pre-cooked food Golden chicken wings Fresh Food B
Using the glass ceramic hob AU ! The glue applied on the gaskets leaves traces of grease on the glass. Before using the appliance, we recommend you remove these with a special nonabrasive cleaning product. During the first few hours of use there may be a smell of rubber which will disappear very quickly. Practical advice on using the hob • Use pans with a thick, flat base to ensure that they adhere perfectly to the cooking zone.
Precautions and tips ! This appliance has been designed and manufactured in compliance with international safety standards.The following warnings are provided for safety reasons and must be read carefully. • General safety • • These instructions are only valid for the countries whose symbols appear in the manual and on the serial number plate. • The appliance was designed for domestic use inside the home and is not intended for commercial or industrial use.
Care and maintenance AU Switching the appliance off Disconnect your appliance from the electricity supply before carrying out any work on it. Cleaning the appliance ! Never use steam cleaners or pressure cleaners on the appliance. • Clean the glass part of the oven door using a sponge and a non-abrasive cleaning product, then dry thoroughly with a soft cloth. Do not use rough abrasive material or sharp metal scrapers as these could scratch the surface and cause the glass to crack.
Removing and fitting the oven door: 1.Open the door 2.Make the hinge clamps of the oven door rotate backwards completely (see photo) WARNING! Oven must not be operated with inner door glass removed! AU WARNING! When reassembling the inner door glass insert the glass panel correctly so that the text written on the panel is not reversed and can be easily legible. 7.Replace the profile, a click will indicate that the part is positioned correctly. 8.Open the door completely. 9.Close the supports (see photo).
Steam-Assisted Oven Cleaning AU This method of cleaning is recommended especially after cooking very fatty (roasted)meats. This cleaning process allows to facilitate the removal of dirt of the walls of the oven by the generation of steam that is created inside the oven cavity for easier cleaning. ! Important! Before you start steam -cleaning: -Remove any food residue and grease from the bottom of the oven. - Remove any oven accessories (grids and drip pans).
AU 15
06/2014 - 195116248.