Gebruiksaanwijzingen WASAUTOMAAT Inhoud NL Nederlands,1 GB English,13 NL Installatie, 2-3 Uitpakken en waterpas zetten Hydraulische en elektrische aansluitingen Technische gegevens Beschrijving van de wasautomaat, 4-5 Bedieningspaneel Het uitvoeren van een wascyclus, 6 Programmas en opties, 7 Programmatabel Wasopties Wasmiddel en wasgoed, 8 AQXL 125 Wasmiddel Voorbereiden van het wasgoed Wastips Balanceersysteem van de lading Voorzorgsmaatregelen en advies, 9 Algemene veiligheid Afvalverwijdering
Installatie NL Het is belangrijk dit boekje te bewaren, zodat u het op ieder gewenst moment kunt raadplegen. In het geval u de wasautomaat verkoopt of u verhuist, moet u de handleiding bij het apparaat bewaren. Lees de instructies aandachtig door: u vindt er belangrijke informatie betreffende installatie, gebruik en veiligheid. In de envelop vindt u samen met deze gebruiksaanwijzing, de garantie en instructies die nodig zijn voor de installatie.
Aansluiting van de afvoerbuis 65 - 100 cm Verbindt de afvoerbuis, zonder hem te buigen, aan een afvoerleiding of aan een afvoer in de muur tussen de 65 en 100 cm van de grond af. Gebruik geen verlengsnoeren of dubbelstekkers. NL Het snoer mag niet gebogen of samengedrukt worden. De voedingskabel en de stekker mogen alleen door een bevoegde installateur worden vervangen. Belangrijk! De fabrikant kan niet aansprakelijk worden gesteld wanneer deze normen niet worden nageleefd.
Beschrijving van de wasautomaat NL BEDIENINGSPANEEL DEUR WASAUTOMAAT HANDVAT DEUR WASAUTOMAAT PLINT STELVOETJES DEUR GEBLOKKEERD WASMIDDELBAKJE: Om de deur van de wasautomaat te openen dient u altijd het speciale handvat te gebruiken (zie afbeelding). Bevindt zich aan de binnenkant van de automaat en verschijnt als u de deur opent. Voor de dosering van wasmiddelen zie het hoofdstuk Wasmiddelen en wasgoed. 20 1 2 1. bakje wasmiddel voorwas: voor waspoeder. 2.
Bedieningspaneel NL Toetsen en Controlelampjes OPTIES Knop WASPROGRAMMAS Toets met controlelampje AAN/UIT en ANNULEREN Toets Toets Symbolen WASFASES UITGESTELDE START TEMPERATUUR Toets CENTRIFUGE Toets met controlelampje AAN-/UIT en ANNULEREN: druk even op de toets om de wasautomaat aan of uit te zetten. Het groene controlelampje geeft aan dat de wasautomaat aanstaat. Om de wasautomaat tijdens de wascyclus uit te zetten moet u de toets langer, circa 2 sec.
Het uitvoeren van een wascyclus NL N.B.: voordat u de wasautomaat gaat gebruiken moet u hem met wasmiddel maar zonder wasgoed een wascyclus laten uitvoeren. Kies het programma van 90° zonder voorwas. De eigenschappen van de wascyclus wijzigen. 1. DE WASAUTOMAAT AANZETTEN. Druk op de toets . Alle controlelampjes gaan 1 seconde lang aan, waarna het controlelampje van de toets aanblijft; het controlelampje START/PAUSE zal langzaam gaan knipperen.
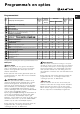
Programmas en opties Programmatabel Symbool NL Maximale Tijdsduur (°C) Maximale snelheid (toeren per minuut) Wassen WIT KATOEN 60° 1200 l l BONT KATOEN 40° 1200 l FIJN SYNTHETISCH MIX 30': Voor het snel opfrissen van niet zo vuil wasgoed (niet geschikt voor wol, zijde en handwas). Krachtige programma's KATOEN MET VOORWAS: Voor het verwijderen van moeilijke vlekken (Doe het wasmiddel in het speciale vakje).
Wasmiddel en wasgoed NL Wasmiddel De keuze en de hoeveelheid wasmiddel hangen af van het type stof (katoen, wol, zijde ), van de kleur van het wasgoed, de wastemperatuur, de vuilgraad en de hardheid van het water. Een juiste dosering van het wasmiddel voorkomt verspillingen en beschermt het milieu: ook al zijn wasmiddelen biologisch afbreekbaar, toch bevatten ze elementen die het evenwicht in de natuur verstoren. We raden u aan: waspoeder te gebruiken voor de witte katoenen was en voor de voorwas.
Voorzorgsmaatregelen en advies Deze wasautomaat is ontworpen en uitgevoerd volgens de internationale veiligheidsnormen. Deze aanwijzingen zijn om veiligheidsredenen geschreven en moeten aandachtig worden doorgenomen. Handmatige opening van het deurtje Mocht er in het huis geen stroom aanwezig zijn en u wilt het deurtje openen om de was op te hangen, dan dient u het volgende te doen: Algemene veiligheid Dit apparaat is uitsluitend ontworpen voor huishoudelijk niet-professioneel gebruik.
Onderhoud en verzorging NL Afsluiten van water en stroom Sluit na iedere wasbeurt de kraan af. Hiermee beperkt u slijtage van de waterinstallatie van de wasautomaat alsmede lekkagegevaar. Sluit altijd eerst de stroom af voordat u de wasautomaat schoonmaakt en gedurende onderhoudswerkzaamheden. Toegang tot het voorvakje: 1.
Storingen en oplossingen Het kan gebeuren dat het apparaat niet werkt. Voor u contact opneemt met de Servicedienst (zie Service) moet u controleren of het niet een storing betreft die uzelf makkelijk kunt verhelpen met behulp van de volgende lijst. Storingen: Mogelijke oorzaken / Oplossing: De wasautomaat gaat niet aan. De stekker zit niet in het stopcontact of niet diep genoeg om contact te maken. Er is in het hele huis geen stroom. De wascyclus start niet. De deur is niet goed dicht.
Service NL Voordat u Servicedienst inschakelt: Controleer eerst of u het probleem zelf kunt oplossen (zie Storingen en oplossingen); Start het programma opnieuw om te controleren of de storing is verholpen; Als dit niet het geval is, kunt u contact opnemen met de erkende Servicedienst; In het geval de automaat verkeerd is geïnstalleerd of u hem niet correct heeft gebruikt zal u gevraagd worden de reparatiekosten te betalen. Wendt u nooit tot een niet erkende installateur.
Instruction booklet WASHING MACHINE Contents GB English GB Installation, 14-15 Unpacking and levelling Connecting the cold water and electricity supplies Technical data Description of the machine, 16-17 Control panel Running a wash cycle, 18 Programmes and options, 19 Table of Programmes Wash options Detergents and laundry, 20 AQXL 125 Detergent Preparing the laundry Washing advice Load-balancing system Precautions and tips, 21 General safety Disposal Opening the door manually Care and maintenance
Installation GB Keep this instruction manual in a safe place for If positioned on a fitted carpet or a rug, adjust the Please read this instruction manual carefully it Connecting the cold water and electricity supplies future reference. If the appliance is sold, given away or moved, please ensure the manual remains with the machine so that the new owner may benefit from the advice contained within it.
Do not use extension cables or multiple sockets. Drainage Connection 65 - 100 cm Connect the outlet hose to a draining duct or a stand pipe at a height between 65 and 100 cm from the floor. Do not bend it under any circumstances. GB The cable should not be bent or compressed. The cable should be replaced only by authorised technicians. Warning! The company shall not be held responsible for any incidents that occur if these regulations are not observed.
Description of the machine GB CONTROL PANEL DOOR DOOR HANDLE TOE-KICK ADJUSTABLE FEET DOOR DETERGENT DISPENSER: Always use the handle to open the door (see figure). 20 This is inside the machine and may be accessed by opening the door. For information relating to detergents, please refer to the chapter entitled Detergents and laundry. 1. pre-wash compartment: use powder detergent. 1 2. main wash compartment: use 2 powder or liquid detergent.
Control panel GB OPTION PROGRAMME knob ON-OFF/CANCEL button with indicator light WASH CYCLE PHASE buttons and indicator lights START/PAUSE button with indicator light icons TEMPERATURE DELAYED START button SPIN SPEED button ON-OFF/CANCEL button with indicator light : press the button briefly to switch the machine on or off. The green indicator light shows that the machine is switched on.
Running a wash cycle GB NOTE: the first time you use the washing machine, add detergent and run an empty 90°C cotton wash cycle without the pre-wash phase. 1. SWITCH ON THE MACHINE. Press the button. All the indicator lights will illuminate for 1 second, after which the light corresponding to the button will remain lit constantly, while the START/PAUSE indicator light will flash slowly. 2. LOAD THE LAUNDRY. Open the porthole door.
Programmes and options Table of Programmes Icon GB Max. temperature (°C) Max. spin speed (r.p.m.) WHITE COTTON 60° 1200 l l Programme description Detergent Fabric Washing softener Maximum load (kg) Cycle duration 6 2h 35' Everyday programmes COLOURED COTTON 40° 1200 l l 6 1h 40' DELICATE SYNTHETICS MIX 30': Refreshes lightly soiled garments quickly (not recommended for wool, silk or clothes that should be washed by hand). Vigorous programmes PRE-WASH: Removes stubborn stains.
Detergents and laundry GB Detergent The type and quantity of detergent used depends on the type of fabric (cotton, wool, silk...), its colour, the temperature of the wash, the level of soiling and the hardness of the water in the area. Measuring out the detergent carefully will avoid accidental spills and help to protect the environment: although they may be biodegradable, detergents contain elements that alter the balance of nature.
Precautions and tips This machine was designed and manufactured in compliance with cuurent international safety standards. The following advice is provided for safety reasons and should be read carefully. Opening the door manually If it is not possible to open the porthole door due to a powercut and you wish to hang out the laundry, proceed as follows: General safety This appliance was designed for domestic use inside the home and is not intended for commercial or industrial use.
Care and maintenance GB Turning off the water and electricity supplies Turn off the water tap after every wash. This limits wear and tear on the machines water supply and prevents leaks. To access the pre-chamber: 1. Remove the kick strip on the front of the machine using a screwdriver (see figure); Disconnect the appliance from the electricity supply before cleaning it and before performing any maintenance work on it.
Troubleshooting From time to time your machine may not operate as it should. Before calling for Assistance (see Assistance), make sure that the problem cannot be resolved easily using the following list. GB Malfunction: Possible causes / Solutions: The washing machine will not switch on. The plug has not been inserted into the electrical socket, or it has not been inserted far enough to make contact. There is no power in the house. The wash cycle does not begin.
Assistance 195057363.00 03/2006 - Xerox Business Services GB Before contacting Assistance: Check whether you can resolve the problem on your own (see Troubleshooting); Restart the programme to check whether the problem has been overcome; If this is not the case, contact the Authorised Technical Assistance Centre; If the machine has been installed or used incorrectly, you may be charged for the maintenance callout service. Never use the services of an unauthorised technician.