
Use and Care Manual


ahl-647 Revision Date 7.12.23
4
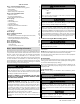
D. Water Temperature Adjustment
thermostat is factory set at 125°F (51,7°C) or lower to reduce the risk of
scalding injury If the water heater is going to have a set temperature
above 120
o
F, it is recommended to use an ASSE 1017 rated mixing
valve to avoid severe burns or death from scalding temperatures.
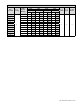
Approximate Time / Temperature Relationships in Scalds
120
o
F More than 5 minutes
125
o
F 1 1/2 to 2 minutes
130
o
F About 30 seconds
135
o
F About 10 seconds
140
o
F Less than 5 seconds
145
o
F Less than 3 seconds
150
o
F About 1 1/2 seconds
155
o
F About 1 second
Households with small children, disabled, or elderly persons may
require a 120
o
F or lower temperature setting to prevent severe
personal injury or death due to scalding.
Table 1 - Approximate Time / Temperature Relationships in Scalds
Part 2 - Prepare the Water Heater
COLD WEATHER HANDLING - If the water heater has been stored
in a very cold location (BELOW 0
o
F) before installation, handle with
care until the components come to room temperature. Failure to do
so could result in damage to the water heater.
Remove all sides of the shipping crate to allow the heater to be moved
into its installation location.
A. What’s in the Box
Components included with the water heater:
• Drain Valve
• Temperature and Pressure Relief Valve
• Insulation
• Hot Water Outlet
• Dip Tube
• Use and Care Manual and Warranty
• Conversion Labels (2) and Envelope
NOTE: Some components may ship factory installed. This depends on
water heater model.
All water heaters eventually leak. Locate the water heater
where any leakage from the relief valve, related piping, tank, or
connections will not result in damage to surrounding areas or
lower oors of the building. Any water heater should be installed
in such a manner that if it should leak the resulting ow of
water will not cause damage to the area in which it is installed.
National Plumbing codes require a drain pan for any water heater
installation. This drain pan should be sized with a maximum depth
of 2”, and a minimum diameter 2” greater than the diameter of
the water heater. The drain pan should empty into an open drain
line. This drain line should be 3/4” ID minimum, piped to an open
drain. Leakage damages ARE NOT covered by warranty. Failure to
install a drain pan is the sole responsibility of the owner and/or
installer. Reference UPC 2000 (Uniform Plumbing Code) Section
510 - Protection from Damage or IPC 200 (International Plumbing
code) Section 504 - Safety Devices. Leakage damages ARE NOT
covered by warranty.
In addition, water leak detection devices and automatic water
shuto valves are readily available at plumbing supply houses. IT
IS HIGHLY RECOMMENDED BY THE MANUFACTURER TO INSTALL
WATER LEAK DETECTION DEVICES AND AUTOMATIC SHUTOFF
VALVES IN ANY WATER HEATER INSTALLATION WHERE A LEAKAGE
OF WATER COULD RESULT IN PROPERTY DAMAGES.
This water heater is certied for indoor use only. DO NOT INSTALL
OUTDOORS. Outdoor installations ARE NOT covered by warranty.
Failure to install the water heater indoors could result in property
damage, severe personal injury, or death.
B. Locating the Water Heater
1. Installation Area (Mechanical Room) Operating Conditions
• Ensure ambient temperatures are higher than 32
o
F / 0
o
C and
lower than 104
o
F / 40
o
C
• Avoid continuously high levels of humidity
• Never close existing ventilation openings
NOTE: When installing in a zero clearance location, it may not be
possible to read or view some product labeling. It is recommended to
make note of the water heater model and serial number.
NOTE: A combustible door or removable panel is acceptable front
clearance.
2. Choose a location for the water heater as centralized to the piping
and electrical system as possible. Also, locate the water heater and
domestic water piping where it will not be exposed to freezing
temperatures. All piping should be insulated. Additionally, place the
water heater so that the drain, controls, and inlets/outlets are easily
accessible.
NOTE: To save on heating costs and improve energy eciency keep
the distance between the water heater and xtures to a minimum
to reduce heat loss from excess piping and keep friction loss at a
minimum. Ensure all water heater piping is properly insulated to
minimize heat loss.
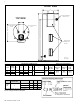
NOTE: If you do not provide the minimum clearances shown in
Figure 1, it might not be possible to service the water heater without
removing it from the space.
NOTE: In the State of California, the water heater must be braced,
anchored, or strapped to avoid moving during an earthquake.
Contact local utilities for code requirements in your area. Visit
http://www.dsa.dgs.ca.gov or call 1-916-445-8100 and request
instructions.
However, applicable local codes shall govern installation. For
residential water heaters of a capacity of greater than 52 gallons,
consult the local building jurisdiction for acceptable bracing
procedures.
3. Check area around water heater. Remove any combustible
materials, gasoline, and other ammable liquids.
The service life of the water heater’s exposed metallic surfaces, such
as the junction box, is directly inuenced by proximity to damp
and salty marine environments. In such areas higher concentration
levels of chlorides from sea spray coupled with relative humidity
can lead to degradation of water heater components.
Failure of the water heater or components due to incorrect
operating conditions IS NOT covered by product warranty.
Incorrect ambient conditions can lead to damage to the heating
system and put safe operation at risk. Ensure that the installation
location adheres to the information included in this manual.
Failure to do so could result in property damage, serious personal
injury, or death.