Operating Instructions COOKER AND OVEN Contents GB English,1 Installation, 2-6 Positioning and levelling Mounting a Power Supply Cable Electrical connection Gas connection Adapting to different types of gas Table of burner and nozzle specifications Table of characteristics Description of the appliance, 7 Overall view Control panel Start-up and use, 8-10 CX65SM2 AUS CX65SM2 X AUS Using the hob Using the oven Using the cooking timer Cooking modes Oven cooking advice table Precautions and tips, 11 Gene
Installation GB Before operating your new appliance please read this instruction booklet carefully. It contains important information concerning the safe installation and operation of the appliance. Please keep these operating instructions for future reference. Make sure that the instructions are kept with the appliance if it is sold, given away or moved.
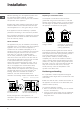
If the cooker is installed underneath a wall cabinet, there must Min. 600 mm. be a minimum distance of 420 mm between this cabinet and the top of the hob. This distance should be increased to 700 mm if the wall cabinets are flammable (see figure). GB 420 mm. Min. min. 650 mm. with hood min. 700 mm. without hood 420 mm. Min. HOOD Do not position blinds behind the cooker or less than 200 mm away from its sides.
GB How to connect an alternative plug GREEN & YELLOW BROWN BLUE 13 amp fuse CROSS-BAR CORD GRIP The wires in this mains lead are coloured in accordance with the following code: BLUE NEUTRAL (N) BROWN LIVE (L) GREEN AND YELLOW EARTH (E) Once the appliance has been installed, the power supply cable and the electrical socket must be easily accessible. The cable must not be bent or compressed. The cable must be checked regularly and replaced by authorised technicians only.
Connecting a flexible jointless stainless steel pipe to a threaded attachment Make sure that the hose and gaskets comply with current national legislation. To begin using the hose, remove the hose holder on the appliance (the gas supply inlet on the appliance is a cylindrical threaded 1/2 gas male attachment). Adjusting the hob burners minimum setting: 1. Turn the tap to the minimum position. 2.
GB Table of burner and nozzle specifications Table 1 Propane Burner Diameter (mm) Natural Gas Nominal Thermal Power Nozzle 1/100 Nominal Thermal Power Nozzle 1/100 (MJ/h)* (mm) (MJ/h)* (mm) Auxiliary (A) 55 3.5 50 3.3 85 Tripl Crown (TC) 130 15.0 105 15.0 175 SemiRapid (S) 75 5.5 64 6.0 110 Rapid (R) 100 9.0 80 8.3 129 Supply pressures Nominal (kPa) Minimum (kPa) Maximum (kPa) 1.00 0.75 1.20 2.75 2.00 3.50 * At 15°C and 101.3 kPa dry gas Propane = 95.
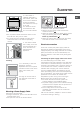
Description of the appliance Overall view GB Gas burner Hob grid Containment surface for spills GUIDE RAILS for the sliding racks position 5 position 4 position 3 position 2 position 1 Control panel GRILL rack DRIPPING PAN rack Adjustable foot Adjustable foot Control panel THERMOSTAT indicator light THERMOSTAT knob OVEN OPERATION indicator light SELECTOR knob Hob BURNER control knobs COOKING TIMER knob 7
Start-up and use GB Using the hob Lighting the burners For each BURNER knob there is a complete ring showing the strength of the flame for the relevant burner. To light one of the burners on the hob: 1. Bring a flame or gas lighter close to the burner. 2. Press the BURNER knob and turn it in an anticlockwise direction so that it is pointing to the maximum flame setting -. 3. Adjust the intensity of the flame to the desired level by turning the BURNER knob in an anticlockwise direction.
Using the cooking timer 1. To set the buzzer, turn the COOKING TIMER knob clockwise almost one complete revolution. 2. Turn the knob anticlockwise to set the desired time: align the minutes shown on the COOKING TIMER knob with the indicator on the control panel. 3. When the selected time has elapsed, a buzzer sounds and the oven turns off. 4. When the oven is off the cooking timer can be used as a normal timer.
GB and place the more delicate food on the rack in position 4. Remove the food that requires a shorter cooking time first. When cooking pizzas on several racks with the temperature set to 220°C, the oven is preheated for 15 minutes. Generally speaking, cooking on the rack in position 4 takes longer: we recommend that the pizza cooked on the lowest rack position is removed first, followed by the pizza cooked in position 4 a few minutes later. Place the dripping pan on the bottom and the rack on top.
Precautions and tips This appliance has been designed and manufactured in compliance with international safety standards. The following warnings are provided for safety reasons and must be read carefully. General safety The appliance was designed for domestic use inside the home and is not intended for commercial or industrial use. The appliance must not be installed outdoors, even in covered areas. It is extremely dangerous to leave the appliance exposed to rain and storms.
Care and maintenance GB Switching the appliance off Disconnect your appliance from the electricity supply before carrying out any work on it. Cleaning the appliance Never use steam cleaners or pressure cleaners on the appliance. The stainless steel or enamel-coated external parts and the rubber seals may be cleaned using a sponge that has been soaked in lukewarm water and neutral soap. Use specialised products for the removal of stubborn stains. After cleaning, rinse well and dry thoroughly.