
Warranty


10
EN
An ASSE 1017 or ASSE 1070 temperature limiting or mixing valve is
recommended in installations servicing disabled or elderly persons, or
children. Mixing valves do not eliminate the risk of scalding.
To avoid scalding:
• Set the water heater set point temperature as low as possible.
• Feel water before bathing or showering.
• If thermostatic valves are required, use devices speci cally designed
for such purpose. Install these devices in accordance with instructions
provided by the manufacturer.
Failure to install a temperature limiting or mixing valve and follow these
instructions could result in property damage, severe personal injury, or
death due to scalds.
To protect against injury, install a mixing valve in the water system. This
valve will reduce point of use discharge temperatures by mixing cold and
hot water in branch supply lines. Such valves are available from your local
plumbing supplier.
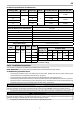
Table 1 details the relationship of water temperature and time with regard
to scald injury and may be used as a guide in determining the safest water
temperature for your applications.
E. Filling the Heater
• Make certain any drain valves in the system are completely closed.
• Open the shut-o valve in the cold water supply line.
• Open the hot water faucets to allow air to vent from the heater and piping.
• Allow su cient time for the heater to completely ll with water.
• Check for and repair any leaks.
When lling the water heater, open a hot water tap to release air in the tank
and piping. The tank must be full of water before the heater is turned on.
Failure to ensure the water heater is full before turning it on could result in
damage to the water heater and other property damages. Such damages ARE
NOT covered by water heater warranty.
Part 4 - Electrical Connection
Tank must be full of water before the power is turned on. The heating element will be damaged if energized for
even a short time while tank is dry. Failures due to “dry- ring” ARE NOT covered by warranty.
The voltage requirement and dedicated wattage load for the heater is speci ed on the water heater rating label.
Consult your local power company to determine if your electrical service is adequate for the additional load of
the heater.
This water heater must be hard wired to the correct breaker size with the appropriate wire gauge. All wiring must
conform to local code and the National Electric Code, and should be done by a quali ed licensed electrician or
the local electric utility. See Figures 4, 5, 10, and 11.
• Make sure power to the unit is shut o by means of the dedicated circuit breakers on the main electrical
panel.
• Connect the appropriate AWG wire power cable for the model water heater to the terminal block and secure
with conduit strain relief (not supplied).
• Make secure, appropriate wiring connections to the water heater per the National Electric Code.
• The unit must be grounded.
• Secure the water heater cover once wiring connections have been made.
F. Aerator Installation (3kW Models ONLY)
For optimal heating performance and proper operation, the provided 0.5 GPM aerator must be installed to your
sink faucet. This will ensure a continuous ow and consistent maximum temperature rise. Output temperature
will vary depending on seasonality and inlet cold water temperatures.
Maximum of 0.5 GPM ow rate is required for optimal heating performance.
Figure 9 - Aerator Installation
(3kW Models ONLY)