
Warranty


12
EN
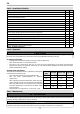
Part 5 - Installation Checklist
Water Heater Location Yes No
Close to area of heated water demand
Indoors and protected from freezing temperatures
Area free of ammable vapors
Provisions made to protect area from water damage
Su cient room to service heater
Relief Valve Ye s N o
Pressure Relief Device (PRD) properly installed and discharge line run to open drain
Discharge line protected from freezing
Wiring Ye s N o
Power supply voltage agrees with water heater rating plate
Branch circuit wire and fusing or circuit breaker of proper size
Electrical connections tight and unit properly grounded
Water Supply Ye s N o
Water heater completely lled with water BEFORE operating the unit
Air purged from water heater and piping
Water connections tight and free of leaks
Table 4 - Installation Checklist
Part 6 - Operation
The water heater must be full of water before the power is turned on. The heater will be damaged if energized
for even a short time while dry. Failures due to “dry- ring” ARE NOT covered by warranty.
A. Starting and Testing
• Supply power to the water heater by turning on the circuit breaker.
• Turn the control knob in a clockwise direction.
• The LED on the control knob will turn on until the water temperature has reached the thermostat
temperature setting. The light will come back on any time the water temperature inside the tank drops
below the thermostat setting.
B. Thermostat Adjustment
The temperature of the hot water is adjusted by rotating the
knob located on the front cover.
• Turn the knob clockwise to increase temperature.
• Turn the knob counterclockwise to decrease
temperature.
• After adjusting the water temperature, allow the water
heater enough time to heat the water to temperature.
Do not attempt to repair this water heater yourself. Call a quali ed service technician for assistance. Always
turn o the power supply to the heater prior to servicing or draining the heater. Failure to do so could result in
property damage, severe personal injury, or death.
Part 7 - Maintenance
For most of these maintenance operations, the water will have to be drained from the heater. For all of these
operations, the power should be turned o at the circuit breaker and the front cover removed.
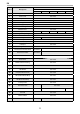
*Wattage
(kW)
Low kW Medium kW High kW
3 1 2 3.1
6.5 3 3.5 6.5
8.5 3.8 4.7 8.5
10.5 5.25 5.25 10.5
13 4.5 8.5 13
Table 5 - Model Operation Guide (by kW)
After the water heater has stopped heating, measure
the water temperature at the nearest hot water outlet
in the structure.
• Temperature can range from 90 - 134.6
o
F (30 - 57
o
C).