User guide WASHING MACHINE Contents NA English,1 SP Español, # F Français, 49 NA Description, 2 Important Safety Instructions, 3-4 Your safety and that of your family Warnings about installation Technical details Unpacking, Installation, 5-6-7-8-9 Unpacking and levelling Remove the shipping bolts Water and Electric connections Final Installation Checklist AW 125 Washing Machine Description and Option Modifiers, 10-11 Control panel Washing Options Variable spin Variable temperature Programs, 12 Prog
Description NA Program listing Dispenser drawer Control panel, pages 10-11 ( Varies by Model) Please record the Model number and Serial number of your machine located behind the door for future reference. Interlocking door and release lever Front adjustable feet Power cord Hot and Cold water inlet points Four shipping bolts ! They must be removed BEFORE you use your machine (see page 6) ! The machine was designed and built in compliance with the appliance international safety regulations.
Important Safety Instructions INTRODUCTION Congratulations on your new Ariston washing machine. This is a highly sophisticated engineered product that will give you many years of satisfaction. Please spend a few moments reading the Owner Manual. This will show you ways to best utilize your valuable purchase Save these instructions Your washing machine has been built in compliance with the strictest international safety regulations, to protect you and all your family.
NA RECESSED, CLOSET AND ALCOVE INSTALLATION (Instructions) Te c h n i c a l d e t a i l s M od el AW 125 D im en sion s 2 3 .4 " (5 9 .5 c m ) 3 3 .4 " (8 5 c m ) 2 0 .8 " (5 3 c m ) C a p a c ity f r o m 2 t o 1 2 L b s (5 K g ) E l e c t ri c c on n ec tion s v o lt a g e 1 2 0 V o lt s 6 0 H z m a x im u m W ater c on n ec tion s m a x im u m p r e s s u r e 1 0 0 p s i (6 8 9 . 6 k P a ) m in im u m p r e s s u r e 2 0 p s i (1 3 7 .
Unpacking ! Keep this instruction book on hand in order to refer to it when necessary. Take it you when you move, and should you sell this appliance or pass it on to an other party, make sure that this booklet is supplied along with the appliance so that the new owner may be informed about warnings and suggestions on how the works. Unpacking 1. Using scissors, cut carefully along one corner post to remove the film. 2. Open the door, check inside the drum and remove the accessories bags.
NA Remove the Shipping Bolts Location IMPORTANT: Read these instructions to remove the 4 shipping bolts (see Description for location). Situated on one either side of the rear panel, All shipping bolts MUST be removed before use. ! Failure to do so may cause damage to your machine. It is important the transit bolt and spacer (see pic) come out intact.
Installation Water Connection Drainage Connection Caution Standpipe Diameter/Capacity. Needs a 1 1/4 minimum diameter standpipe with a minimum carry-away capacity of 7 gallons per minute. 1. The washing machine must only be operated with cold and hot (max. 140°F//60°C) tap water. Do not connect the appliance to the mixer tap of an unpressured hot-water boiler. NA Top of Standpipe. Must be between 25 - 34 inches (6286 cm) high measured from the bottom of the machine. 2.
Installation NA Floor Standpipe Drain Sink Drainpipe Method Top of standpipe must be at least 25 inches (62 cm) high and no higher than 34 inches (86 cm) from the bottom of the washer (A). (A) 25"-34" inches 62 - 86 cm Entry into the sink drain system must be above the trap (see fig. aside ). When routing the drain hose through cabinets or walls use aprotective material such as electrical duct tape to cover sharp edges that could damage the drain hose.
Electrical connection Final installation checklist Machine Voltage/Amperage - 120V, 60 Hz, 3 Amp. Connection - 3-prong plug with 6 cord is provided with the machine. Circuit/Protector - 3-wire single phase, 120V, 60 Hz, AC, on a separate 15 Amp circuit. Instructions and Installalion Kit have been removed from the tub. GROUNDING INSTRUCTIONS This appliance must be grounded.
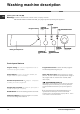
Washing machine description NA Control panel AW 125 (NA) Warning: To reduce the risk of fire, electric shock, or injury, read the IMPORTANT SAFETY INSTRUCTIONS, (see page 3) before operating this appliance.
Program and Option Modifiers Option modifiers NA Superwash: Use this option to select a more intensive wash and time program for the cotton (Heavy cotton, Regular cotton) and syntheticspermanent press (Heavy synthetics, Regular Synthetics). Pre-wash Button: For heavily soiled loads, push this button to add an extra wash to any wash program (except 3-4-7-10-11 programs). Easy Iron Button (Rinse Hold): This option reduces the amount of creasing on fabrics, making them easier to iron.
Program and Options Modifiers AW 125 (NA) NA Type of fabric and degree of soil Program Program Dial N. Max Load Lbs Pre-wash Detergent Fabric Temperature Bleaching (Option) for wash softener F°/C° Options Length of the cycle (min.) without Options Description of wash cycle COTTON HEAVY DUTY Exceptionally soiled whites Heavy K K K 140 / 60 (sheets, tablecloths, etc.
Detergents tips and laundry Detergent dispenser Good washing results also depend on the correct dose of detergent: adding too much detergent won't necessarily make for a more efficient wash, and may in fact cause build up on the interior of your appliance and even pollute the environment. MAX Open up the detergent dispenser and pour in the detergent and fabric softener, as follows.
Starting a wash Program NA Laundry preparation Sorting Clothes should be sorted from separate items which could damage other garments. Sort items into loads according to similar colors, fabrics, garment construction and degrees of soil. Color Separate clothes into three groups: Whites and pastels, medium and bright colors, Dark colors. Items which bleed color should be washed alone. Type of fabrics Delicate items should be separated from sturdier items.
Washcare tips Useful tips NA Never use your washing machine to wash... torn, fraying or non-hemmed linen. If it is absolutely neccessary, place it in a bag for protection. Do not wash colored linen with whites. How much does it weigh? 1 sheet 1 1/4 lb (400-550 gr.) 1 pillow case 4 oz. (120 gr.) 1 tablecloth 1 lb (450 gr.) 1 bathrobe 2-3 lbs (900-1,300 gr.) 1 towel 5oz/1 lb (150-500 gr.
Operating the washing machine NA Briefly: On-Off / Starting a program A typical wash load 1. Switch the washing machine on by pressing button . All the LEDS will light up for a few seconds and the ON-OFF/DOOR LOCK Led will begin to flash. Two wexampes of maximum load for different types of fabric: 2. Load your laundry into the washing machine and shut the appliance door. COTTON 3. Set the PROGRAM dial to the program required. 4. Set the wash temperature (see page 11). 5.
Stain Removal Chart Blood Rinse or soak fresh stain in cold water. Work detergent into any remaining stain. Rinse. If stain persists, put a few drops of ammonia on stain and repeat detergent treatment. Rinse. If necessary bleach. Candle Wax Scrape off excess. Place stain between clean white blotters or several layers of facial tissues. Press with warm iron. Sponge with detergent. If dye spot remains, bleach. Ketchup Scrape of excess. Soak in cold water 30 minutes. Pretreat with a detergent paste.
NA Grease or Oil Scrape away excess. Rub detergent paste or a general purpose liquid household cleaner into stain, rinse with hot water. If stain remains, sponge thoroughly with a grease solvent. Dry. Repeat if necessary. To remove yellow stain, use a chlorine or oxygen bleach. Ink Some ball-point inks are set by water. First test a scrap of cloth. Sponge stain repeatedly with acetone, or rubbing alcohol. Hair spray is effective. Launder. Bleach if necessary.
Care and maintenance NA Cutting off the water or electricity supply Cleaning the pump Turn off the water tap after every wash. This will limit the wear of your appliance's water system and also prevent leaks. Unplug your appliance when cleaning it and during all maintenance operations. The washing machine is fitted with a self-cleaning pump that does not require any maintenance.
Troubleshooting NA From time to time your machine may not operate as it should. Before calling for Assistance (see Service-Assistance), make sure that the problem cannot be resolved easily using the following list. Malfunction: Possible causes / Solutions: The washing machine will not switch on. The wash cycle does not begin. The washing machines fails to fill with water. The machine continuously fills and drains water.
There is too much foam. The washing machine door remains locked www.aristonappliances.us NA The detergent is not designed for machine washing (the packaging should state that the product is for washing by machine, for washing by hand or machine or similar). Too much detergent was used. Wait for the LED to switch itself off before you open the appliance door.
Service NA Before calling for Assistance: Check whether you can solve the problem on your own (see page 20); Restart the programme to check whether the problem has been solved; If this is not the case, contact an authorised Technical Service Centre on the telephone number provided on the guarantee certificate. ! If the machine has been installed or used incorrectly, you may be charged for the maintenance callout service. ! Always request the assistance of authorised servicemen.