
Owner`s manual


9
from the bottom of the oven; Place the pastry pan in the
centre of the rack;
• Do not open the door when cooking pastries in order to
prevent rapid temperature changes that could impede
the cooking process and make the pastry drop.
3. Pizza Mode
- Position of the "L" knob:
- Position of the “M” knob: between 50°C and Max
The bottom and circular heating elements, as well as the
fan, will come on. This combination rapidly heats the oven
due to the large amount of power used by the appliance
(2900 W), which results in the production of considerable
heat coming prevalently from the bottom and from forced air
circulation. The pizza mode is ideal for foods which need
high temperatures to cook, like pizza and large roasts. Use
only one dripping-pan or rack at a time. However, if more
than one is used, they must be switched half way through
the cooking process.
4. Ventilation Mode
- Position of the “L” knob:
- Position of the “M” knob: between 50°C and Max
Both the heating elements and the fan will come on. Since
the heat remains constant and uniform throughout the oven
due to the fan at the bottom, the air cooks and browns food
uniformly over its entire surface. With this mode, you can
also cook various dishes at the same time, as long as their
respective cooking temperatures are the same. A maximum
of 2 rack levels can be used at the same time, following the
instructions in the section entitled, "Cooking On More Than
One Rack". This cooking mode is ideal for au gratin dishes
or those which require an extended cooking time like lasa-
gne etc...
Moreover, the excellent heat distribution makes it possible to
use lower temperatures when cooking roasts. This results in
less loss of juices, meat which is more tender and a de-
crease in the loss of weight for the roast. The ventilated mode
is especially suited for cooking fish, which can be prepared
with the addition of a limited amount of condiments, thus
maintaining their flavour and appearance. Excellent results
can also be attained when cooking vegetable-based side
dishes like cabbage, beats, courgettes, aubergines, peppers,
etc.
Desserts: leavened cakes are also perfect for the ventilated
mode. Moreover, this mode can also be used to thaw white
or red meat, fish and bread by setting the temperature to
80°-100°C. To thaw more delicate foods, set the thermostat
to 50°C or use only the cold air circulation feature by setting
the thermostat to 0°C.
5. Grill
- Position of the “L” knob:
- Position of the “M” knob: Max
The central heating element of the grill will come on. The
incandescent heating element cooks food by means of ther-
mal radiation directed downward. The extremely high and
direct temperature of the grill makes it possible to brown the
surface of meats and roasts while locking in the juices to
keep them tender. The grill is also highly recommended for
dishes that require high temperature on the surface: beef
steaks, veal, entrecôte, filets, hamburger etc...
6. Double Grill
- Position of the “L” knob :
- Position of the “M” knob : Max
This oversized grill has a completely new design, increasing
cooking efficiency by 50%. The double grill also eliminates
pockets of unheated air in the corners of the oven.
7. Ventilated Double Grill
- Position of the “L” knob:
- Position of the “M” knob: between 50 and 200°C
This combination of features increases the effectiveness of
the unidirectional thermal radiation of the heating elements
through forced air circulation of the air throughout the oven.
This helps prevents foods from burning on the surface, al-
lowing the heat to penetrate into the food. Excellent results
are achieved with kebabs made with meats and vegetables,
sausages, ribs, lamb chops, chicken, quail, pork chops, etc.
This mode is also ideal for cooking fish steaks, like sword-
fish, tuna, grouper etc.
Note: All grill modes (features 5, 6 and 7) must be used with
the oven door closed.
Thermostat Light (O)
This light indicates that the oven is heating. When it turns off,
the temperature inside the oven has reached the setting made
with the thermostat knob. At this point, the light will turn on
and off as the oven maintains the temperature at a constant
level.
Green Light (P)
This light comes on when any of the electrical heating ele-
ments in the oven have been turned on.
Practical Advice on Using the Burners
In order to obtain the best performance, keep in mind the
following:
• Use the appropriate cookware for each burner (see ta-
ble) so that the flames do not extend beyond the bottom
of the cookware;
• Only flat bottom cookware should be used;
• At the boiling point, turn the knob to minimum;
• Always use a lid with the cookware.
Burner ø Cookware diameter (cm)
Auxiliary (A) 10 - 14
Semi-Fischburner (SP) 16 - 20
Ultrarapid (UR) 24 - 26
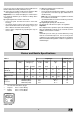
N.B. Some models are equipped with 2 reduction grids. These
grids should be used with the rear right and left “Half Fish-
Kettle” burners (Fig.A) and the auxiliary burner (Fig.B) when
cookware with a diameter of less than 12 cm is used.
Fig. A Fig. B