User Instruction Book for ARISTON BUILT-IN WASHER DRYER Model CD12TUK 19501829602
Margherita Thank you for choosing an Ariston product. This washer-dryer is reliable and easy to use. We suggest you read your owner's manual carefully. This will help you become familiar with your washer-dryer and its functions in order to obtain years of trouble free performance. Saves while it washes The double action wash penetrates so deeply that at just 60°C you obtain the same results you would normally obtain at 90°C with a traditional washer.
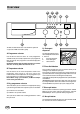
Overview E G F C D The dials are flush with the facia of the machine To pull them L H B M N I A D. Detergent dispenser out, press the middle of the dial in gently. The detergent dispenser has three compartments marked 1, 2 and 3: 1 prewash detergent 2 wash detergent 3 fabric softener. A. Programme selector Use this dial to select one of the 18 wash programmes available for all your laundry requirements (see programme table on page 6). The programme selected is displayed in window N.
H. Extra Economy button M. ON/OFF Indicator light Reduces water consumption during the rinse cycles. We recommend that you use this function only with small laundry loads, dosing the detergent proportionally. When this is lit, the machine is on. I. ON-OFF button This button turns your appliance ON/OFF. Press button I to turn on the washer-dryer and depress button I to turn off the washer-dryer. N.
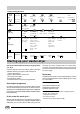
1. Understanding the labels Strong action Wash at 95°C Wash Wash at 60°C Wash at 40°C Wash at 30°C Iron at max 100°C Not ironable Hand wash Delicate action Not washable in water cl Bleaching Do not only in bleach cold water Bleachin Hot iron at max 200°C Ironing A Dry cleaning High Temperat Drying Medium hot ironing at max 150°C F P Dry clean with any solvent Dry clean only with, perchloride benzine av., pure alcohol, R111 and R113 Dry clean with av.
Now select the programme Turn knob A to one of the two settings , select the drying time required with knob C (table 2 on page 5) and then press on/off button I (postion I). At the end of the drying cycle... Turn off the tumble dryer by pressing on/off button I and wait at least 3 minutes before opening the door. Remove the laundry and leave the door ajar to prevent the formation of bad odour; remember to turn off the water tap.
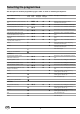
Selecting the programmes The description of the wash programme by type of fabric is shown on the detergent dispenser. Type of Fabric & How Dirty Cycle Knob Temp. Knob Pre-wash Detergent Wash Detergent Softener Description of Wash Cycle Extremely dirty whites (sheets, tablecloths, etc.) 1 MAX ◆ ◆ ◆ Warm prewash, wash at 90°C, rinses, intermediate and final spins. Very dirty whites (sheets, tablecloths, etc.) 2 MAX ◆ ◆ Wash at 90°C, rinses, intermediate and final spins.
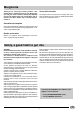
Washing tips Stain removal What not to wash in your appliance? The most common stains will disappear during the wash. If they are particularly stubborn, soak the garment in water and rub a little detergent onto the stain before putting it in the washer-dryer. Greasy marks (especially old ones) need treating with a stainremover. Be careful not to mark the fabric with remover.
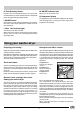
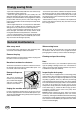
Energy saving hints - Try to wash complete laundry loads: this saves unnecessary consumption of water and energy. - Select the right programme for your laundry: this will obviously depend on the type of fabric and how soiled your laundry is; we recommend the use of programmes without prewash which will save you time, water and energy. The prewash cycle should in fact be used only for heavily soiled, cotton fabrics.
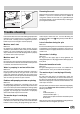
Z Removing limescale Water contains increasing amounts of limescale because of pollution. If you live in a hard water area in addition to using water-softener in each wash, it is a good idea to put the machine through a cycle without laundry or detergent, just using limescale remover. Fig. 1 Fig. 2 Trouble shooting If the machine does not seem to be working properly before calling the service engineer there are a number of things you can check.
Installation Transit packing After removing the packing, check the appliance for damage. If you have any doubts do not use the washer and call a qualified technician. Keep the packaging components (plastic bags, polyester foam, nails etc.) out of the reach of children since they could be dangerous. The interior of the washerdryer, has an oscillating unit which is fixed on the back by 3 screws during transport (figure 3). Before starting up the washer-dryer, release the unit, by unscrewing the 3 screws.
Electrical connection (figure 8) Your appliance is now supplied with a 13 amp fused plug it can be plugged into a 13 amp socket for immediate use. Before using the appliance please read the instructions below. WARNING - THIS APPLIANCE MUST BE EARTHED. THE FOLLOWING OPERATIONS SHOULD BE CARRIED OUT BY A QUALIFIED ELECTRICIAN. Replacing the fuse: When replacing a faulty fuse, a 13 amp ASTA approved fuse to BS 1362 should always be used, and the fuse cover refitted.
Mounting the wooden panel onto the door and inserting the machine into cabinets: Door Mounting Accessories (Fig. 9-10-11-12-13-14) In the case where the machine must be shipped for final installation after the wooden panel has been mounted, we suggest leaving it in its original packaging. The packaging was designed to make it possible to mount the wooden panel onto the machine without removing it completely (see figures below).
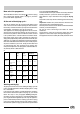
Using the Drilling Template · Place the top edge of the drilling template so that it is flush with the top edge of the panel, making sure that it is positioned correctly and centered in the horizontal direction (use the dotted lines on the edges to line the template up). Mark the points on the panel for the four holes. · Use an appropriately sized router to mill the holes for the two hinges, the rubber plug and the magnet.