5713216061/03.
2
A7 A6 A8 A A3 A4 FR A5 A10 A18 A2 A1 A14 A13 A19 A12 A15 A16 A17 A20 A21 A22 A23 A9 A11 B B10 B11 B12 B6 B1 B4 B7 B8 B9 B5 B2 B3 3
2 1 4 1 2 3 4 5 6 7 8 9 10 11 12 13 14 15 16
FR 17 18 19 20 1 2 21 22 23 24 25 26 27 28 29 30 5
Instructions COFFEE AND CAPPUCCINO MAKER CONTENTS IT INTRODUCTION ...........................................7 GB FR Français DE Deutsch PT Português IL MCKA103X GB IT English Italiano NL Nederlands GR Ελληνικά ES Espãnol RU Русский Symbols used in these instructions .......................................7 Letters in brackets .................................................................7 Troubleshooting and repairs ..................................................7 SAFETY ..........
Buzzer ..................................................................................16 TURNING THE APPLIANCE OFF .........................16 TECHNICAL SPECIFICATION...........................16 DISPLAYED MESSAGES ...............................17 TROUBLESHOOTING....................................18 INTRODUCTION Symbols used in these instructions Important warnings are identified by these symbols.
IT GB Child safety PRELIMINARY CHECKS To lock the control panel, press the icon (B3) then the OK icon (B9). To unlock the control panel, press any icon, then within 5 seconds, press the OK icon (B9). Controls after transport DESCRIPTION Description of the appliance (page 3 - A) A1. Cup tray A2. Service door A3. Coffee guide A4. Grounds container A5. Brewing unit A6. Cup tray lights A7. On/OFF/stand-by button A8. Control panel A9. Terminal board A10. Cappuccino maker (removable) A11. Tray A12.
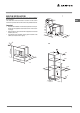
BUILT-IN INSTALLATION Verify the minimum measurements required for correct installation of the appliance. The coffee maker must be installed in a column and the column must be firmly fixed to the wall with commercially available brackets. • 528 m m 361 mm m 21 m m 45 m 595 m 398 mm m 45 m m 560 + 850 mm Min 450 + 2 mm • Important: all installation or maintenance operations must be performed with the appliance disconnected from the mains electricity supply.
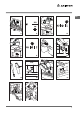
IT x 16 x2 x4 GB Position the rails on the sides of the cabinet as shown in the figure. Fix with the screws supplied, then extract them completely. If the coffee maker is installed over a warmer drawer, use the top surface of this as a reference to position the rails. In this case, there will be no surface to rest the rails on. Position the appliance on the rails, making sure the pins are correctly inserted in the housings, then fix it with the screws supplied. x4 x1 560 + 1 mm mm x.
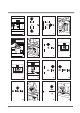
USING THE APPLIANCE FOR THE FIRST TIME MAKING COFFEE USING COFFEE BEANS • 1. The appliance is preset to make coffee with a normal taste. You can also choose coffee with an extra-mild, mild, standard, strong or extra-strong taste. There is also a pre-ground coffee option. To choose the required taste, press the icon (B4) a number of times (fig. 7). The required coffee taste is displayed. 2. Place 1 cup under the spouts to make 1 coffee (fig. 9) or 2 cups for 2 coffees (fig. 8).
The appliance is now reprogrammed with the new setting and is ready for use. You can change the amount of coffee in the small cup, medium cup, large cup and mug. IT GB N.B.: When the icon (B11) is pressed, double the amount of coffee set previously with the icon (B10) is delivered. To reset the original settings, see "Resetting default values". ADJUSTING THE COFFEE MILL When cleaning, always extract the drip tray completely.
• • Turn the cappuccino maker outwards and place a container underneath (fig. 5). Press the icon (B6) (fig. 20). The appliance displays: "HOT WATER PRESS OK". Press the OK icon (B9) again and hot water is delivered from the cappuccino maker into the container below. You should not deliver hot water for more than 2 minutes at a time. To interrupt, press the icon (B6) or the OK icon (B2). The appliance stops delivery once the set quantity is reached.
fee funnel is not blocked (fig. 21). IT GB Danger! Before performing any cleaning operations, the machine must be turned off by pressing the main switch (A23) and unplugged from the mains power supply. Never immerse the coffee maker in water. Cleaning the inside of the coffee maker 1. Check regularly (about once a week) that the inside of the appliance is not dirty. If necessary, remove coffee deposits with a sponge. 2. Remove the residues with a vacuum cleaner (fig. 29). 8.
Setting the language To change the language on the display, proceed as follows: • Press the MENU icon (B2) to enter the menu, then the icons (B7) and (B8) to select the "LANGUAGE" function. • Press the OK icon (B9). • Press the icons (B7) and (B8) until the required language is displayed. • Press the OK icon (B9) to confirm. • Press the MENU icon (B2) to exit the menu. Setting auto-start time This function programmes the time the machine will come on automatically.
IT • • GB • • Press the OK icon (B9). Press the icons (B7) and (B8) until the number of spots coincides with the number of red squares on the test strip (for example, if there are 3 red squares on the test strip, select “●●●◦”); Press the OK icon (B9) to confirm. The coffee maker is now programmed to provide the descale warning when actually necessary. Press the MENU icon (B2) to exit.
DISPLAYED MESSAGES DISPLAYED MESSAGE POSSIBLE CAUSE REMEDY • The water tank is empty or positioned incorrectly. • Fill the tank with water and/or insert it correctly, pushing it as far as it will go. GROUND TOO FINE ADJUST MILL! INSERT WATER SPOUT! press OK • The grinding is too fine and the coffee is delivered too slowly. • Turn the grinding adjustment knob one click clockwise towards "7".
IT GB TROUBLESHOOTING Below is a list of some of the possible malfunctions. If the problem cannot be resolved as described, contact Customer Services. PROBLEM The coffee is not hot POSSIBLE CAUSE REMEDY • The cups were not preheated. • • • • The brewing unit has cooled down because 2/3 minutes have elapsed since the last coffee was made. The temperature set is too low. • The coffee is ground too coarsely. • • Wrong type of coffee • The coffee is delivered too slowly or a drop at a time.
19