FB 52 AUS FB 52 IX AUS Multifunction Oven Instructions for installation and use 2
Congratulations on choosing an Ariston appliance, which you will find is dependable and easy to use. We recommend that you read the instructions in this owner’s manual carefully before use for the best performance and to extend the life of your appliance, as it will provide you with all the instructions you require to ensure its safe installation, use and maintenance. Always keep this owner’s manual close to hand since you may need to refer to it in the future. Thank you.
How to use your oven This multi-function oven combines the advantages of traditional convection ovens with those of the more modern fan assisted models in a single appliance. It is an extremely versatile appliance that allows you to choose easily and safely between 5 different cooking modes. The various features offered by the oven are selected by means of selector knob “B” and thermostat “C” situated on the control panel.
on the control panel with the number of minutes on the knob. At the end of the programmed length of time, the timer will sound and automatically turn off the oven. Attention: to use the oven in manual mode without the cooking control timer, match the indicator on the control panel with the 9 symbol on the timer knob. When the oven is not in use, the cooking control timer can be used like a normal timer.
How to Keep Your Oven in Shape How to remove the oven door For a more thorough clean, you can remove the oven door. Proceed as follows: • open the door fully; • lift up and turn the small levers situated on the two hinges; • grip the door on the two external sides, shut it slowly but not completely; • pull the door towards you, pulling it out of its seat; Reassemble the door by following the above procedures backwards.
Practical Cooking Advice When using this mode, place the grid on the 2nd or 3rd oven rack from the bottom (see cooking table) then, to prevent fat and grease from dripping onto the bottom of the oven and thus smoke from forming, place a drippingpan on the 1st rack from the bottom. Important: always use the grill with the oven door shut. This will allow you both to obtain excellent results and to save on energy (approximately 10%).
Cooking Fish and Meat When cooking white meat, fowl and fish, use temperature settings from 180 °C to 200 °C. For red meat that should be well done on the outside while tender and juicy in the inside, it is a good idea to start with a high temperature setting (200°C-220°C) for a short time, then turn the oven down afterwards. In general, the larger the roast, the lower the temperature setting. Place the meat on the centre of the grid and place the dripping pan beneath it to catch the fat.
Selector knob Food to be cooked setting 1 Convection a 2 Fan assisted b 3 Top Oven c 4 Grill d 5 Fan assisted grill Weight (in kg) Cooking rack position from bottom Preheating time (minutes) Thermostat knob setting Cooking time (minutes) 1 1 1 1 3 3 3 3 3 15 15 15 15 15 200 200 200 180 180 65-75 70-75 70-80 15-20 30-35 Pizza (on 2 racks) Lasagne Lamb Roast chicken + potatoes Mackerel Plum-cake Cream puffs (on 2 racks) Biscuits (on 2 racks) Sponge cake (on 1 rack) Sponge cake (on 2 racks)
Safety Is A Good Habit To Get Into To maintain the efficiency and safety of this appliance, we recommend that you do the following: • only call the Service Centres authorised by the manufacturer • always use original spare parts • • • • • When handling the appliance, we recommend you always use the purpose provided handles recessed into the sides of the oven to prevent harming people or damaging the appliance itself.
Instalation The appliance must be installed only by a qualified person in compliance with the instructions provided. The manufacturer declines all responsibility for improper installation which may harm persons and animals and damage property. Important: The power supply to the appliance must be cut off before any adjustments or maintenance work is done on it. The panels of the adjacent cabinets must be made of heatresistant material.
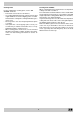
Fitting on a Power Supply Cable Opening the terminal board: • Using a screwdriver, prise on the side tabs of the terminal board cover; • Pull open the cover of the terminal board. To install the cable, proceed as follows: • Remove the wire clamp screw and the three contact screws L-N-6 • Fasten the wires beneath the screwheads using the following colour scheme: Blue (N) Brown (L) YellowGreen 6 • Fasten the supply cable in place with the clamp and close the cover of the terminal board.
Nuovo Forno da incasso “Multifunzione” 03/03 - 195034620.02 Xerox Business Services - Docutech viale Aristide Merloni, 47 - 60044 Fabriano tel. 0732/6611 - telex 560196 - fax 0732/662954 www.Merloni.