ARISTON OVENS FB 86 P FO 97 P FC 97 P FD 96 P FD 97 P Multifunction oven with self-cleaning by fast clean Instruction for installation and use 26 This document contains only the english version, extracted from a multilanguage handbook
6
Safety is a good habit to get into Before using your appliance, read the instructions in this owner's manual carefully since it contains all the instructions you require to ensure safe installation, use and maintenance. Always keep this owner's manual close to hand as you may need to refer to it in the future. 1. This appliance is designed for non-professional, household use. • never use the appliance barefoot, do not use extensions, but if these are necessary caution must be exercised.
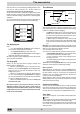
Front view A. The mode selector B. The temperature selector C. The programmer C 23.58 o ˚C A MAX C A B D 5 s.
The different cooking modes available ARISTON ovens are equipped with controls and indicator lights to ease operation, all situated on the control panel. : "Pizza" The heating elements (bottom and circular) are turned on to heat the oven up quickly. Your pizzas and tarts will benefit from a greater amount of heat from below, thus guaranteeing the rapid baking of the dough during cooking. As for the fan, the latter browns the surface as necessary, making the food even more appetising.
The accessories The rotisserie Your oven offers you many differing cooking modes. These can only be achieved thanks to a certain number of accessories which we have chosen for you. These accessories slide in and out of the different oven racks inside your oven and can thus be positioned in accordance with the individual cooking requirements of differing foods and dishes. For each cooking mode and each example suggested, we specify the oven rack to use (from the oven bottom up).
Fast clean How to set the cleaning process in motion Safety devices In fast clean mode, the temperature inside the oven reaches 500°, which is necessary for the destruction of food and fat residue, as illustrated below. – Take all the accessories out of the oven. Remove the toughest grease and food spots and especially all substantial overflows in order to avoid the creation of flames or smoke. – Shut the oven door.
The programmer Display for all functions : clock, timer, cooking duration and end-of-cooking/fast-cleaning time Indicator light for a programmed operation: - lit : operation underway - off: operation finished - flashing: programmed operation has finished Timer indicator light Letter A: - off: manual mode - lit: an operation has been programmed Button to start cooking Button to set the cooking duration Buttons + and - to set the clock, timer, cooking duration and end-of-operation time, press on: + to in
Programmed cooking Programmed cooking with immediate start Programmed cooking with delayed start Cooking starts immediately and comes to an automatic stop when the end cooking time is reached. The programmer automatically selects the cooking start time according to the parameters you have set: cooking time and end cooking time.
A FEW EXAMPLES OF COOKING ON ONE LEVEL Dish Cooking mode Temperature Time Shelf level Remarks Preheat Bread (1 kg loaf) Multicooking 210°C 30-35' 2 On enamelled tray Yes Savoury pasties Multicooking 200°C 20-25' Depending on thickness 2 On enamelled tray Yes Pizza (bread dough) Pizza 240°C 10-15' 1 On enamelled tray Yes Quiche Pizza 220°C 30' 1 Tin on enamelled tray Yes Cheese soufflé Multicooking 200°C 30-40' 2 Tin diam.
Cooking advice Cooking is by definition the passage from a raw state to a cooked one. The consequent result is appreciated according to different criteria: the colouring, any development in the dish, its smoothness or tenderness, how cooked you want it to be, etc… . The oven settings (temperatures and cooking time) obviously depend on two important parameters: - the size of the food or dish, - the ability of the food to brown (quantity of sugar and eggs in the recipe).
Installation The panels of the adjacent cabinets must be made of heatresistant material. In particular, cabinets with a veneer exterior must be assembled with glues which can withstand temperatures of up to 100°C. In compliance with current safety standards, contact with the electrical parts of the appliance must not be possible once it has been installed. All protective parts which ensure the safe operation of the appliance must be removable only with the aid of a tool. Built-in installation m.
Installation Built-in installation of FC 97 P (see figure on the right) 1. Place brackets "A" well against the oven support blocks "B". 2. Place the tabs "C" well against brackets "A". In particular, if the cabinet side panel: • is 16 mm thick: mount the tab so that the number 16 it features is facing you; • is 18 mm thick: mount the tab so that the part without any wording is facing you; • is 20 mm thick: do not mount the tab. 3. Fasten the brackets and tabs on the oven cabinet side panel using screws "D".
11/02 - 19503064204 - Xerox Business Services - Docutech Merloni Electroménager S.A. BP 80048 - 57101 Thionville Cedex tél 03.82.55.75.00 - fax 03.82.55.77.80 http://www.merloni.