Operating Instructions Freestanding Cooker Contents AUS Introduction, 2 For Your Safety, 3-4 English, 1 Oven Timer Operation, 5-8 Hotplate, 9-10 Griddle, 11 Some Recipe ideas for your Griddle, 12 Twin Grill, 13 Fan Oven, 14 Conventional Oven, 15 CX109SV6 AUS Oven Cooking Chart - Meat, 16 Oven Cooking Chart - Baking, 17 The Slow Cook Setting, 18 Care and Cleaning, 19-20 Something Wrong with your cooker?, 21-22 Installation Instructions, 23-28 Electrical Connection, 29-30 Service schedule, 32 Installer
Introduction AUS To help you make the best use of your cooker, PLEASE READ THIS BOOKLET CAREFULLY. Your new cooker is guaranteed and will give lasting service. The guarantee is only applicable if the cooker has been installed in accordance with the Installation Instructions. The cooker is designed specifically for domestic use and responsibility will not be accepted for use in any other installation. When first using the cooker ensure that the room is well ventilated (e.g.
For your Safety General Appliance Warnings " Read the recommendations in this instruction booklet carefully, as they give important advice regarding safe installation, use and maintenance. Keep this booklet in a safe place for further reference when required. " This appliance is not suitable for marine craft, caravans or recreational vehicles. " This appliance has been designed for private, nonprofessional use in normal dwellings.
AUS touch the heating element and catch fire. " Do not allow pot handles to overhang other burners that are in use, as this will cause scorching of the handle, and potential handling burns. " Always make sure that pan handles are turned towards the centre of the hob in order to avoid accidental burns. " Always make sure the knobs are in the OFF position when the appliance is not in use. Maintenance Warnings " DO NOT MODIFY THIS APPLIANCE.
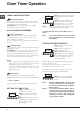
Oven Timer Operation The oven timer (only ventilated Oven) offers you the following features: A U T O 1. Time of Day 2. Automatic Cooking 3. Minute Minder . 0 00 CLOCKFACE The timer incorporates a 24 hour clock. Ensure the correct time of day is always set, before using your cooker. AUTOMATIC COOKING The main oven can be controlled automatically. GUIDANCE ON AUTOMATIC COOKING 1. Select foods which will take the same time to cook. 2.
Oven Timer Operation AUS TIMER FUNCTION BUTTONS A U T O . Minute Minder Button Here you can set a time period of up to 23 hours 59 minutes, that will count down. When it reaches zero, the timer will emit an audible tone. For Example: If you set 20 minutes, the audible tone will occur 20 minutes later. AUTO COOKING PROGRAMME Cook Period Button Cook Period is the actual length of time for which, the timer will switch the oven(s) on as part of an "Auto Cooking" programme. (e.g.
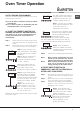
Oven Timer Operation AUTO COOKING PROGRAMMES There are two Auto Cooking programmes that can be selected using your timer:- . A U T O 1 4 20 (a) To set the timer to switch the oven(s) On and Off Automatically (b) To set timer to switch on immediately and OFF automatically after a set cook period. a) TO SET THE TIMER TO SWITCH THE OVEN(S) ON AND OFF AUTOMATICALLY This allows you to cook at a specified time for a chosen period before the oven switches off Automatically.
AUS Release all buttons. Step 5 A U T O . 1 4 20 NOTE: The Cookpot symbol disappears A U T O . 1 6 20 . 1 6 20 The timer display will revert to the time of day with the 'Auto' symbol lit & 'cookpot' symbol remaining lit. At the end of the Cook Period the 'Auto' symbol will flash and an intermittent audible tone will be heard. The audible tone will continue until cancelled. The 'Auto' symbol will continue to flash until the timer is returned to Manual operation (see below).
Hotplate The hotplate has one dual control wok burner, one large high speed burner, three normal simmering burners and one small simmering burner. The dual control wok burner consists of a smaller inner and a larger outer burner that can operate either together or separately. Use of the two burners together with large pans on maximum setting gives a very high input and reduces cooking times with respect to conventional burners.
AUS Models with Hob Gas Burner Safety Devices to Prevent Leaks (only available on certain models) These models can be identified by the presence of the device itself. ! Since the hob burners are equipped with a safety device, you must hold the control knob in for about 3 seconds after the burner has been lighted to allow the gas to pass until the safety thermocouple has heated.
Griddle A non-stick griddle is supplied for use over the two burners on the right hand side of the hob. The griddle is made of cast iron and the surface is covered with a special nonstick finish. To protect the non-stick coating never use metal cooking utensils as they may scratch the surface. Wooden or heat resistant plastic utensils may be used. Do not use saucepans on the griddle plate. AUS UNDER NO CIRCUMSTANCES MUST THE GRIDDLE PLATE BE USED OVER ANY OTHER HOTPLATE BURNERS.
Some Recipe ideas for your Griddle AUS DROPPED SCONES 4oz (100g) plain flour 1/4 tsp salt 1 level tsp (5ml) cream of tartar 1/2 level tsp (2.5ml) bicarbonate of soda 1 egg 1oz (25g) caster sugar 1/4 pint (150ml) milk 1/2oz (10g) margarine WELSH CAKES 6oz (175g) plain flour 1/2 level tsp (2.5ml) salt 1/4oz (5g) baking powder 2oz (50g) margarine 2oz (50g) sugar 2oz (50g) currant or sultanas 1/4 tsp grated nutmeg 1 egg a little milk POTATO CAKES 8oz (225g) warm creamed potatoes 2oz (50g) plain flour 1/2 (2.
Twin Grill CAUTION - ACCESSIBLE PARTS MAY BECOME HOT WHEN THE GRILL IS USED. YOUNG CHILDREN SHOULD BE KEPT AWAY. GRILLING SHOULD NEVER BE UNDERTAKEN WITH THE GRILL DOOR CLOSED. The grill control is designed to provide variable heat control of either the full width of the grill or just the grill half. Turning the control knob clockwise will switch on the full width and turning anticlockwise will switch on just the grill half.
Fan Oven AUS The heating of the oven is achieved by turning the control knob clockwise to the required temperature as recommended in the temperature charts. The pilot light will immediately come on and will automatically go off and on during cooking as the oven thermostat maintains the correct temperature.
Conventional Oven OVEN CONTROL Heating of the oven is achieved by turning the control clockwise to the required oven temperature scale on the control panel, as recommended in the temperature charts. The pilot light will immediately come on and off during cooking as the thermostat maintains the correct temperature. The ‘Oven Cooking’ charts are a guide only, giving approximate cooking temperatures and times.
Oven Cooking Chart - Meat AUS It is not necessary to pre-heat the fan oven before roasting. Note: Where times are stated, they are approximate only. Conventional Oven Meat Pre-heat Temperature °C Time (approx.) Beef Yes 190/200 25-30 mins per 450g (1lb) +25 mins over. Lamb Yes 190/200 25-30 mins per 450g (1lb) +25 mins over. Pork Yes 190/200 30-35 mins per 450g (1lb) +30 mins over.
Oven Cooking Chart - Baking Fan Oven Cooking AUS Food Pre-heat Temperature and Time Position in Oven Scones Yes 210/220°C approx. 8 - 10 mins. Runner 3 Small Cakes Yes 160/170°C approx. 15 - 20 mins. Runner 3 Victoria Sandwich No 160/170°C approx. 20 - 25 mins. Runner3 Sponge Sandwich (fatless) Yes 160/170°C approx. 15 - 20 mins. Runner 3 Swiss Roll Yes 170/180°C approx. 12 - 15 mins.
The Slow Cook Setting AUS With the fanned oven thermostat set to 90° the oven can be used for slow cooking - The 'Slow Cook' setting. PREPARING FOOD FOR SLOW COOKING 1. All dishes cooked by the 'Slow Cook' setting should be cooked for a minimum 6 hours. They will 'hold' at this setting for a further hour but marked deterioration in appearance will be noticed in some cases. 2.
Care and Cleaning DO NOT TOUCH HOT SURFACES. ALLOW COOKTOP AND ALL OVEN SURFACES TO COOL COMPLETELY BEFORE CLEANING. ! Never use steam cleaners or pressure cleaners on the appliance. ! Clean the glass part of the oven door using a sponge and a non-abrasive cleaning product, then dry thoroughly with a soft cloth. Do not use harsh abrasive cleaners or materials, or metal scrapers to clean the oven door glass since these can scratch the surface, which may result in shattering of the glass.
Care and Cleaning AUS COOKER FINISH Vitreous Enamel Hotplate (Traditional), pan supports, burner caps, roasting dish, grill pan, oven base, rear and roof, door inner panels, grill and warming compartments. CLEANING METHOD Clean the enameled parts with soapy water when cold and wipe off with a clean, dry cloth. The enamel could dull if cleaned while still hot. Never use abrasives, scouring pads or sharp objects. This will cause irreparable damage to the enamel. Aluminium Burner bodies, door handles.
Something Wrong with your Cooker Before contacting your Service Centre or Installer, check the problem guide below, there may be nothing wrong with your cooker. PROBLEM CHECK Slight odour or small amount of smoke when grill/oven used for first time. This is normal and should cease after a short period. Oven cooks too fast or too slow. Check that the oven setting and shelf positions are as recommended in the Cooking Charts.
AUS Disposal of your product To minimise the risk of injury to children please dispose of your product carefully and safely. Remove all doors and lids. Remove the mains cable (where fitted) by cutting off flush with the appliance and always ensure that no plug is left in a condition where it could be connected to the electricity supply. To help the environment, Local Authority instructions should be followed for the disposal of your product.
Installation Compliance with standards This cooktop must be installed by a licensed gasfitter in accordance with the requirements of local gas and electrical authorities, as well as the latest published versions of the following standards: " AS/NZS 5601 Gas Installation code " SAA Wiring Rules. Prior to installation, ensure that the local distribution conditions (nature of the gas and gas pressure) and the adjustment conditions are compatible.
AUS TECHNICAL DATA DIMENSIONS Height Widht Depth 900 - 915 mm 1000 mm 600 mm (excluding door handles) GENERAL Gas connection Location of gas inlet Pressure test point Gas rate adjustment Aeration adjustment Electrical input Location of Electrical Connection 24 1/2" BSP female Rear of upright cooker 433 mm C/L from LH side (as viewed from front) 700 mm from base Hotplate burner injector none none 230-240V 50Hz AC 6.00-6.
Gas Consumption AUS Natural Gas (1.0 kPa) ULPG (2.75 kPa) Injector Diameter Gas Input Injector Diameter Gas Input Auxiliary Burner 0.90 mm 4.0 MJ/hr 0.55 mm 4.0 MJ/hr Semi Rapid Burner 1.10 mm 6.0 MJ/hr 0.70 mm 6.5 MJ/hr Rapid Burner 1.50 mm 10.8 MJ/hr 0.85 mm 10.0 MJ/hr Fish Burner (eac h) 1.01 mm 5.0 MJ/hr 0.64 mm 5.5 MJ/hr W ok (inner) Burner 0.65 mm 2.0 MJ/hr 0.44 mm 2.4 MJ/hr W ok (outer) Burner 2 x 1.15 mm 13.4 MJ/hr 2 x 0.70 mm 13.
Installation CONVERSION FOR USE ON LPG Each hob burner requires the injector to be replaced and each burner gas tap to have the by-pass screw adjusted according to the following procedure: 1. Lift off the burner cap and the burner body and place it to one side. 2. Remove the injector from the burner base with a suitable box spanner and discard. 3. Replace the injector with the appropriate replacement (see Table on the previous page). " Minimum clearance from burner to overhead cabinetry must be 600 mm.
Installation LEVELLING Your cooker is heavy, so it would be advisable for two people to move it. The cooker is fitted with rear wheels and will slide into position easily. Movement of your cooker is most easily achieved as follows. Open the grill/oven door sufficiently to allow a comfortable grip on the underside front edge of the oven roof, avoiding any grill or oven interior furniture, and then lift and slide back at the same time.
with the appliance installed. " The inner diameters of the pipe are as follows: 8 mm for LPG; 13 mm for Natural Gas. Upon completion of installation, check the gas circuit, the internal connections and the taps for leaks using a soapy solution (never a flame). Also check that the connecting pipe cannot come into contact with moving parts which could damage or crush it. Make sure that the natural gas pipe is adequate for a sufficient supply to the appliance when all the burners are lit.
Electrical Connection WARNING - THIS APPLIANCE MUST BE EARTHED The cooker must be connected to the mains power by a licensed electrician. The electrical supply for the cooker must be 240 Volt 50 Hz. 1. The fuse and electrical wiring of the home/ premises must support the load of the appliance. 2. The appliance must be earthed. 3.
AUS Low flame setting Check the low flame setting for each hob burner to ensure that the minimum flame will not be extinguished by air draughts. " Light the burner. " Turn the control until it engages in the minimum position. " Ensure the flame is stable and will not be extinguished by air draughts. To adjust the minimum flame: Follow the procedure described in the gas conversion instruction. Instruct the customer on proper operation prior to leaving.
AUS 31
Service schedule 10/2010 - 195075015.01 XEROX FABRIANO AUS To keep your cooker running smoothly, we recommend that you have your cooker serviced every 5 years by an authorised service agent. Never use unauthorised technicians and never accept replacement parts which are not original. Service and spare parts are available on the numbers below. Please have the following information handy: " The appliance model (Mod.). " The serial number (S/N).