
Operation Manual


28
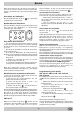
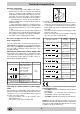
Electrical connections
Voltage,
Frequency
Fuses,
Sections
FR-AT-BE-DE-GP--
ES-IE-IL-IS-IT-LU-
RE-FI-GB-GR-PT--
SE-MA-NZ
230V-1+N~50 Hz
25 A*
2,5 mm²
FR-BE-NO
230V-2~50/60 Hz
25 A*
2,5 mm²
FR-BE-CH-DE-AT--
ES-IL-IT-NZ-PT-
MA- LU-SE-IS-NL
400V2-N~50 Hz
16 A*
1,5 mm²
FR-BE-NO
230V3~50 Hz
16 A*
1,5 mm²
FR-AT-BE-DE-ES-
IL-IS-IT-LU-PT-SE
-MA-NZ-CH-DK-N-
L
400V3+N~50 Hz
16 A*
1,5 mm²
NL
230V2+2-N~50 Hz
16 A*
1,5 mm²
CY-AU-NZ-KW-MT
240V-1+N~50 Hz
25 A*
2,5 mm²
* Application of the simultaneity coefficient in accordance with
cei 60335-2-6 norm
Technical characteristics
This appliance conforms with the following European
Community Directives:
- 73/23/EEC of 19/02/73 (Low Voltage) and subsequent
amendments;
- 89/336/EEC of 03/05/89 (Electromagnetic
compatibility) and subsequent amendments;
- 93/68/EEC of 22/07/93 and subsequent amendments;
Warning: If the hob is fitted above a built-in oven, the hob
and the oven must be connected to the mains separately for
safety reasons and to simplify operations when it is necessary
to pull the oven out for some reason.
Electrical connection
• The electrical safety of this appliance can only be
guaranteed if the latter is correctly and efficiently
earthed, in compliance with regulations on electrical
safety. Always ensure that this vital safety measure has
been taken. If you have any doubts, call in a qualified
technician to check the electrical system thoroughly.
• The manufacturer denies all responsibility for
damage resulting from a system which has not been
earthed correctly.
• Before powering the appliance, check whether the
technical characteristics featured on the appliance data
plate correspond with those of the mains electrical
system.
• Check that the current load of the mains supply and
of the power sockets is suitable for the maximum power
of the appliance, indicated on the appliance data plate.
If in doubt, contact a qualified professional.
Disconnect the appliance from the electricity supply
before all operations.
Connect your hob to the electrical system by means of a
junction box: if the appliance is connected permanently
to the mains, an omnipolar circuit breaker, accessible if
necessary, with a minimum contact opening of 3 mm
should be installed.
Valid only for models with a power supply cable
Some models are supplied with a single-phase power
supply cable, and should consequently only be connected
to the single-phase mains. Observe the wire colours, as
indicated in the diagram attached.
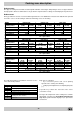
Electrical connections Voltage, Frequency Fuses, Sections
FR-BE-AT-DE-GR-ES-IL-
IT-NZ-PT-GP-CH-MA-LU-
IE-FI-SE-IS-GB-NL-DK
230V - 1+N~ 50Hz
CY-MT-AU-NZ-KW
240V - 1+N~ 50Hz
25A *
2,5 mm²
FR-BE-NO
230V - 2 ~ 50Hz
BR=BRUN,BL=BLEU
BR=BRUIN, BL=BLAUW
BR=BRAUN, BL=BLAU
BR=BROWN, BL=BLUE
* Application of the simultaneity coefficient in accordance with
cei 60335-2-6 norm
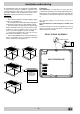
Valid only for models without a power supply
cable
Some models are not fitted with a power supply cable, as
the cable should be sized according to the type of electrical
connection in use (see connection table below). To connect
the cable, proceed as follows:
• Using a screwdriver, prise on the side tabs of the
terminal board cover;
• Pull open the cover of the terminal board.
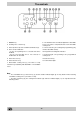
LN
12345
L1 L2
12345
L1 L2 N
12345
L1 L2 L3
12345
L1 L2 L3 N
12345
L1 L2 N2N1
12 34 5
LN
12345
To install the cable, proceed as follows:
• unscrew the wire clamp screw and the contact screws.
• to make the desired electrical connection (see table),
use the jumpers housed inside the box. Position the
power supply cable wires according to the indications
in the table.
• once the connections have been made, tighten all the
terminal screws fully.
• Fasten the supply cable in place with the clamp and
close the cover of the terminal board.
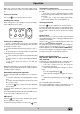
BL
N
BR
L
BL
N
BR
L