Instructions for use Coffee machine Index GB English,1 F Français, xx E Espanol, xx GB Installation 4 Positioning Built-in installation Ventilation Centring and fixing Electrical connection Installing the power cable Rating plate Description of the appliance 6 Overall view Control panel Starting and using 7 The first time you switch on Priming the water circuit Regulating water hardness Aqua Prima filter (where installed) Installing the Aqua Prima filter Additional information for correct use of the
IMPORTANT SAFEGUARDS GB When using electrical appliances, basic safety precautions should always be followed to reduce the risk of fire, electric shock, and/or injury to persons, including the following: 1 Read all instructions and information in this instruction book and any other literature included in this carton referring to this product before operating or using this appliance. 2 Do not touch hot surfaces. Use handles or knobs.
CAUTION GB This appliance is for household use. Any servicing, other than cleaning and user maintenance, should be performed by an authorized service centre. Do not immerse base in water. To reduce the risk of fire or electric shock, do not disassemble the base. There are no user serviceable parts inside. Repair should be done by authorized service personnel only. 1 2 3 4 5 Check voltage to be sure that the voltage indicated on the nameplate agrees with your voltage.
Installation GB ! Keep this booklet for consultation at any time. In the event of sale, transfer of the machine or of the owner ensure that the booklet is kept with the machine so that the new owner is informed of the operating instructions and warnings. ! Once the appliance has been encased, there must be no contact possible with electrical parts. Declared consumption values shown on the rating plate are measured on the basis of this type of installation.
! All protective parts must be attached so that they cannot be removed without the aid of a tool. Rating plate GB Next replace the protection and the drip tray. • Nominal voltage See plate on the appliance Electrical connection • Power rating See plate on the appliance ! Coffee machines with three-pole power cable are regulated for alternating current, with voltage and frequency shown on the rating plate attached to the appliance.
Description of the appliance GB Overall view Water tank Main switch Front control panel SBS Coffee bean hopper Hot water/steam spout Grill Tray full float Grind regulation Brew group Adjustable-height coffee brewer Drip tray Control panel DESCALING key PROGRAMMING/EXIT selection key PAGE SCROLL key SELECT/CONFIRM Key 6 Select STEAM key Select HOT WATER key Select ESPRESSO key Select REGULAR COFFEE key Select LONG COFFEE key Select DOUBLE COFFEE key
Starting and using ! Before starting the machine make sure the hoppers contain the amount described in the manual. Prime the circuit immediately to prevent damage to the machine. Rinse and fill the tank with fresh drinking water. GB Close the lid and replace the tank in position. ! After starting the machine, regulate water hardness. That will allow you to keep your machine in perfect order (see Programming). The first time you switch on 1.
GB Priming the water circuit Aqua Prima filter (where installed) ! Before starting the machine after long periods of inactivity, if the water tank has been completely emptied, it is essential to prime the machine circuit. Moreover the circuit must be primed every time the following is displayed: The Aqua Prima filter purifies the water used in the preparation of coffee. Its properties reduce the hardness of water and remove the unpleasant taste of chlorine.
Additional information for correct use of the “Aqua prima” filter (where installed) For correct use of the “Aqua Prima” filter (where installed), here are a number of recommendations: 1. Store the “Aqua prima” filter in a cool place away from the sun, at a temperature of between +5°C and +40°C; 2. Use in areas with temperature no higher than 60°C; 3. It is advisable to wash the “Aqua prima” filter if the machine has been inactive for 3 days or more; 4.
Brewing GB SBS System Wait for the cup to fill with the required amount. Press the key again. The machine has a device to regulate the body of coffee: SBS. This system gives optimal brewing with any kind of coffee on the market. In this way the machine is programmed to brew the quantity of coffee you require. ! Regulation can even be done while the coffee is brewing. Turn the knob to regulate. Rotate knob: • left for crème café; • to the centre for espresso; • right for a strong coffee.
Brewing coffee (2 cups) Dispensing hot water ! Before brewing coffee, make sure the water tank and the coffee tank are full and that the display shows: ! At the start, short spurts of hot water may be dispensed. Danger of scalding. The hot water spout can reach high temperatures. Do not touch it with bare hands. SELECT PRODUCT READY FOR USE Before dispensing water, make sure the following is shown on the display: Place 2 cups beneath the brew spouts.
Maintenance and care 1. With the machine ready to brew coffee, place a cup and/or a container below the hot water/steam spout. GB 2. Press the key to discharge any water left in the steam spout; in a short time, only steam will come out of the spout. The display shows: STEAM 3. Press the key to stop dispensing steam. 4. Fill 1/3 of the container you wish to use to prepare the cappuccino with cold milk. ! Use cold milk and a cold cup for better results when preparing cappuccino. 5.
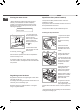
The brew group must be cleaned every time the coffee bean hopper is filled and at least once a week. • Switch off the machine by pressing the main switch to “O”. Descaling Scale normally forms with use of the appliance. Descaling is necessary every 3 - 4 months when there is a reduction in water flow or when the machine displays the following message: • Remove the drip tray and the dregs drawer. Open the service door. • Remove the brew group by the handle and press the key marked “PUSH”.
GB The machine will start an automatic descaling cycle with pauses programmed by the manufacturer and automatically managed by the machine. The display will show: MACHINE IS DESCALING 6. At the end of the cycle, dispensing of the descaling solution will stop and the display will show: RINSE MACHINE FILL WATERTANK 7. Rinse the water tank thoroughly and fill it with fresh drinking water. Replace the tank and close the front panel. The display will show: RISCIACQUARE PREMERE TASTO ACQUA 8.
Programming Setting machine functions Programmable functions The user can change a number of the machine’s operating parameters according to personal preference. STANDBY GB When the appliance is used very little, it is possible to select the STANDBY mode. This function reduces energy costs. Nevertheless, it is recommended to switch off the appliance at the mains if it is to be out of service for long periods. The machine reheats in just a few minutes when reactivated.
Programming GB Now, with the WATER HARDNESS key select RINSING OFF and save the choice using the Water hardness varies according to geographical region. Hence, the machine must be regulated for the hardness of the water used. This is expressed on a scale of 1 to 4. The appliance is already programmed for average hardness (3). key. To regulate hardness, briefly dip (1 second) the strip provided in water. Next, shake the strip gently to eliminate excess water.
Enable it with the PROGRAMMING COFFEE SIZE key. The display shows: FILTRO ACQUA DISATTIVATA Use the You can program the amount dispensed one key at a time. Continue repeating the procedure described below to program several keys. key to select WATERFILTER ON and press the Use the ! The “RESET” must be given whenever a new cartridge filter is installed. key to select the WATERFILTER RESET Enable it with the key.
Programming GB Enable it with the ESPRESSO FLAVOUR key. This function allows you to program a dosage (quantity) setting for coffee beans to be ground for espresso (strong, medium, mild). The display shows: SELECT PRODUCT PROGRAMM. WATER Use the Position the container that you want to fill and press . Water is dispensed from the steam spout and the display shows: HOT WATER PROGRAMM.
LONG COFFEE FLAVOUR TOTAL COFFEES This function allows you to program a dosage (quantity) setting for coffee beans to be ground for long coffee (strong, medium, mild). This function displays the number of coffees already dispensed by the appliance. Use the Use the key to select the function key to select the function TOTAL COFFEE TIMER AROMA LARGE COFFEE * PREBREWING Enable it with the Enable it with the GB * key. key. The display shows (e.g.): The display shows (e.g.
Programming GB CLOCK This function is enabled and/or disabled by the user and: - displays the exact time when the machine is in “STANDBY” or “SELECT FUNCTION” mode. - selects the on/off time. Use the function key to choose whether to enable the SHOW CLOCK TIME ON Save using the * key. To correctly program this function, the exact time must be set ! Note: the time is only displayed at certain times. This function can only be disabled by the user.
Next, press the save using key. key to set the minutes and ! Attention: if the on and off times coincide, the machine ignores both settings. The clock must be enabled after this programming in order to function correctly. WASHING CYCLE ! A person should be present during the washing cycle to supervise the operation. Before performing the washing cycle fill the water tank.
Programming GB Factory settings This function resets the machine’s operating parameters to the manufacturer’s settings. Use the key to select this function: FACTORY SETTINGS STANDBY Enable it with the * key. The display then shows: FACTORY SETTINGS NO Choose whether to restore parameters with the key, and press the key to confirm. ! Warning: when all parameters are restored to factory settings, all customised settings are lost.
Display messages Display messages The machine’s display informs the user of how it is to be used. Here is a list of the alarm messages that prevent coffee brewing and what the user should do to solve the problem. CLOSE DOOR GB • Close the front door. CLOSE CONTROL PANEL • Close the upper panel. STANDBY • Press the key “MENU/OK”. READY FOR USE DECALCIFY • Descale the machine. BREWUNIT BLOCKED GRINDER BLOCKED • Contact an authorised customer service centre.
Problems - causes - solutions GB Problem Cause Solution The machine does not switch on The machine is not connected to the Check connection to the power power supply supply Coffee is not hot enough The cups are cold Warm the cups with hot water No hot water or steam is dispensed Steam spout clogged Pull the steam spout downwards to remove it, and clean Coffee brews too slowly Coffee too fine Change coffee blend Rotate the grind regulation knob to the highest number Brew group dirty Wash the
Precautions and recommendations Intended use • The coffee machine is intended only for domestic use. • Do not make any technical changes or use the machine for unlawful purposes as this may lead to hazards! • The machine should only be used by adults in full possession of their physical and mental faculties. Power supply • Only connect the coffee machine to a suitable power socket. • The voltage must correspond to the value on the rating plate.