Operating Instructions HOB Contents Warning, 2 Installation, 3-5 GB English,1 Positioning Electrical connection Description of the appliance, 6 Control panel Start-up and use, 7-10 NRB 640 C AUS Switching on the hob Switching on the cooking zones Switching off the cooking zones Heating elements Control panel lock Switching off the hob Practical advice on using the appliance Safety devices Practical cooking advice Precautions and tips, 11 General safety Disposal Care and maintenance, 12 Switching the
WARNING GB • WARNING: The appliance and its accessible parts become hot during use. • Care should be taken to avoid touching heating elements. • Children less than 8 years of age shall be kept away unless continuously supervised.
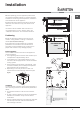
Installation GB 5 mm ! Before operating your new appliance please read this instruction booklet carefully. It contains important information concerning the safe operation, installation and maintenance of the appliance. ! Please keep these operating instructions for future reference. Pass them on to any new owners of the appliance. min. 20 mm COMPARTMENT ! A board must be installed under the hob if it is not installed above an oven. Please, refer to the “Installation Instructions” for minimum dimensions.
GB Fixing The appliance must be installed on a perfectly level supporting surface. Any deformities caused by improper fixing could affect the features and operation of the hob. The thickness of the supporting surface should be taken into account when choosing the length of the screws for the fixing hooks: • 30 mm thick: 17.5 mm screws • 40 mm thick: 7.5 mm screws Fix the hob as follows: 1.
Voltage and mains frequency Electrical connections 400V 3-N ~ 50/60 Hz Terminal board Three-phase 400 5. Secure the power supply cable by fastening the cable clamp screw, then put the cover back on. Phase Phase Phase 1 2 3 Three-phase 400 Neutral 4 5 Earth U-bolt connection support Connecting the electricity supply cable to the mains If the appliance is being connected directly to the electricity mains an omnipolar switch must be installed with a minimum opening of 3 mm between contacts.
Description of the appliance GB Control panel The control panel described in this manual is only a representative example: it may not exactly match the panel on your appliance. 5 3 4 GB Description of the appliance Control panel The control panel described in this manual is only a representative example: it may not exactly match the panelon your appliance. 1 INCREASE POWER button switches on the hotplate and controls the power (see Start-up and use).
Start-up and use ! The glue applied on the gaskets leaves traces of grease on the glass. Before using the appliance, we recommend you remove these with a special nonabrasive cleaning product. During the first few hours of use there may be a smell of rubber which will disappear very quickly. ! A few seconds after the hob is connected to the electricity supply, a buzzer will sound. The hob may now be switched on.
GB Switching off the hob Safety devices Press the button to switch the appliance off. If the control panel lock has been activated, the controls will continue to be locked even after the hob is switched on again. In order to switch the hob on again, you must first remove the lock function. Pan sensor Control panel lock When the hob is switched on, it is possible to lock the oven controls in order to avoid accidental changes being made to the settings (by children, during cleaning, etc.).
Safety switch GB The appliance has a safety switch which automatically switches the cooking zones off after they have been in operation for a certain amount of time at a particular power level. When the safety switch has been triggered, the display shows “0”. For example: the right rear hotplate is set to 5 and will switch off after 5 hours of continuous operation, while the front left hotplate is set to 2 and will switch off after 8 hours.
Low-flame cooking Medium-flame cooking High-flame cooking Very high-flame cooking Practical cooking advice Very low-flame cooking GB 10 ª • • ¶ ¶ § § S S ¢ ¢ £ ™ ™ ¡ Pressure cooking Pressure cooker Frying Grilling Boiling Crêpes Cooking on a high flame and browning (roasts, steaks, escalopes, fish fillets, fried eggs) Fast thickening (liquid juices) Boiling water (pasta, rice, vegetables) Milk Slow thickening (dense juices) Bain-marie cooking Low-flame cooking (stews) Chocolate sauce Pr
Precautions and tips ! This appliance has been designed and manufactured in compliance with international safety standards. The following warnings are provided for safety reasons and must be read carefully. This appliance conforms to the following European Economic Community directives: - 2006/95/EEC dated 12/12/06 (Low Voltage) and subsequent amendments; - 2004/108/EEC dated 15/12/04 (Electromagnetic Compatibility) and subsequent amendments; - 93/68/EEC dated 22/07/93 and subsequent amendments.
Care and maintenance GB Disposal • When disposing of packaging material: observe local legislation so that the packaging may be reused. • The European Directive 2002/96/EC relating to Waste Electrical and Electronic Equipment (WEEE) states that household appliances should not be disposed of using the normal solid urban waste cycle.
Technical description of the models This table provides a model-by-model list of the energy absorption values, type of heating elements and diameters of each cooking zone.
GB 14
GB 15
04/2013 - 195101871.00 XEROX FABRIANO GB AUSTRALIA ARISIT PTY LIMITED 40-44 Mark Anthony Drive, Dandenong South, VIC 3175, Australia Fax: Service & Sales (03) 9768 0838 Email: consumer.care@arisit.com NEW ZEALAND ARISIT PTY LIMITED PO Box 68-140 Newton, Auckland 1145, New Zealand Fax: (09) 302 0077 Email: sales@aristonappliances.co.