Operating Instructions HOB Contents GB English,1 PT FR Français, 14 AR Português,41 NRO 642 D Z NRO 841 O X ES Espanol, 27 Installation, 2-4 Positioning Electrical connection Description of the appliance, 5-6 Control panel Extendable cooking zones Start-up and use, 7-10 Switching on the hob Switching on the cooking zones Switching off the cooking zones Power function Heating elements Programming the cooking duration Timer Control panel lock Switching off the hob Demo mode Practical advice on us
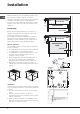
Installation this instruction booklet carefully. It contains important information concerning the safe operation, installation and maintenance of the appliance. Please keep these operating instructions for future reference. Pass them on to any new owners of the appliance. 5 mm Before operating your new appliance please read min. 20 mm COMPARTMENT Positioning min.
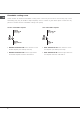
Fixing Single-phase connection supporting surface. Any deformities caused by improper fixing could affect the features and operation of the hob. The hob is equipped with a pre-connected electricity supply cable, which is designed for single-phase connection.
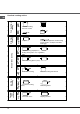
GB connection required and position the connection supports as shown in the following table and diagrams. 4. Position the wires in accordance with the information given in the following table and diagrams and connect the appliance by tightening all the screws for the springs as much as possible. Voltage and mains frequency Electrical connections 400V 3-N ~ 50/60 Hz Terminal board Three-phase 400 5. Secure the power supply cable by fastening the cable clamp screw, then put the cover back on.
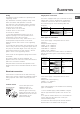
Description of the appliance Control panel The control panel described in this manual is only a representative example: it may not exactly match the panel on your appliance. INCREASE TIME button increases the time value set on the timer (see Start-up and use). DECREASE TIME button decreases the time value set on the timer (see Start-up and use). COOKING ZONE SELECTOR button shows a particular cooking zone has been selected and therefore various adjustments are possible.
GB Extendable cooking zones Certain models are fitted with extendable cooking zones. These may be circular or oval and may vary in their extensibility (they may be double or triple hotplates). A list of controls is given below (these controls are only present in models with the extendable cooking zone option).
Start-up and use The glue applied on the gaskets leaves traces of grease on the glass. Before using the appliance, we recommend you remove these with a special nonabrasive cleaning product. During the first few hours of use there may be a smell of rubber which will disappear very quickly. A few seconds after the hob is connected to the electricity supply, a buzzer will sound. The hob may now be switched on.
GB will be switched on. To display the time remaining for the other Switching off the hob programmed hotplates, press the Press the button repeatedly. The times remaining for each hotplate will be shown in a clockwise order, beginning with the front left hotplate. Changing the programme 1. Press the button repeatedly until the duration buttons to set the new duration. 3. Confirm by pressing the button. To cancel a programme, follow the above instructions.
Make sure that the base of the cookware is always clean and dry, in order to fully utilise and extend the life of both the cooking zones and the cookware. Avoid using the same cookware which has been used on gas burners: the heat concentration on gas burners may distort the base of the pan, causing it not to adhere correctly.
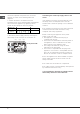
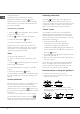
Low-flame cooking Medium-flame cooking High-flame cooking Very high-flame cooking Practical cooking advice Very lowflame cooking GB 10 ª ¶ ¶ § § S S ¢ ¢ £ ¡ Pressure cooking Pressure cooker Frying Grilling Boiling Crêpes Cooking on a high flame and browning (roasts, steaks, escalopes, fish fillets, fried eggs) Fast thickening (liquid juices) Boiling water (pasta, rice, vegetables) Milk Slow thickening (dense juices) Bain-marie cooking Pressure cooking after whistle Low-flame cooki
Precautions and tips This appliance has been designed and manufactured in compliance with international safety standards. The following warnings are provided for safety reasons and must be read carefully. This appliance conforms to the following European Economic Community directives: - 2006/95/EEC dated 12/12/06 (Low Voltage) and subsequent amendments; -89/336/EEC dated 03/05/89 (Electromagnetic Compatibility) and subsequent amendments; - 93/68/EEC dated 22/07/93 and subsequent amendments.
Care and maintenance GB Switching the appliance off Disconnect your appliance from the electricity supply before carrying out any work on it. Cleaning the appliance Do not use abrasive or corrosive detergents (for example, products in spray cans for cleaning barbecues and ovens), stain removers, anti-rust products, powder detergents or sponges with abrasive surfaces: these may scratch the surface beyond repair.
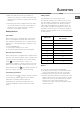
Technical description of the models This table provides a model-by-model list of the energy absorption values, type of heating elements and diameters of each cooking zone.