
Technical data

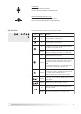


16
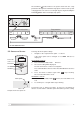
5.10 CONTROLLER SETTINGS
On power up the controller will go through an initialisation phase during
which the operating control light flashes red then green.
The controller then shows the system image display see 5.6.
To display menu options use forward button to scroll forward and back
button to scroll backwards.
To change the menu option settings:-
1. Press forward button to scroll through to required option.
If the menu option can be changed or reset will also be displayed.
TO CHANGE A VALUE
2. Press and hold set button until flashes.
3. The current setting will be displayed.
Record current value so value is not forgotten.
Press forward button to increase value or back button to decrease
value.
4. Press and hold set button again until stops flashing.
The new value will now be saved.
TO RESET A VALUE
2. Press and hold set button until flashes, the value will be reset
to 0.
3. To confirm press again until it stops flashing.
To interrupt reset or change procedure, do not press any button for about
5 seconds and the counter will return to previous setting.
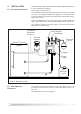
AST 100
BACK
FORWARD
SET
INDICATOR
LIGHT
Menu option
Value
Example shown menu option ‘Arr’
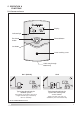
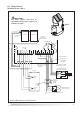
5.9 OPERATING MODE HND1 &
HND2
When HND1 and/or HND2 are set to On or Off the following icons will be
displayed flashing
HND 1
Set to Auto - Normal operation.
Set to On - Relay R1 On - solar pump running - pump icon flashes.
Set to Off - Relay R1 Off - solar pump not running - pump icon not
flashing.
HND 2
Set to Auto - Normal operation.
Set to On - Relay R2 On - auxiliary heat pump running - pump icon
flashes.
Set to Off - Relay R2 Off - auxiliary heat pump not running - pump icon
not flashing.
Solar pump icon
Arr 1
Arr 2
Auxiliary heat
source pump icon