
Installation Guide


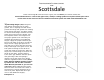

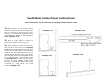

2)
After you mount the hinges on the
door, mark each end of the curb with a
mark that will represent the outside sur-
face of the door glass. The glass is usually
set in the center of the curb. For example
if your curb is 4" wide and you want your
door to line up in the center of the curb,
your center line will be at 2". These marks
will be the same distance in from the edge
of the curb to keep a consistent reveal
from curb edge to the glass surface. View
Example 2.0 for visual representation.
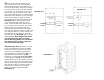
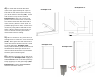
If you would like the center line to be
closer to the outside of the shower enclo-
sure, measure one end of the curb to the
distance that you would like and then
measure the same distance on the oppo-
site side. For example, with a 4" wide curb
you could measure 1" in from the left out-
side and then do the same for the right
outside side. View Example 2.1 for visual
representation. Note hinge Back Plates
are wider than the glass. Consider
where the hinge plates are and if they
will still mount to surface of the tile
and not past the tile edge.
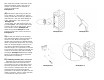
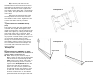
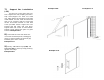
3) Setting the door: The door can now
be set in the opening to mark the hinge
placement. ASD heavy doors are config-
ured to have a P990WS polycarbonate
sweep installed on the bottom (#5). The
gap needed for this sweep is 7/16”.
Therefore, you will need 2) 7/16” shims
or setting blocks (#13) (wood and hard
plastic/rubber are ok. No metal) to set the
door on to ensure proper clearance for the
sweep. Set the door on your blocks/shims
and position it with your marks made on
the curb. Use a level to set your door
plumb with hinges against the wall.
Example 3.0.
Outside
ofcurb
Outside
ofcurb
Example 3.0
Example 2.0
Example 2.1