
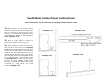
Installation Guide


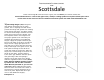


B)
Take the pull that has the
threaded hole in the end and from the in-
side begin to thread the top screw into it
and then the bottom screw. Tighten the
stud head screws down with a screwdriver
(not a drill). This pull will be on the inside
of the door.
C)
Place the remaining pull, with
the large holes and set screw, onto the
stud heads of the screws. Tighten the set
screws with Allen wrench provided..
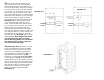
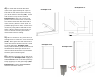
7) Directions for P990WS Sweep
(#5)
The sweep comes with the angled shield
rounded. The angled shield goes to the
inside of the shower. Cut the sweep to the
width of the glass by cutting off the hinge
side using miter saw or hacksaw. Then
place over bottom edge of door. Then, us-
ing a plastic covered mallet, gently pound
up on bottom sweep until it is high
enough to not bend and drag on tile but
still slightly making contact. This will en-
sure a maximum seal from leakage. Sili-
cone ends and horizontal seams from
glass to plastic.
Example 9.0
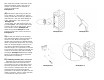
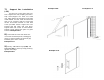
8) Directions for SDDTNL “L” Seal
(Please see Inline instructions for installation if
opening width is greater than 30”)
A) Refer back to your marks in step 2.
Make a mark on the curb at the handle
side of the door representing the in-
side surface of the glass. Place the “L”
seal (per drawings) on the curb and
against wall. Example 10.0. This will
ensure that the door is allowed to
open out. Use a level to position the
seal plumb against wall. Make a mark
on the wall, on the inside of seal the
location of where the “L” seal will be
positioned down the length of the seal.
Example 8.0
angled shield
angled shield
Siliconeends
Example 9.0