2 Hi n g e 2 ASD3 0 0 Cyl i nde rLa dde rPul l 1 CYLP8X8 3 PVCSt r i keAs s e mbl e d 1 ZVP043884MAG 4 Fl a tMa gne t MAG4 014 Dua lSt r i ke ZVP0 4SEAL84 3/ 8”St r i keJ a mb ZV0438 84 MAGUCh a n n e l 1 MAG4 0 3 8 5 3 / 8 ”Bo t t o mSwe e p 1 P9 9 0 WS 6 Su p p o r tBa r SBK2 4 7 Bu l bSe a lw/Ta p e 1 SDTBT2 8 Bo t t o mCh a n n e l 1 ZSS4 1 0 4 9 UCh a n n e l 1 ZSS6 1 0 4 1 0 MAG4 0 3 8Vi n y l 1 ZV9 1 4 3 1 1 Wa l lAn c h o r 8 EXP2 0 0 5 1 2 F6X1 1 / 4 8 F6
Arizona Corporate Office 2801 W.
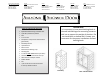
Installation Instructions for Scottsdale Please read through all of the instructions to get an over‐view before you install the shower door. Arizona Shower Door Inc. reserves the right to alter, modify or redesign products at anytime without prior notice. For the most current versions of all our installation instructions please visit www.arizonashowerdoor.
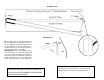
2) After you mount the hinges on the door, mark each end of the curb with a mark that will represent the outside surface of the door glass. The glass is usually set in the center of the curb. For example if your curb is 4" wide and you want your door to line up in the center of the curb, your center line will be at 2". These marks will be the same distance in from the edge of the curb to keep a consistent reveal from curb edge to the glass surface. View Example 2.0 for visual representation.
Now mark the outside screw holes of the hinge back plates using a pencil or ink marker. You will need an assistant to mark the inside holes. Example 4.0 4) Drill holes in wall using a 3/16” ma- sonry drill bit as a pilot hole for ease as some porcelain tile can be very difficult to drill with just a 1/4” bit. After drilling all holes, follow with a 1/4” masonry bit. Example 5.0 Insert green 1/4” wall anchors that are provided (#11). Cut anchors flush to tile surface if they do not fully insert.
B) Take the pull that has the threaded hole in the end and from the inside begin to thread the top screw into it and then the bottom screw. Tighten the stud head screws down with a screwdriver (not a drill). This pull will be on the inside of the door. C) Place the remaining pull, with the large holes and set screw, onto the stud heads of the screws. Tighten the set screws with Allen wrench provided.. 7) Directions for P990WS Sweep (#5) The sweep comes with the angled shield rounded.
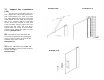
Example 10.0 Example 10.1 B) Last apply the “L” seal with VHB to the tile by peeling off the protective coating on the VHB tape and firmly applying it to the tile. Making sure to correspond the location of the “L” seal with the marks on the tile made earlier in step A). Example 10.1 (it’s a good idea to press the inside of the “L” seal with your thumb and run it down the length of the wall to help make sure that sufficient contact between the VHB tape, “L” seal, and tile are made).
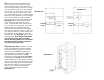
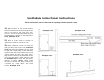
Scottsdale Inline Panel Instructions These instructions are for units with an opening Greater than 30” wide. 1) With the door in the closed position measure the distance from the edge of the door to the wall on the open side. Subtract a ¼” from the opening width and cut the ZSS4104 U-channel to that dimension (#8). Example 11.0. Example 11.0. Example 12.0. 2) Drill 2) 3/16” holes in bottom of channel for screws to mount to curb. 3) Make reference marks on both the wall and door side of the curb.
4) To install wall channel drill three 3/16” holes approximately 16” apart in backside of wall channel (the same way you did for bottom channel) (#9) . Stack wall channel on top of base channel Example 13.0. then use a level to set plumb. Then mark the holes on the wall. Set channel aside then drill holes with a 3/16” masonry drill bit. Insert 3/16” expandable plug anchors then, secure the uchannel by using #8x1” flathead screws.
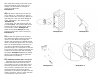
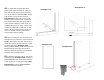
7) Support Bar Installation Example 16.0. (#6) Set the bar on the glass and position it against the wall, keeping it horizontally level.(support bar does not need cut). Mark where the mounting screw hole needs drilled. Set bar aside and drill wall with a 1/4” masonry drill bit. Insert wall anchor and fasten bracket to wall with screw provided. Attach support bar into bracket and slip other end over glass. Tighten Allen set screws on wall bracket. Tighten screw against the glass on glass bracket.