
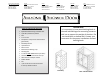
Installation Guide

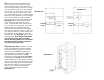

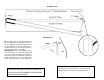

Now mark the outside screw holes of the
hinge back plates using a pencil or ink
marker. You will need an assistant to
mark the inside holes.
Example 4.0
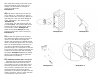
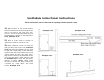
4) Drill holes in wall using a 3/16” ma-
sonry drill bit as a pilot hole for ease as
some porcelain tile can be very difficult to
drill with just a 1/4” bit. After drilling all
holes, follow with a 1/4” masonry bit.
Example 5.0
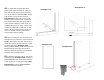
Insert green 1/4” wall anchors that are
provided (#11). Cut anchors flush to tile
surface if they do not fully insert. A flat
razor blade is used in Example 6.0
(Note: there should always be wood
backing in the wall to secure screws to).
Example 6.0
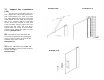
5) Set the door back into the opening
onto the blocks/shims and line up door to
marks on curb. Make sure hinges are
against wall. The holes you drilled should
match up with back plate holes. Use a drill
with a 6” long #2 Phillips screw bit to se-
cure door to wall with screws provided
with the hinges. (It is important to use the
6” long bit as using a shorter screw bit will
result in the chuck of the drill scratching
the hinge). Example 7.0 Remove setting
blocks to check swing of door and make
adjustments as necessary.
6) Installing handle (#2):
Example 8.0
A)
Take the two stud head mounting
screws and sleeve one metal and one
clear washer on each screw. Next, insert
the clear grommets into the holes in the
door. From the outside of the door, push
the thread of the screws through the
grommets in the holes in the glass. On the
inside of the door, sleeve a clear and then
a metal washer onto the screws.
Example 4.0 Example 5.0
Example 6.0
Example 7.0