
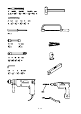
Installation Guide


7 - ck
24. TightenthepartB03completely(g.10).
25. TightenthepartB02oftheuppertreadcompletely(g.2).
26. Checkoncemoretheverticalpositionoftherailingbalusters(C03)and,ifnecessary,correctit,byrepeatingthe
previous operations.
27. Settherstbaluster(C03-H1190mm-46 ⁄
”
)togetherwiththereinforcingpart(F07).Cutonelongbaluster
(C03-H1190mm-46⁄
”
)toobtainthesamesizeasallothersyouassembledpreviously.
28. Fixintotheoorinrelationtotherstbaluster(C03),thepartF01,bydrillingwith8 mm (⁄
”
)diameter bit. Use
thepartsC58,B12andB02(g.1).
29. Findthehandrailpiecemarkedwithletter“M”(A22)andtheonewithletter“R”(A23)whichwillbeusedforthe
railingofthelanding(E03)(g.11).
30.Starttomodelthehandrailpieces(A22)markedwith“M”,inordertogiveitthehandrialstaircase’sshapemost
alike(g.1).
31.Beginningfromthebaluster(C03)onthelanding(E03),starttoxthehandrail(A22),thatyouhavealready
slightlybentinthepreviousoperation.UsethepartsC64.
32. Connectallotherhandrailpieces(A22),byscrewing,glueingandshapingthem.UsethepartsB33,D72andthe
glue(X01).
33. Whenyoureachtherstbaluster(C03)atthebottomofthestair,cuttheexcesspieceofthehandrailwitha
hacksaw.
34. Completethehandrail(A22)byassemblingthepartA37.UsethepartsC64andtheglue(X01)(g.1).
35. Fitallremainingrailingbalustersintothetreads(L02),tightenthepartB02andxtothehandrail(A22),paying
attentiontotheverticalposition(forthestairswithadiameterlargerthan140cm(55⁄
”
),wesuggestthatyou
rstassembletheshorterbalusters)(g.12).
36. Checkagaintheregularshapeofthehandrail(A22)and,ifnecessary,correctitwitharubberhammer.
37. CompletetherailingassemblybyttingthepartsB82intothelowerpartofthebalusters(C03)(g.1).
Assembly of the Balustrade
38. Screwthebaluster(C04)intothepartG01thatsticksoutfromthelanding(E03)(g.10).
39. AssemblethepartsF01intotheholesofthelanding(E03),usingthepartsB07,B06,B23(g.1).
40.Positiontheshorterbalusters(H. 935 mm - 36 ⁄
”
)
andtightenthepartB02(g.1).
41.FixthepartA36intothebaluster(C04),byusingthepartB02(g.1).
42. Fixthehandrail(A23)markedwiththeletter“R”,usingthepartsC64(g.1).
43. Incasetherewerewallsaroundthestairanddependingontheirposition,itcouldbenecessarytosetoneor
twomorebalusters(H. 935 mm - 36 ⁄
”
)
(g.12).
44. Inthatcaseitisnecessarytoconsidereitherthedistancebetweenallotherbalusters,orotherwisethe
distancefromthewall.Forthexingitissuggestedtodrillthelanding(E03)with9mm(⁄
”
)diameter bit and
tousethexingpartsF01,B02,B07,B06,B23.Whereasforthexingintotheooritissuggestedtodrillwith
the12mm(⁄
”
)drillbitandtousethepartsF01,B02,B87(g.13).
Final Assembly
45. Inordertotightenthestaircaseattheintermediatepoints,youmustxintothewallthepartsF09andconnect
themtothebalusters(C03)byusingthepartF08.Drillthewallwithadrillbit8andusethepartsC50,C49,
C58,B12(g.14).
46. Stickthepanels(H01)tothetreads(L02)usingthepartB96(g.1).
47. Stickthepanels(H03,H04),tothelanding(E03)usingthepartB96(g.1).
www.fontanot.it