Arlo Pro Wire-Free HD Security Camera System User Manual NETGEAR, Inc.
Support For product updates and web support, visit http://www.arlo.com/en-us/support/. Trademarks © NETGEAR, Inc., NETGEAR and the NETGEAR Logo are trademarks of NETGEAR, Inc. Any non‑NETGEAR trademarks are used for reference purposes only. Compliance For the current EU Declaration of Conformity, visit http://support.netgear.com/app/answers/detail/a_id/11621/. For regulatory compliance information, visit http://www.netgear.com/about/regulatory/.
Contents 1. Set Up Your System 6 Insert the Battery Into Your Camera ��������������������������������������������������������������������������������������������������������������6 Get the Arlo App.....................................................................................................................................................................................
Safely Eject and Remove a USB Device ���������������������������������������������������������������������������������������������������28 View Video Clips on a USB Device �����������������������������������������������������������������������������������������������������������������������29 Change the USB Device Overwrite Setting ��������������������������������������������������������������������������������������30 Format a USB Storage Device �������������������������������������������������������������
Audio Settings.........................................................................................................................................................................................
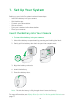
1. Set Up Your System Setting up your Arlo Pro system involves these steps: • • • • • • Insert the battery into your camera. Get the Arlo app. Connect your base station. Get an account. Sync your cameras to the base station. Place your cameras. Insert the Battery Into Your Camera ¾¾ To insert the battery into your camera: 1. Unlock the battery compartment by pressing and holding the latch. 2. Gently pull the battery door back to open the compartment. 3. Align the battery contacts. 4.
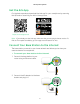
Set Up Your System Get the Arlo App For the best experience, download the Arlo app for your smartphone by scanning this QR code or searching for Arlo in the app store. https://arlo.netgear.com Note: If you already use the Arlo app, make sure that you are using the latest version. To find out if an update is available, go to the app store and search for Arlo. Connect Your Base Station to the Internet The base station connects to your home network and allows you to view your camera streams from anywhere.
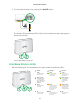
Set Up Your System 3. Turn the base station on by pressing the On/Off button. The Power LED and Internet LED on the front of the base station light green in about two minutes. Your base station is set up. Arlo Base Station LEDs See the following list for explanations for green, amber, and blinking LEDs: Power Internet Camera Green The base station is powered on. Green The base station is connected to the Internet. Green Cameras are connected to the base station.
Set Up Your System Arlo Pro Camera LED The LED on the camera lights when the camera is powered on. The LED changes color and blinks depending on the battery charge and to indicate the status of activities such as syncing the camera and updating the camera firmware. See the following table for explanations for the Camera LED. Camera LED Color and Action Meaning Solid blue The camera is connected to the Quick Charge 9v power adapter and is fully charged.
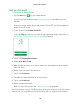
Set Up Your System Get an Account ¾¾ To set up an Arlo account: 1. Tap the Arlo icon on your mobile device. If you are using a computer, enter arlo.netgear.com in the address bar of a browser. If you are using a mobile device that supports Touch ID®, you are prompted to enable Touch ID or skip. 2. To use Touch ID, tap Enable Touch ID. If you tap Skip, you can turn on the Arlo app fingerprint ID login later. See Turn the Arlo App Fingerprint ID Login On and Off on page 55. 3.
Set Up Your System Sync Your Cameras With the Base Station ¾¾ To sync your cameras: 1. Bring the camera within one to three feet (30 –100 centimeters) of the base station. Note: Cameras must be synced one at a time. 2. Press the Sync button on the top of the base station for about two seconds and then release the button. 3. Wait for the Sync status LED to blink green. 4. Press the Sync button on top of the camera for about two seconds and then release the button.
Set Up Your System The LED on the camera LED lights blue and blinks rapidly to confirm syncing. The camera is ready for viewing. The LED lights amber and blinks rapidly for 10 seconds if the sync is not successful. You must repeat the sync process. 5. Repeat for each camera. Arlo Pro Firmware Updates During initial setup, when you add the base station to your Arlo account, the Arlo Pro system checks for firmware updates.
Set Up Your System ¾¾ To mount your camera to the wall: 1. Fasten the mounting screw into the wall, and hang the magnetic mount from the screw. 2. If you’re mounting the camera to drywall, be sure to use the plastic drywall anchors that are provided. Note: You can also use double-sided tape instead of screws. Position Your Cameras Arlo’s Position mode allows you to see what your camera sees.
Set Up Your System When positioning your Arlo camera, keep these tips in mind: • Keep active locations in the camera’s field of view. Your Arlo camera provides a 130-degree viewing angle. Position your camera so that the space that you want to monitor is within the camera’s field of view. • Aim with the cloud. Use Arlo’s Position mode to send video to the cloud as quickly as possible.
Set Up Your System Position Mode Position mode is available only when the camera is not streaming, recording motion, or in Motion Detection mode. ¾¾ To place your camera in Position mode: 1. Tap the Arlo icon on your mobile device. If you are using a computer, enter arlo.netgear.com in the address bar of a browser. If you are using a mobile device that supports Touch ID, you are prompted to enable Touch ID or skip. 2. Tap or click Settings. The Settings page displays. 3.
Set Up Your System 3. Connect the other end of the adapter cable to the camera. 4. Plug the power adapter into an electrical outlet. The camera LED lights solid blue when the camera battery is fully charged. Note: You can buy spare Arlo Pro rechargeable batteries and charge them in the Arlo Charging Station (sold separately). For uninterrupted Arlo Pro camera use, we recommend that you keep a fully charged spare battery on hand.
Set Up Your System The settings for the camera display. 6. Scroll down and Tap or click Remove Device. The camera is removed from your account. 7. Log out of the Arlo app. 8. Sync the camera to the base station.
2. View Your Content Videos recorded by your camera are stored in a library. You can view your recordings and snapshots, mark them as favorites, and search using the filter. View the Devices Page When you launch the Arlo app, the Devices page displays. Camera name Camera icons Camera feed New recordings Select devices Settings Snapshot and video library Live Feed Icon Detection modes Tap or click Live to display Camera Icon Display is based on the mode and camera setup Pause.
View Your Content View Camera Feeds You can view your camera feeds at any time. ¾¾ To view camera feeds: 1. Tap the Arlo icon on your mobile device. If you are using a computer, enter arlo.netgear.com in the address bar of a browser. The Devices page displays. The icons above each camera feed depend on the rules in the currently selected mode and how the camera is connected. For information about these icons, see View the Devices page on page 18. 2.
View Your Content Record Clips From Live Video ¾¾ To record clips from live video: 1. Tap the Arlo icon on your mobile device. If you are using a computer, enter arlo.netgear.com in the address bar of a browser. The Devices page displays. 2. Tap or click Live in the camera feed image. The camera feed icons display at the bottom of the camera feed image. 3. Tap or click Record Video . This icon turns red to indicate that you are recording the live feed. 4.
View Your Content Talk and Listen ¾¾ To talk and listen: 1. Tap the Arlo icon on your mobile device. If you are using a computer, enter arlo.netgear.com in the address bar of a browser. The Devices page displays. 2. Tap or click Live in the camera feed image. The camera feed icons display at the bottom of the camera feed image. 3. Tap or click Microphone . A microphone button displays. 4. Wait for the button to turn bright green. This can take up to five seconds.
View Your Content 3. Under System, Tap or click Device Order. A list of devices displays in the order that they display on the Devices page. 4. If you are using a smartphone or tablet, tap Edit at the top of the page. A list icon displays. 5. Tap and hold or right-click the list icon and drag the camera to the correct position on the list. 6. Tap or click Done. Your settings are saved. Zoom a Camera Image ¾¾ To zoom a camera image: 1. Tap the Arlo icon on your mobile device.
View Your Content Invert a Camera Feed You can invert the video feed image. ¾¾ To invert the video display: 1. Tap the Arlo icon on your mobile device. If you are using a computer, enter arlo.netgear.com in the address bar of a browser. The Devices page displays. 2. Tap or click Settings > My Devices. A list of devices displays. 3. Tap or click the camera. The camera settings display. 4. Tap or click Video Settings. The Video Settings page displays. 5. Tap or click Rotate Image. 6.
View Your Content View Recordings and Snapshots Your Arlo Pro camera stores recordings and snapshots in the library. You can use the filter and the calender to find and view specific recordings. Use the Library You can use the library to find and view recordings based on the date. ¾¾ To use the library: 1. Tap the Arlo icon on your mobile device. If you are using a computer, enter arlo.netgear.com in the address bar of a browser. The Devices page displays. 2. Tap or click Library.
View Your Content Use the Filter You can use the filter to find and view recordings based on criteria that you select. ¾¾ To use the filter to view your library: 1. Tap the Arlo icon on your mobile device. If you are using a computer, enter arlo.netgear.com in the address bar of a browser. The Devices page displays. 2. Tap or click Library. The Library page displays. 3. Tap or click the Filter icon in the upper left corner of the page. The filter page displays. 4.
View Your Content 3. Tap or click the Filter icon in the upper left corner of the page. The Filter page displays. 4. Tap or click Reset at the bottom of the page. Filtering is turned off. The Filter icon filtering is not in use. becomes an outline to show that Share and Download Clips ¾¾ To share and download clips from the library: 1. Tap the Arlo icon on your mobile device. If you are using a computer, enter arlo.netgear.com in the address bar of a browser. The Devices page displays. 2.
3. USB Device Storage With Arlo Pro All recordings are stored in the cloud, but you can optionally connect a USB storage device to the Arlo Pro base station and use the USB storage device as a backup location to store recordings. Simply connect a USB storage device and the base station automatically enables all the settings for you. The USB storage device cannot be used on its own as a substitute for cloud recording.
USB Device Storage With Arlo Pro View the USB Storage Device Status The Arlo app notifies you if the USB storage device is getting full or if the USB storage device is not the correct format. You can also use the Arlo app to view the USB storage device status. ¾¾ To view the status of a USB storage device connected to the base station: 1. Tap the Arlo icon on your mobile device. If you are using a computer, enter arlo.netgear.com in the address bar of a browser. The Devices page displays. 2.
USB Device Storage With Arlo Pro ¾¾ To safely eject and remove a USB storage device: 1. Tap the Arlo icon on your mobile device. If you are using a computer, enter arlo.netgear.com in the address bar of a browser. The Devices page displays. 2. Tap or click Settings > My Devices. A list of cameras displays. 3. Tap or click the camera. The base station and a list of cameras displays. 4. Tap or click the base station. The Device Settings page displays. 5. Tap or click Local Storage.
USB Device Storage With Arlo Pro Windows or Mac computer to view the clips. ¾¾ To view video clips on a USB storage device: 1. Safely eject the USB storage device. For more information, see Safely Eject and Remove a USB Device on page 28. Cloud recording is still enabled. If another USB storage device is connected to your Arlo Pro base station and USB recording is turned on, recording is automatically enabled on that USB storage device. 2.
USB Device Storage With Arlo Pro The Device Settings page displays. 4. Tap or click Local Storage. The Local Storage page displays. 5. Tap or click Automatic Overwrite. The setting changes. Format a USB Storage Device The Arlo app displays a pop-up message to let you know if it is necessary to format the USB storage device. The Arlo Pro base station can format the USB storage device. ¾¾ To format a USB storage device: 1.
USB Device Storage With Arlo Pro If you see the message Requires Formatting next to USB Device 1 or USB Device 2, the USB storage device is not in the correct format (FAT32). You must format the USB storage device before you can use it for local storage. Warning: Formatting the USB storage device erases all data from the device. If you want to keep any files that are on the USB storage device, copy those files to another location before you format the USB storage device. 7.
USB Device Storage With Arlo Pro 6. If the message next to the USB storage device is Requires Formatting, follow the formatting procedure. For more information about formatting, see Format a USB Storage Device on page 31. 7. Tap or click USB Device Recording. USB device recording toggles off and on. Stop Recording Onto a USB Storage Device ¾¾ To stop recording onto a USB storage device: 1. Tap the Arlo icon on your mobile device. If you are using a computer, enter arlo.netgear.
4. Personalize Your System You can customize Arlo Pro settings such as the camera name to make it easier to manage. You can grant access to friends and set up cloud recording. Name Your Camera You can easily customize your Arlo Pro camera by renaming it. ¾¾ To rename your Arlo Pro camera: 1. Tap the Arlo icon on your mobile device. If you are using a computer, enter arlo.netgear.com in the address bar of a browser. The Devices page displays. 2. Tap or click Settings > My Devices.
Personalize Your System Change Your Password and User Name ¾¾ To change your password and user name: 1. Tap the Arlo icon on your mobile device. If you are using a computer, enter arlo.netgear.com in the address bar of a browser. The Devices page displays. 2. Tap or click Settings. The Settings page displays. 3. Under Account, Tap or click Profile. The Profile page displays. 4. If you are using a smartphone, tap Edit at the top of the page. The Profile page displays. 5.
Personalize Your System 3. Under Account, Tap or click Profile. The Profile page displays. 4. Tap Auto Login. Your settings are saved. Grant Access to Friends You can add friends to your Arlo account. Friends can view live streams from your cameras; record video clips; view, share, mark as favorite, and delete clips from your library; and take snapshots. Friends are granted limited access to some of the settings and features of your Arlo account.
Personalize Your System Edit a Friend’s Access Privileges ¾¾ To edit a friend’s access privileges: 1. Tap the Arlo icon on your mobile device. If you are using a computer, enter arlo.netgear.com in the address bar of a browser. The Devices page displays. 2. Tap or click Settings. 3. Under Account, Tap or click Grant Access. A list of your friends displays with the status of their accounts. 4. Tap or click the friend, and Tap or click Edit . The Edit page displays. 5.
Personalize Your System 4. Select the friend, and Tap or click Edit The Edit page displays. 5. Tap or click Delete Friend. 6. Tap or click Yes. The friend is deleted. 38 .
5. Modes, Rules, and Smart Alerts Modes and rules let you tell your Arlo system what to do in different situations. For example, you can set your Arlo system to record a 30-second video when the motion sensor is activated on a specific camera and alert you via email. Modes Modes let you tell your Arlo cameras to respond differently at different times. For example, you probably don’t want to receive an alert about motion in the living room while you’re doing yoga in the living room.
Modes, Rules, and Smart Alerts Rules Each mode consists of one or more rules that provide detailed instructions for your Arlo system. For each mode, you can set the following options: • Trigger device. The trigger device is the camera that detects motion or sound. • Trigger. Triggers can be motion detection, sound detection on Arlo Pro WireFree cameras. You can adjust the camera’s sensitivity to motion and sound to minimize false alarms. • Devices.
Modes, Rules, and Smart Alerts If you are using a computer, enter arlo.netgear.com in the address bar of a browser. The Devices page displays. 2. Tap or click Mode. A list of cameras displays. 3. Tap or click the Arlo Pro camera. The Mode page displays. 4. Tap or click a mode to activate it. The mode that you selected turns on immediately. The mode stays active until you change it.
Modes, Rules, and Smart Alerts Change Motion Sensitivity You can easily change the sensitivity level for Arlo Pro cameras. ¾¾ To change the sensitivity level for a camera: 1. Tap the Arlo icon on your mobile device. If you are using a computer, enter arlo.netgear.com in the address bar of a browser. The Devices page displays. 2. Tap or click Mode. A list of cameras displays. 3. Tap or click the Arlo Pro camera. The Mode page displays. 4. Tap or click Edit next to the mode.
Modes, Rules, and Smart Alerts Change Audio Sensitivity ¾¾ To change audio sensitivity for a camera: 1. Tap the Arlo icon on your mobile device. If you are using a computer, enter arlo.netgear.com in the address bar of a browser. The Devices page displays. 2. Tap or click Mode. A list of cameras displays. 3. Tap or click the Arlo Pro camera. A list of modes displays. 4. Tap or click Edit next to Armed. The Edit Rule page displays. 5. Tap or click Edit next to the rule.
Modes, Rules, and Smart Alerts Manage Alerts Arlo can push notifications to your smartphone, send you email alerts, or do both. To receive Arlo notifications on your phone, you must get the Arlo app. Note: If you log out of the Arlo app on your smartphone or mobile device, you will stop receiving push notifications. ¾¾ To change the alert settings for a camera: 1. Tap the Arlo icon on your mobile device. If you are using a computer, enter arlo.netgear.com in the address bar of a browser.
Modes, Rules, and Smart Alerts Set Up Geofencing Geofencing is a virtual fence that helps you discover when something or someone enters or exits a predefined zone. You can use Arlo geofencing to arm, disarm, or resume schedule modes, when your mobile device is in zone or out of zone. To set up geofencing, you must use your mobile device and you must allow the Arlo app to use your location. Configure Your Mobile Device ¾¾ To configure your mobile device for more accurate geofencing: 1.
Modes, Rules, and Smart Alerts 7. To change your radius setting, tap the Radius icon, select a radius size, and tap Next. Radius size options are Small, Medium, or Large (approximately 150 meters, 250 meters, and 500 meters, respectively). 8. Enter a name for your location and tap Next. The Away Mode page displays a list of available modes. The away mode is the detection mode used by the camera when you are away from the location that you specified. 9. Select an away mode and tap Next.
Modes, Rules, and Smart Alerts Enable or Disable Geofencing for Friends’ Mobile Devices ¾¾ To enable or disable geofencing for your friends’ mobile devices: 1. Tap the Arlo icon on your mobile device. The Devices page displays. 2. Tap Mode. A list of cameras displays. 3. Tap or click the camera. A list of available modes displays. 4. Tap the Edit icon. next to Geofencing The Geofencing editing page displays. 5. Tap Enabled Devices.
Modes, Rules, and Smart Alerts To improve geofencing accuracy, ensure that your mobile device meets these conditions: • WiFi is turned on. • GPS or location services are turned on. Geofencing First In, Last Out Arlo cameras use the first in, last out principal within the geofencing feature. First in, last out allows you to come and go without worrying about arming and disarming your Arlo cameras.
4. Tap or click Schedule . The Schedule mode is selected. 5. Tap or click Edit next to Schedule. 6. Tap or click + Add. 7. Set the days and times and then Tap or click Save. The schedule is saved. Edit a Schedule ¾¾ To edit a schedule: 1. Tap the Arlo icon on your mobile device. If you are using a computer, enter arlo.netgear.com in the address bar of a browser. The Devices page displays.
2. Tap or click Mode. A list of cameras displays. 3. Tap or click the Arlo Pro camera. A list of available modes displays. 4. Tap or click Schedule 5. Tap or click Edit . next to Schedule. 6. Tap or click the schedule. 7. Change the start and stop times and Tap or click Save. The schedule is saved.
Add a Mode You can add new modes to tell your Arlo Pro camera what to do in certain situations. For example, you can set your Arlo Pro camera to record videos when the motion sensor is activated and to alert you with an email message. You can use the rules you create within modes and schedules to customize your Arlo Pro camera. With Arlo Pro cameras, you can create one rule for each mode. ¾¾ To add a mode for a camera: 1. Tap the Arlo icon on your mobile device. If you are using a computer, enter arlo.
9. Set the audio sensitivity and Tap or click Next. The Devices page displays. 10. When prompted, specify what you want the camera to do when motion or audio is detected and Tap or click Next. You can select Record video, Take snapshot, or Do nothing. 11. When prompted, specify if you want to be notified with alerts when motion or audio is detected. If you are using a computer web browser, you can also specify the recording time setting. 12. Tap or click Next. The Summary page displays. 13.
Modes, Rules, and Smart Alerts 4. Tap or click > next to the mode. 5. Under Rules, tap or click Edit next to the camera. 6. Select the Turn Siren ON check box. 7. Tap or click > next to Sound Alarm. 8. Set the sliders for Siren Duration and Siren Loudness. 9. Tap < Edit Rule or click Back. 10. Tap Done or click Save. Note: Note: This rule is not active until you activate the mode to which you added the siren trigger.
Modes, Rules, and Smart Alerts 6. Tap or click an Arlo-Pro camera to select it as the trigger device for a rule and then tap or click Next. 7. If you want the camera to perform an action when motion or audio is detected, tap or click Next. Otherwise, clear the check box for the trigger that you do not want to use. 8. If you selected motion as a trigger, set the Motion Sensitivity using the slider and tap or click Next. 9.
6. Settings You can customize the Arlo Pro settings. Turn the Arlo App Fingerprint ID Login On and Off The Arlo app supports Touch ID fingerprint identity sensors. If you are using a mobile device with this feature, you can turn the Arlo app Touch ID login on and off. ¾¾ To turn the Arlo app Touch ID login on and off: 1. Tap the Arlo icon on your mobile device. The Devices page displays. 2. Tap Settings. The Settings page displays. 3. Tap Profile. The Profile page displays. 4.
Settings 4. Tap or click Time Zone. The Time Zone page displays. 5. Tap or click a time zone. 6. Tap or click Done. If you are using a mobile device, your settings are saved. 7. If you are using a computer, click Save. Your settings are saved. Camera Settings Turn Off the Camera LED The LED on the Arlo Pro camera lights in different colors. You can turn off this LED. ¾¾ To turn off the LED on the Arlo Pro camera: 1. Tap the Arlo icon on your mobile device. If you are using a computer, enter arlo.
Settings 5. If you are using a computer, click Save. Your settings are saved. Change the Video Resolution The default video resolution is 720P. You can change this setting to a higher or lower resolution. Decreasing the resolution of Arlo Pro videos reduces the required WiFi bandwidth. ¾¾ To change the video resolution: 1. Tap the Arlo icon on your mobile device. If you are using a computer, enter arlo.netgear.com in the address bar of a browser. The Devices page displays. 2.
Settings Turn Night Vision On and Off When night vision is enabled, the camera automatically turns on infrared (IR) LEDs to record in low light conditions. We recommend that you turn off night vision if the Arlo Pro camera is facing reflective surfaces, such as windows. ¾¾ To turn night vision on and off: 1. Tap the Arlo icon on your mobile device. If you are using a computer, enter arlo.netgear.com in the address bar of a browser. The Devices page displays. 2. Tap or click Settings > My Devices.
Settings 3. Tap or click the camera. The camera settings display. 4. If you are using the Arlo App on a mobile device, tap Audio Settings. The Audio Settings page displays. 5. Tap or click Microphone. Your settings are saved. Change the Speaker Settings You can turn the speaker off and on and you can control the volume on your camera settings. ¾¾ To change the speaker settings: 1. Tap the Arlo icon on your mobile device. If you are using a computer, enter arlo.netgear.
Settings Base Station Settings You can view or change base station settings. Change the Base Station Name When you set up your Arlo system, you entered a name for the base station. You can change this name. ¾¾ To change the base station name: 1. Tap the Arlo icon on your mobile device. If you are using a computer, enter arlo.netgear.com in the address bar of a browser. The Devices page displays. 2. Tap or click Settings > My Devices. A list of devices including the base station cameras displays. 3.
Settings A list of devices including the base station cameras displays. 3. Tap or click the base station. The base station settings page display. 4. Tap or click Flicker Adjustment. The Flicker Adjustment page displays. 5. Tap or click a setting. 6. Tap or click Save. Your settings are saved.. View Base Station Device Information ¾¾ To view base station device information: 1. Tap the Arlo icon on your mobile device. If you are using a computer, enter arlo.netgear.
Settings The Devices page displays. 2. Tap or click Settings > My Devices. A list of devices including the base station cameras displays. 3. Tap or click the base station. The base station settings page display. 4. Tap or click Restart. The base station restarts. Remove the Base Station From Your Account ¾¾ To remove the base station from your account: 1. Tap the Arlo icon on your mobile device. If you are using a computer, enter arlo.netgear.com in the address bar of a browser.
Settings The base station siren has three settings, Loud, Very Loud, and Extremely Loud. ¾¾ To select the siren volume: 1. Tap the Arlo icon on your mobile device. If you are using a computer, enter arlo.netgear.com in the address bar of a browser. The Devices page displays. 2. Tap or click Settings > My Devices. A list of devices including the base station cameras displays. 3. Tap or click the base station. The base station settings page display. 4. Tap or click the Siren icon.
Settings Turn Off the Siren To turn off the siren when near the base station, press the button on the top of the base station. ¾¾ To turn off the Arlo Pro base station siren remotely: 1. Tap the Arlo icon on your mobile device. If you are using a computer, enter arlo.netgear.com in the address bar of a browser. The Devices page displays. 2. Tap or click Turn Siren OFF. The siren stops. View Device Information ¾¾ To view device information: 1. Tap the Arlo icon on your mobile device.
Settings 4. Scroll down to the Version heading and view the firmware version, hardware version, and the serial number. Restart the Camera ¾¾ To restart the camera: 1. Tap the Arlo icon on your mobile device. If you are using a computer, enter arlo.netgear.com in the address bar of a browser. The Devices page displays. 2. Tap or click Settings > My Devices. A list of devices displays. 3. Tap or click the camera. The camera settings display. 4. Scroll down and tap or click Restart.
7. Manage Your Subscription Plan Every Arlo camera includes free Basic service that offers basic features and functionality. When activating your camera, you can choose between the Basic, Premier, and Elite service plans. Subscription Plans Upgrading to a paid service level gives you the ability to increase the uses of your camera to suit your specific needs. Depending on your service level, you can add cameras or cloud storage and share recordings with friends and family.
Manage Your Subscription Plan 4. Tap or click Upgrade Now. The Subscription Plan page displays retail and business options. 5. To change to a Premier or Elite plan, tap or click SELECT under the plan. 6. To change to an Advanced, Professional, or Enterprise plan, select For Business and then tap or click SELECT under the plan 7. Follow the onscreen instructions to change your subscription. After your payment is processed, your service level information is updated on the Subscription page.
8. FAQs and Troubleshooting Battery FAQs How can I recharge the Arlo Pro battery? Your Arlo Pro battery is fully charged when it leaves the factory. You can use the power adapter cable to plug the camera into an electrical outlet to charge the battery. You can also use the Arlo Pro Charging Station (sold separatey) to charge the battery. For uninterrupted Arlo Pro camera use, you can purchase a spare battery and the charging station.
FAQs and Troubleshooting What is the battery life for NETGEAR Arlo Pro rechargeable batteries? The NETGEAR Arlo Pro camera rechargeable battery life is 4 to 6 months with normal usage and can be extended for optimal usage if you use key settings and follow certain tips. The Arlo Pro cameras offer the best battery life when set up to record when they detect motion.
FAQs and Troubleshooting Night Mode • Best video. 600 kbps @ 15 fps • Optimized. 300 kbps @15 fps • Best battery life. 200 kbps @15 fps Depending on the available bandwidth and how much of the buffer is full, the Arlo Pro Wire-Free system either increases the bit rate or decreases the bit rate and frame rate. For information about setting the resolution for your camera, see Change the Video Resolution on page 57.
Low Battery Recharge or change the battery in the Arlo Pro camera to make sure that the battery level is no less than two bars. A low battery can cause the camera to stream intermittently. Not Receiving Push Notifications You must be logged in to the Arlo app to receive Arlo alerts on your smartphone or mobile device. Arlo registers your device for push notification when you log in. If you used the logout option instead of simply exiting the app, you must log back in to the app.
Check the Arlo App Settings on an iOS Device Make sure that you allow the Arlo app to receive push notifications. The Arlo app push notifications can be disabled on iOS and Android devices. ¾¾ To allow Arlo push notifications on iOS devices: 1. Tap the Settings icon for your iOS device. 2. Tap Notifications > Arlo. The Arlo notification settings display. 3. Make sure that Allow Notification is selected. 4. If you made changes, tap Save. Your settings are saved.
Verify That the Arlo Base Station Is Online To determine whether your base station is online, check the Internet LED on the front of the base station: • If the Internet LED is solid green, the base station is connected to the Internet. • If the Internet LED is amber, the base station is not connected to the Internet.
FAQs and Troubleshooting 4. Power cycle your base station. Unplug the power adapter from the outlet, wait one minute, and reconnect the power adapter to the outlet. The base station takes one to two minutes to start. When the Power LED and Internet LED light solid green, your base station is connected to the Internet. If the Internet LED is amber, continue troubleshooting. 5. Check your router’s DHCP settings and client list.
• Internet connection type (DSL, cable, and so on) and speed (Arlo requires at least 1 Mbps upstream) • Internet router model • List of other devices connected directly to your router • The last time and place that your base station successfully connected to the Internet Signal Strength If an Arlo Pro Wire-Free camera’s signal to the base station is weak, recording delays might occur when motion is detected.
Reset the Arlo Base Station to Factory Settings Performing a factory reset returns your base station values to the default settings. It also removes the serial number from your Arlo account. ¾¾ To perform a factory reset on your base station: 1. Use a straightened paper clip to press and hold the Reset button on the back of the base station for about 10 seconds. When the base station reset completes, the LEDs on the front of the base station blink amber.
9. Rechargeable Battery Safety Safety Rules for Arlo Pro Rechargeable Batteries Arlo Pro Wire-Free HD Security Cameras use rechargeable batteries and can go wherever you need them. But ALL batteries can EXPLODE, CATCH FIRE, and CAUSE BURNS if disassembled, punctured, cut, crushed, short-circuited, incinerated, or exposed to water, fire, or high temperatures, so you need to handle them with care.
Rechargeable Battery Safety Safety Rules for Arlo Pro Charging Station The Arlo Pro Charging Station is sold separately. You can use the charging station to charge one or two Arlo Pro rechargeable batteries. For more information about the Arlo Pro Charging Station, see the instructions that are included in the Arlo Pro Charging Station package.