
User Manual

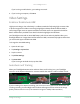

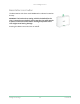
Table Of Contents
- 1. Get to Know Your Pro 3 Floodlight Camera
- 2. Get Started
- Setup: Use the Arlo app
- Prep: Insert the battery
- Prep: Check the LED
- Prep: Find a good location for your floodlight
- Prep: What you need for wall mounting
- Wall-mount your floodlight
- Prep: Install the ceiling adapter (sold separately)
- Check your floodlight’s field of view
- Test motion detection
- Arm your Floodlight Camera
- Reposition your floodlight after mounting
- HEVC 2K playback-supported devices
- 3. WiFi Setup and Connections
- WiFi connection options for your floodlight
- Tips for optimal WiFi performance
- Connect your mobile device to a 2.4 GHz WiFi network during setup
- Connect an optional Arlo SmartHub
- Connect an optional Arlo Base Station with Siren
- Move your floodlight’s WiFi connection to a SmartHub or base station
- Move your floodlight’s WiFi connection to a direct router connection
- 4. Use Your Floodlight Camera
- Manually turn your floodlight on and off
- View your camera feeds
- Record clips from live video
- Take a snapshot from live video
- CVR with an optional Arlo SmartHub or base station
- Customize your camera feed image
- Motion detection activity zones
- Talk and Listen
- Turn the siren on and off manually
- View recordings and snapshots
- Download recordings
- 5. Modes, Rules, and Alerts
- Modes
- Select a mode
- Mute Notifications
- Rules for modes
- Change motion sensitivity
- Change the light duration for a rule that doesn’t record
- Automatically stop recording when motion stops
- Change audio sensitivity
- Use a rule to turn on the floodlight
- Use a rule to activate the floodlight’s siren
- Add a rule with an optional base station siren trigger
- Manage alerts
- Schedule when your floodlight is armed
- Set up Arlo Geofencing
- Geofencing with multiple mobile devices
- 6. Change Your Settings
- Two-step verification
- Use face or fingerprint authentication
- Customize your profile
- Change your Arlo password
- Reset a forgotten password
- Grant access to friends
- Change the time zone
- Change the light settings
- Camera settings
- Video Settings
- Audio settings
- Adjust the flicker setting
- View device information
- Remove a device from your account
- Restart the floodlight from the Arlo app
- Optional SmartHub and Base Station settings
- 7. SmartHub SD Card Storage
- 8. SmartHub or Base Station USB Storage
- 9. Arlo Connect
- 10. Arlo XL Rechargeable Battery
- 11. Troubleshooting

52Change Your Settings
Pro 3 Floodlight Camera
User Manual
3. Under ACCOUNT, tap Grant Access.
4. Select the friend, and tap Edit
.
5. Tap Delete Friend.
6. Tap Yes.
Change the time zone
1. Open the Arlo app.
2. Tap Settings > My Devices.
3. Tap the oodlight or your optional Arlo SmartHub or base station, if you use one.
4. Tap Time Zone.
5. Tap a time zone.
If you’re using a mobile device, your settings are saved.
6. If you’re using a computer, click Save.
Change the light settings
You can use the Arlo app to adjust the dusk to dawn sensor, oodlight brightness, behavior,
and duration settings.
Adjust your oodlight’s dusk to dawn sensor
Your oodlight’s ambient light sensor automatically measures the amount of light in its
surroundings and determines if your light should turn on when motion or audio is detected.
You can adjust the setting to decide how bright or dark the outside environment must be
for your light to activate when motion or audio is detected. By default, if it’s still bright
outside, your light doesn’t turn on when motion or sound is detected, but you still receive
a notication. This feature can preserve power during the day, when the oodlight is not
needed.
Note: You can manually activate your oodlight no matter which Dusk to Dawn setting you
use.
To adjust the Dusk to Dawn Sensor setting:
1. Open the Arlo app.