
User Manual
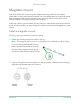
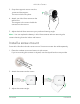
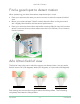
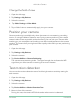
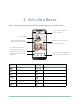
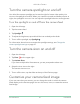
Table Of Contents
- 1. Get to Know Arlo Ultra
- 2. Get Started
- Connect your SmartHub to the Internet
- SmartHub LED
- Use the Arlo app for installation and setup
- Insert the battery into your camera
- Tips for optimal WiFi performance
- Magnetic mount
- Install a screw mount
- Find a good spot to detect motion
- Arlo Ultra’s field of view
- Position your camera
- Test motion detection
- Arm your camera to detect motion
- 3. Arlo Ultra Basics
- View your camera feeds
- Look back video
- Record clips from live video
- Take a snapshot from live video
- Talk and Listen
- Turn the camera spotlight on and off
- Turn the camera siren on and off
- Customize your camera feed image
- Motion detection activity zones
- Cloud recordings
- View recordings and snapshots
- Download recordings
- Charge your camera battery
- Replace a camera battery
- 4. Image Quality Features
- 5. Modes, Rules, and Alerts
- 6. Change Your Settings
- 7. Use SD Card Storage
- 8. FAQs and Troubleshooting
- 9. Rechargeable Battery Safety

13Get Started
Arlo Ultra Camera
User Manual
Find a good spot to detect motion
When positioning your Arlo Ultra camera, keep these tips in mind:
• Place your camera so the area you want to monitor is within the camera’s eld of
view.
• Mount your camera at least 7 feet (2 meters) above the oor or the ground and
aim it slightly downward for the best sensor performance.
• Place your camera so that side-to-side trafc crosses its eld of view. Arlo’s motion
sensor is most sensitive to side-to-side motion that’s 5 to 20 feet (1.5 to 6 meters)
from the camera.
Arlo Ultra’s eld of view
The eld of view is the area in which the camera can detect motion. You can set the
eld of view to Full (120 degrees), Wide (155 degrees), or Super wide (180 degrees).
Each setting auto corrects the image to reduce the sheye effect. The Full setting
completely eliminates the sheye effect.
120°
155°
180°