
User Manual
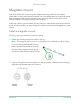
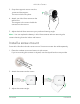
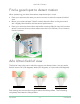
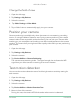
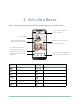
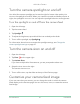
Table Of Contents
- 1. Get to Know Arlo Ultra
- 2. Get Started
- Connect your SmartHub to the Internet
- SmartHub LED
- Use the Arlo app for installation and setup
- Insert the battery into your camera
- Tips for optimal WiFi performance
- Magnetic mount
- Install a screw mount
- Find a good spot to detect motion
- Arlo Ultra’s field of view
- Position your camera
- Test motion detection
- Arm your camera to detect motion
- 3. Arlo Ultra Basics
- View your camera feeds
- Look back video
- Record clips from live video
- Take a snapshot from live video
- Talk and Listen
- Turn the camera spotlight on and off
- Turn the camera siren on and off
- Customize your camera feed image
- Motion detection activity zones
- Cloud recordings
- View recordings and snapshots
- Download recordings
- Charge your camera battery
- Replace a camera battery
- 4. Image Quality Features
- 5. Modes, Rules, and Alerts
- 6. Change Your Settings
- 7. Use SD Card Storage
- 8. FAQs and Troubleshooting
- 9. Rechargeable Battery Safety

15Get Started
Arlo Ultra Camera
User Manual
6. Move the slider to adjust the motion sensitivity level as needed.
7. Edit the rule for your camera to enter the motion sensitivity level that you want to
use. See Change motion sensitivity on page 34.
Arm your camera to detect motion
You control when your camera detects motion and the rules it uses to record and alert
you by selecting a mode. The Arlo app comes with four modes, Armed, Disarmed,
Schedule, and Geofending. You can customize each mode and you can also create
custom modes. For information about how to do this, see 6. Modes, Rules, and Alerts
on page 33.