
User Manual
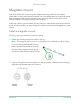
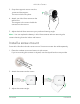
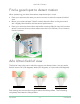
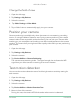
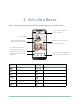
Table Of Contents
- 1. Get to Know Arlo Ultra
- 2. Get Started
- Connect your SmartHub to the Internet
- SmartHub LED
- Use the Arlo app for installation and setup
- Insert the battery into your camera
- Tips for optimal WiFi performance
- Magnetic mount
- Install a screw mount
- Find a good spot to detect motion
- Arlo Ultra’s field of view
- Position your camera
- Test motion detection
- Arm your camera to detect motion
- 3. Arlo Ultra Basics
- View your camera feeds
- Look back video
- Record clips from live video
- Take a snapshot from live video
- Talk and Listen
- Turn the camera spotlight on and off
- Turn the camera siren on and off
- Customize your camera feed image
- Motion detection activity zones
- Cloud recordings
- View recordings and snapshots
- Download recordings
- Charge your camera battery
- Replace a camera battery
- 4. Image Quality Features
- 5. Modes, Rules, and Alerts
- 6. Change Your Settings
- 7. Use SD Card Storage
- 8. FAQs and Troubleshooting
- 9. Rechargeable Battery Safety

16
3. Arlo Ultra Basics
When you open the Arlo app, the Devices page displays your camera feeds.
Camera
icon
Located below each camera feed Camera
feed icon
Tap the camera feed to display these icons
Battery charge
Play/Stop
WiFi signal from the SmartHub Mute the audio
Audio detection is on Talk and Listen
Motion detection is on Record video manually
Open a menu and view or change the
camera settings
Take a snapshot
View or change the camera settings Turn the camera spotlight on and o.
Camera feed
This camera is disarmed.
The icons for sound and
motion detection are gray.
Tap to turn the camera
siren on and off.
Number of new recordings
SmartHub or base station
settings
Tap to open a menu
This camera is armed to
detect sound and motion.
Tap a button to go to Devices,
Library, Modes, or Settings.