Installation Manual
Contents: • • • General information • • Armaflex Thickness Recommendations, p.2 Rules for using Armaflex, p.3 Armaflex Tube Installation • • • • • • • • Sweat fittings on new pipe, p.4 Screwed fittings on new pipe, p.4 Armaflex on new piping: the slip-on method, p.5 Armaflex on existing piping: the snap-on method, p.6 Fabricating fitting covers, p.7 Using miter boxes, p.8 Pipe Hangers • • Using Armafix IPH or NPH at pipe hanger locations, p.18 Traditional method for pipe hanger locations, p.
Installation: 1. To the contractor ... Armaflex Insulations are ideal for such mechanical systems as plumbing, hot-water heating, dual temperature piping, air conditioning, and refrigeration. Armaflex Insulations are two-purpose materials. They control condensation drip from cold piping operating at temperatures down to –297˚F when used in recommended thicknesses. They save heat on hot pipes operating at temperatures up to 220˚F. AP Armaflex SS may be used on lines operating up to 180˚F.
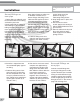
Please note: For installing self sealing AP Armaflex SS, refer to p.19. Installation: Sweat fittings on new pipe 1. Before fitting is soldered, push the Armaflex back on the tubing, and hold in place with clamps applied to the tubing. To avoid damage to the insulation, tubing and fitting temperatures must not exceed the upper use limit of 220˚F. Remove clamps after fitting has been soldered and has cooled. Note that sweat fittings are insulated with the same size Armaflex as used on the tubing. 2 1 6.
Please note: For installing self sealing AP Armaflex SS, refer to p.19. Installation: 2. Armaflex on new piping: the slip-on method 5. Apply brush coating of 520 or 520 BLV Adhesive to both butt ends to be joined, since this is a contact-type adhesive. 6. Allow the adhesive to set until dry to the touch but tacky under slight pressure before joining surfaces. 1 2 The slip-on method is used when you can insulate new piping before it goes up or while it’s being connected. 1.
Please note: For installing self sealing AP Armaflex SS, refer to p.19. Installation: 3. Armaflex on existing piping: the snap-on method The snap-on method is used when pipe or copper tubing is insulated after it has been installed and connected. 6. When the adhesive has air-dried, apply moderate pressure to entire joint to assure a vapor-tight bond. 7. In double-layer work when using the snap-on method, apply Armaflex with side and end joints staggered where possible. Armaflex pipe insulation 5 1.
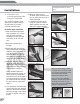
Installation: 4. Fabricating fitting covers This section includes: a. Using miter boxes, pg 8 b. Using Armaflex Sheet on pipes, pgs 9 & 10 b.1. Armaflex Templates, pg 11 b.2. Yield of Armaflex Sheet, pgs 11-12 c. Armaflex Sheet on 90° Elbows, pg 13 d. Armaflex Sheet on Flanged Valve Fitting Covers, pgs 1415 Use unslit Armaflex when making up covers for fittings. Make up a group of covers at one time instead of cutting and assembling each one as you come to it.
Installation: 4.a. Using miter boxes ▲ ▲ ▲ 45° miter cuts 1/3 2/3 ▲ ▲ ▲ Length ▲ ▲ ▲ 45° miter cut for 90° ell ▲ Length ▲ ▲ 1. Use a sharp, non-serrated edge knife. Note the long knife length shown in photo. 2. On smaller pieces of Armaflex Pipe Insulation, brace the piece to be cut with your hand as illustrated. This will insure a clean and accurate cut. 3. The illustrations show sleevetype fitting covers. The same fabrication steps may be used for copper tube fittings.
Please note: For installing self adhering SA Armaflex sheets and rolls, refer to p.19. Installation: 4.b. Using Armaflex sheet insulation on pipes Application to pipes 1. Apply Armaflex Sheet Insulation on pipes larger than 5″ IPS. Cut the sheet insulation to proper width, permitting it to fit loosely without stretching around the pipe. (See pgs 11-12.) The fabrication must be done at the job site, at the same ambient conditions as the application. 2.
Please note: For installing self adhering SA Armaflex sheets and rolls, refer to p.19. Installation: 5. Snap the formed cover in place over the fitting. Adhere the mating surfaces of the inner arc joint with 520 or 520 BLV Adhesive. Join the straight pipe covering to the fitting cover, making sure to coat both the pipe-section butt surface and the fitting-cover butt surface. Note: On screwed fittings, select the proper template from section 4.b.1., page 11.
Installation: 4.b.1 Templates are available for screwed and long-radius weld fittings Template number and description Templates for the Iron Pipe Sizes Shown Below in 3/8″, 1/2″ and 3/4″ Armaflex: No. AT Set A Screwed 45˚ Elbows ■ 3/8″—1/2″—3/4″ Walls ■ 2″, 2-1/2″, 3″ IPS SCREWED Pipe Size IPS 2" 2-1/2″ 3" 3/8″ 1/2″ 3/4″ No. AT Set B Screwed 90˚ Elbows ■ 3/8″—1/2″—3/4″ Walls ■ 2″, 2-1/2″, 3″ IPS 45˚ 90˚ T 45˚ 90˚ T 45˚ 90˚ T • • • • • • • • • • • • • • • • • • • • • No.
Installation: LF/R OLL (Ft. ) PCS (4-F ./ROL t. Le L ngth s) ... AP ARMAFLEX SHEET FOR WELDED 90˚ ELBOW FITTINGS INS U LEN LATIO (Pip GTH N eC ircu m., In.) APP R LEN OX. GTH ROL (LF L ) ... 48-INCH-WIDE AP ARMAFLEX ROLLS AS PIPE INSULATION INS U THI LATIO C (In.) KNES N S 4.c. measuring ... PIP E SIZ E Yields of ... Half Circumference Plus Throat Meas.
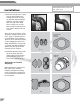
Please note: For installing self adhering SA Armaflex sheets and rolls, refer to p.19. Installation: 1. Check the type ell (long or short radius) and size. 5. Trim ends of fitting cover square to meet the straight pipe insulation. Place metal band or metal strap around fitting cover, and scribe a straight line. Then trim with a sharp knife. ▲ Weld 1 ▲ ▲ C/2 ▲ ▲ R2 ▲ ▲ R1 ▲ C/2 2 ▲ Outer arcs ▲ ▲ R1 ▲ 3.
Installation: ment across the throat of the valve at a point under the flange where the stem enters. 4.d. Armaflex sheet on flanged valve fitting covers These instructions are meant to serve as a guide for insulating flanged valves with Armaflex. Because of the variety in shape and design of flanged valves, some modifications to these instructions may be necessary. At this time, the Armaflex donuts at the ends of the fitting should be sealed to the fitting body insulation with 520 Adhesive. ▲ 2.
Installation: The bonnet insulation may now be installed using 520 or 520 BLV Adhesive to bond the two ends, to adhere the bonnet insulation to the body insulation and to adhere the bonnet insulation around the Armaflex donut. This should complete the flange valve fitting. ▲ Y Y Y ▲ ▲ L2 1/4 C L1 ▲ ▲ ▲ ▲ ▲ ▲ ▲ 1/4 C ▲ ▲ 1/4 C ▲ C 1/4 C ▲ ▲ ▲ ▲ ▲ ▲ 6 L2 The bonnet insulation of Armaflex Sheet is cut to the size of C x L1.
Please note: For installing self adhering SA Armaflex sheets and rolls, refer to p.19. Installation: Armaflex sheet on metal ductwork The preferred method for square and rectangular ducts is to cut and fit the sheets, using full coverage of Armaflex 520 or 520 BLV Adhesive to adhere the insulation. 1. Measure—Sheets should be sized with the following application sequence in mind. Cut the bottom piece first, making it the same width as the duct.
Please note: For installing self adhering SA Armaflex sheets and rolls, refer to p.19. Installation: Flexible ArmaTuff Plus, ArmaTuff White or ArmaTuff Silver can be used for all exterior applications. They are practical also for use on exterior ducts, tanks, vessels, large pipes and fittings. The material provides a durable, tough and maintenance-free surface. The material is resistant to UV, ozone, acid rain and most industrial pollutants. No painting is required.
Installation: Pipe hanger locations At pipe hanger locations where the insulation must resist compression, supporting devices must be used in combination with metal hanger shields. Armafix Insulation Pipe Hangers 18 Easy Application ▲ Wood inserts Traditional method Although timesaving Armafix IPH or NPH is recommended, you can use traditional supporting devices such as short lengths of wood dowels or wood blocks, which are the same thicknesses as the Armaflex.
Installation: AP ARMAFLEX SS INSTALLATION INSTRUCTIONS Make sure pipe is clean and dry. Wipe with a clean rag to remove any contaminants or moisture Snap the tubing over the pipe with a gentle twisting motion. The temperature of the air and of the insulation should be between 40°F (4°C) and 100°F (38°C) at the time of installation Peel the protective release strips from the adhesive surface in 8″ and 12″ intervals. The protective release strips can be removed by gently pulling at an angle.
I N S TA L L AT I O N M A N UA L Armacell provides this information as a technical service. To the extent the information is derived from sources other than Armacell, Armacell is substantially, if not wholly, relying upon the other source(s) to provide accurate information. Information provided as a result of Armacell's own technical analysis and testing is accurate to the extent of our knowledge and ability, as of date of printing, using effective standardized methods and procedures.