
Installation Guide


Installation:
14
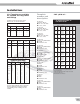
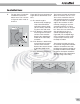
4.d. Armaflex sheet on
flanged valve fitting
covers
These instructions are meant to
serve as a guide for insulating
flanged valves with Armaflex.
Because of the variety in shape
and design of flanged valves,
some modifications to these
instructions may be necessary.
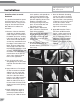
1. Cut Armaflex donuts the same
diameter as the flanges, and
install at pipe/flange and valve
stem areas.
2. Use scrap strips of Armaflex
Sheet to build the body of the
valve out until it is the same
dimension as the OD of the
flanges. Adhere the Armaflex
strips directly to the valve
body, using 520 or 520 BLV
Adhesive.
3. Use a strip of Armaflex Sheet
to wrap around the flange to
measure the circumference or
length of the Armaflex Sheet
needed for the valve body.
4. Cut Armaflex Sheet for the
valve body.
A. This length is determined as
shown in Figure 3.
B. This length is obtained by
measuring the distance
between the outer edges of
the Armaflex donuts which are
located at the flanges.
C. To fit around the valve throat, a
semicircle is cut from each
end of the Armaflex Sheet.
The diameter of semicircle is
determined by the measure-
ment across the throat of the
valve at a point under the
flange where the stem enters.
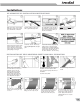
5. The Armaflex Sheet, cut out as
shown in Figure 4, is installed
around the valve body and the
joint adhered with 520
Adhesive.
At this time, the Armaflex donuts
at the ends of the fitting should
be sealed to the fitting body insu-
lation with 520 Adhesive.
This is accomplished by running
the adhesive brush between the
outer circumference of the
Armaflex donut and the inside of
the ends of the body insulation (a
wet joint).
Armaflex donuts
(Same OD as flange)
▲
1
▲
▲
Build out body
▲
2
▲
Adhered
▲
Adhered
▲
5
4
▲
▲
▲
▲
A
B
CC
▲
Circumference
(Do not stretch)
3