ENGLISH NOTE: Various models of the Emporio Armani Orologi collection have screw-down crowns. If you attempt to pull the crown out for time or date setting and it does not pull out easily, you may need to unscrew your crown before pulling the crown out. This is done by turning the crown counter-clockwise until it is completely unscrewed. Your crown will now pull out easily for time adjustment. To return crown to position 0, push in gently and turn clockwise simultaneously.
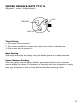
3 HANDS/OPEN DIAL TY2836 (23 Jewels, 1 crown) 3 HANDS/SKELETON DIAL 2189 (20 Jewels, 1 crown) OPEN HEART TY605 (23 Jewels, 1 crown) OPEN HEART M7111 (20 Jewels, 1 crown) MINUTE HOUR MINUTE HOUR 0 1 0 1 SECONDS SECONDS TY2836 2189 CLOSED CLOSED 0 1 0 1 OPEN HEART TY605 M7111 OPEN HEART Time Setting 1. Pull crown out to position 1. 2. Turn crown clockwise to rotate hour and minute hands to desired time. 3. Push crown back to position 0.
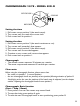
POWER RESERVE/DATE TY2714 (28 Jewels, 1 crown, 1 hidden pusher) A CLOSED POWER RESERVE 0 1 SECONDS DATE Time Setting 1. Pull crown out to position 1. 2. Turn crown clockwise to rotate hour and minute hands to desired time. 3. Push crown back to position 0. Date Setting With any pointed (but not sharp) tool, push hidden pusher A to adjust the date.
DATE MODELS Do not change the date between the hours of 10pm and 2am. This is the time when the movement is in position to carry out the automatic date change, and any interference may cause damage to the movement. CLOSED 0 1 2 Rotate to set hour & minute hands. Date advances with each 24 hour rotation of hour hand. RAPID CORRECTION OF DATE Date Setting 1. Pull the crown out to position 1. 2. Turn the crown either clockwise or counter-clockwise and set the date for the previous day.
Chronograph 2 Eye - MODEL 5021.D CENTER STOP-SECOND MINUTE COUNTER A SECOND HAND B Setting the time 1. Pull crown out to position 3 (the watch stops). 2. Turn crown until you reach the correct time. 3. Push crown back to position 1. Setting the date 1. Pull crown out to position 2 (the watch continues to run). 2. Turn crown until yesterday’s date appears. 3. Pull crown out to position 3 (the watch stops). 4. Turn crown until correct date appears. 5. Continue to turn crown until correct time appears. 6.
Chronograph: Intermediate or interval timing 1. Press pusher A to start the center stop-second hand. 2. Press pusher B to stop the chronograph. Note: Although the chronograph hands have stopped, the movement continues to record the current timing. 3. Make up the measured time: Press pusher B again and the 2 chronograph hands are quickly advanced to the ongoing measured time. To continue to record intervals, continue to push pusher B. 4. Press pusher A to stop and the final time is displayed. 5.
Chronograph Stopwatch VD53 / VD53B 24-HOUR HAND MINUTE HAND SECOND HAND Time and Date Setting 1. Before setting the time, make sure the chronograph is stopped and set to zero (12:00) position. 2. Pull crown out to position 2. 3. Turn crown clockwise until the previous day’s date is displayed. 4. Pull crown out to position 3 when the second hand is at the 12:00 position. 5. Turn crown to set time. Note: 24-hour hand moves correspondingly with the hour and minute hands.
Chronograph Stopwatch VD55 (with date - VD57) (1 crown/2 pushers) 1/10 SECOND HAND MINUTE HAND SECOND HAND Time Setting 1. Pull crown out to position 3. 2. Set time by turning the crown clockwise. 3. Push back to position 1 to start the watch. Using the Stopwatch 1. Press A to start/stop the stopwatch. 2. Press B to control the split time and reset. Stopwatch Hand Adjustment 1. Pull crown out to position 3. 2. Press A to reset the stopwatch 1/10 second hand to the “0” position. 3.
Chronograph Stopwatch OS20 / OS21 (1 crown / 2 pushers) CHRONOGRAPH SECOND HAND A CHRONOGRAPH SECOND HAND A 24-HOUR HAND CHRONOGRAPH MINUTE HAND B CHRONOGRAPH MINUTE HAND B Time Setting 1. Pull crown out to position 3. Chronograph second hand will return to “0.” Do not return the crown to position 1 while the hands are returning to “0,” or else the position the hands are at when this is done will be recognized as the new “0” position. 2. Turn crown to set the desired time. 3.
CHRONOGRAPH 5030D / OS10 (1 crown / 2 pushers) CHRONOGRAPH SECOND HAND A MINUTE HAND A HOUR HAND CHRONOGRAPH MINUTE HAND CHRONOGRAPH HOUR HAND SECOND HAND B SECOND HAND B Time Setting 1. Pull crown out to position 3 (the watch stops). 2. Turn crown to set the desired time. 3. Return crown to position 1. Note: In order to set the time to the exact second, the crown must be pulled out when the second hand is in position “60.
5. Reset: press B (the three chronograph hands are returned to their zero positions). Note: The accumulation of the timing can be continued by pressing A (Restart / Stop, Restart / Stop, …). Chronograph: Intermediate or interval timing 1. Start: press A (start timing). 2. Display interval: press B (e.g. 10 minutes 10 seconds, timing continues in the background). 3. Making up the measured time: press B (the 3 chronograph hands are quickly advanced to the ongoing measured time).
Chronograph OS60 (1 crown/2 pushers) MINUTE HAND A HOUR HAND 1/20 SECOND HAND B Setting the Time 1. Pull the crown out to position 3. Chronograph second hand and 1/20 second hand will return to zero position. NOTE: Do not return the crown to its normal position while the hands are returning to zero, or else the position the hands are at when this is done will be recognized as the new zero position. 2. Turn the crown to set the desired time. 3. Return the crown to its normal position.
Chronograph Operation 1. Push A to start/stop the chronograph. 2. Push B to reset the chronograph. 3. Although the 1/20 second hand stops when the measurement time is over 30 seconds, the watch continues measuring the elapsed time. Exact time elapsed is indicated when the measurement is stopped by pressing button A. 4. If B is pressed again after chronograph is reset, the 1/20 second hand changes to measure each second. Digital BJT001 Normal Time Display 1. Press A to display month/date. 2.
DIGITAL BJ3286 B C A D Normal Time Display 1. Press A to change mode. Mode sequence is normal time, alarm, dual time, countdown timer, and chronograph. 2. Press B for EL. Time and Calendar Setting 1. In normal time display, press D; seconds will begin flashing. 2. Press C to set seconds to zero. 3. Press A to advance to next setting value. 4. Press C to increase digits; press and hold C for fast advance. 5. Setting sequence is: seconds, hour, minute, year, month, date. 6.
Dual Time Mode 1. Press A to change to dual time mode. 2. Press D; hour will begin flashing. 3. Press C to increase digits; press and hold C for fast advance. 4. Press A to advance to minutes. 5. Press C to increase digits; press and hold C for fast advance. 6. Press D to exit setting mode. Countdown Timer 1. Press A to change to countdown timer mode. 2. Press C to start/stop the timer. 3. Press B to reset timer to preset value. NOTE: When timer reaches zero, alarm will sound for 10 seconds.
ADJUSTING THE STRAP 1. Open the buckle and pull the strap (in the direction of the arrow shown) until the adjustment pin appears. 2. When the position is correct for your wrist, place the adjustment pin in the desired hole. 3. Pull the adjustment pin into the buckle (by pulling the strap in the direction of the arrow shown) until pin clicks into place. 4. Slide extra strap through the loop keeper before snapping the clasp together.
PIN LINK DIAGRAM PIN PUSHER CHAIN NOSE PLIERS ARROWS BRACELET HOLDER Link Removal To remove a link from a pin link bracelet, you will need the bracelet holder, pin pusher, and chain nose pliers (see pin link diagram). 1. Open the clasp on the bracelet. 2. Look on the inside of the bracelet and locate the arrows near the clasp (see diagram). 3. Place the band into the appropriate size slot of the bracelet holder with the arrows pointing down (see diagram). 4.
USE PRECAUTIONS RESISTANCE TO WATER All Emporio Armani timepieces are designed to withstand use as indicated on line 1 of the following chart. Indication Water-related Use Waterresistant characteristics Light spray perspiration, light rain, etc. Bathing, etc. Swimming, etc. Skin diving (Diving without oxygen cylinder) 1 3 ATM OK NO NO NO 2 5 atm OK OK NO NO 3 10 ATM OK OK OK NO 4 20 ATM OK OK OK OK Always set the crown in the normal position.
WATCH CARE AND PRECAUTIONS This watch contains precision electronic components. To ensure the best wear, please follow these simple guidelines for watch care: 1. Avoid leaving your watch in any extremes for long periods of time: direct sunlight, extremely warm, or extremely cold location. • Extreme heat will cause malfunctioning and shorten the life of your battery. • Extreme cold will cause your watch to gain or lose time. 2. Avoid wet conditions unless your watch is suited for them.