
User Manual


25
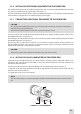
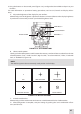
TABLE 32. BUTTON CONTROLS
ITEM NO. FUNCTION DESCRIPTION
1, 3
DISPLAY BRIGHTNESS
CONTROL
One quick push of the button (1) will increase the screen brightness;
push the button (3) to decrease the screen brightness.
NOTE:
It takes seven steps to go from the darkest to the brightest level,
for a total of eight levels.
AND ELEVATION
Push the buttons (1) and (3) at the same time to bring the reticle in
2
INVERTS RETICLE COLOR
Quickly push the button (2) to invert the reticle (switch between
black and white reticles).
Save your preference by pushing buttons (2)and(4) simultaneously.
SAVE should appear in the display.
2, 4
SAVE THE OPTIONS
To save your preference, push buttons (2) and (4) simultaneously.
SAVE should appear in the display.
4
RETICLE PATTERNS
CONTROL
Quickly push the button (4) to switch between available reticle pat-
terns: “Dot”, “Small Crosshair”, “Big Crosshair”, “Crosshair with Dot”,
“Circle”, “Circle with Dot”, or “No Reticle”.
To save your preference, push buttons (2) and (4) simultaneously.
SAVE should appear in the display.
5
BORESIGHT ADJUSMENT
uses in combination
with other buttons
While holding down the button (5), push the buttons:
- (3)/(1) to shift the reticle in the display up/down,
- (4)/(2) to shift the reticle to the right/left, respectively.
To reset to zero azimuth and elevation, push the combination of
indication will appear in the display.
After completing your customization, save your preference by push-
ing buttons (2) and (4) simultaneously. SAVE should appear in the
display.
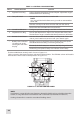
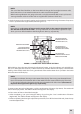
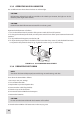
3.2.2 IR ILLUMINATOR CONTROLS
The controls of the optional IR illuminators are shown in Figure 3-14 and dened in Table 3-3. The ITEM
NO. column indicates the number used to identify items in Figure 3-14.
1
2
FIGURE 314. IR ILLUMINATOR CONTROLS