
Technical data


23
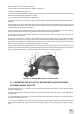
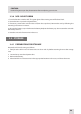
3.LoosentheIRilluminatorxingscrew(C).
4. Mount the IR illuminator on the Weaver rail of transfer piece and tighten the xing screw (C).
B
C
FIGURE 36. MOUNTING AN IR ILLUMINATOR TO THE NYX14
A
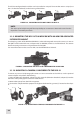
3.1.7 MOUNTING THE NYX14 TO A STANDARD US MIL HELMET/ HEAD
GEAR ASSEMBLY
To mount the NYX-14 to a Standard US Mil helmet or headgear assembly, use an optional transfer
adapter. Perform the following steps:
1. Push down on the lever (C). Mount the adapter (A) to the NYX-14 rail (B).
2. Align the adapter prism (D) with the helmet/ headgear assembly mount (E). Slide the NYX-14 back-
wards until its alignment boss is in line with the alignment groove on the helmet/ headgear assembly
mount. Push down until the NYX-14 locks into the helmet/ headgear assembly mount.
To dismount the NYX-14 from the helmet/ headgear assembly, push down on the lever (F) and remove
the unit.
Push down on the lever (C) and remove the adapter from the NYX-14 rail.
The transfer adapter can be adjusted for either the right or left eye. In Figure 3-7, the NYX-14 is shown in
the proper position for the left eye. Readjust the adapter for the right eye as follows:
— Push down on the lever (C). Remove the adapter from the NYX-14 rail.
—Loosenthenut(G),andturntheadapteraroundbetweenthetwoxingdevices.Retightenthenut
(G).
— Mount the adapter to the other NYX-14 rail located on the opposite side of the unit.
A
C
FIGURE 37. MOUNTING NYX-14 TO STANDARD US MIL HELMET/HEADGEAR ASSEMBLY
B
G
D
F
F
C
E
D
D
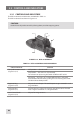
3.1.8 MOUNTING ACCESSORY LENSES TO THE NYX14
To mount the 3X afocal lens (A) or 5X afocal lens (B) to the device, screw it into the threading of the
standard 1X objective lens on the NYX-14.
To mount the 5X (C) or 8X (D) lens, unscrew the existing 1X objective lens of the NYX-14 and screw in
the 5X or 8X lens in its place.