
Technical data


36
(5) Ensure that the compass ts tightly to the objective lens.
(6) Refer to paragraph 3.4.6 for compass operation.
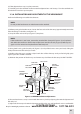
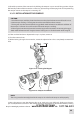
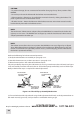
3.3.12. INSTALLATION OF THE 3X MAGNIFIER
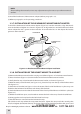
The 3X magnier can be threaded directly into the objective lens. It can also be threaded into the focus
ring adapter and slipped on over the end of the objective lens.
Figures 3-17 and 3-18 illustrate these installation procedures.
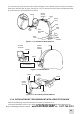
3.3.13. MOUNTING MUNVM TO A WEAPON WITH A QUICKRELEASE PICAT
INNY MOUNT ADAPTER
The MUNVM is mounted to a weapon with a quick-release picatinny mount adapter (QRM) using the
optional bracket.
Mount the MUNVM to the QRM as follows:
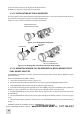
1. Loosen the bracket clamp screw (A, Figure 3-19).
2. Put the bracket clamp (B) onto innity focusing stop ring (D) of the MUNVM objective lens.
3. Fix the MUNVM in the bracket clamp (B) by tightening the screw (A).
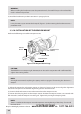
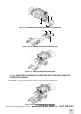
4. To unlock the clamping device (located on top of the QRM), see Figure 3-20. While pushing the lever
holder (C, Figure 3-20) down, turn the lever (B, Figure 3-20) towards the arrow (forward).
5. Install the MUNVM on the mount so that the stop (A, Figure 3-20) is inserted into the transverse slot
of the NVM rail.
6. Secure the MUNVM to the mount by turning the lever (B) to the locked position, as shown in Figure
3-20.
7. Verify that the clamping device is rmly secured to the MUNVM. If necessary, adjust the clamping
device.
MUNVM installed on the QRM is shown in Figure 3-21.
THREAD DIRECTLY INTO
OBJECTIVE LENS AS SHOWN
Figure 3-17. 3X Magnier Installation
3X MAGNIFIER
FOCUS RING
ADAPTER
STEP 1
STEP 2
THREAD 3 X MAGNIFIER
INTO FOCUS RING ADAPTER
Figure 3-18. 3X Magnier Installation with Focus Ring Adapter
Shop for Armasight products online at:
1.877.766.5412
www.SCOUTBASECAMP.ca