
User's Manual


(11) There are 4 mapping buttons M1/M2/M3/M4 with 4 groups of state for option on the back of the
controller. Three groups with mapping functions: Firstly, M1-A, M2-B, M3-X, M4-Y. Secondly, M1-R,
M2-L, M3-ZR, M4-Z. Thirdly, M1&M3-R3,M2&M4-L3. The fourth group without functions, M1/M2/M3/M4
without functions output. In the state of connection with console or PC, press and hold Turbo button,
then press menu button -, it switches to another state. Default setting for these 4 mapping buttons
is: M1-A, M2-B, M3-X, M4-Y.
4. Charging:
LED indicators flash during charging by adapter and turn to off after full charging.
If controller is charging in connection state, corresponding channel LED indicator slowly flashes
and keeps illuminating after full charging.
5. Low voltage alarm:
When the battery voltage is less than 3.6V, corresponding channel LED indicator flashes to indicate
low energy and controller needs to be charged.
6. Standby:
When the controller is powered on, press Docking button to make it standby.
When the controller is in pairing state, it automatically stand by if pairing fails after 60 seconds.
7. Reset function:
Docking button can be used to reset the controller if it is abnormal.
8. Working range:
Working range within 10m.
9. Referenced current:
Sleep current:<2uA
Pairing current:<20mA
Working current without vibration:<20mA
10. Electrical specifications:
Power supply:Built-in polymeric Li-ion battery
Working time:8-10 hours
Battery capacity:500mAh Charging time:2.5 hours
Charging voltage:DC5V Charging current:200MA
11. Instruction for pairing:
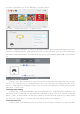
1). Switch on the console, click house icon on the screen to enter the main menu, as below picture: