
Installation Guide


Before You Begin
■ Store and install ceilings in areas with a temperature range of 60° to 85° F
and not more than 70% relative humidity.
■ Remove ceiling tile from cartons 24 hours before installation and allow to
adjust to normal interior conditions of the installation area.
■ Do not apply loose fill or batt insulation so that it rests directly on the back
of the tiles.
■ Do not install ceiling tiles below imbedded radiant-heat coils.
■ Keep hands clean during tile installation to avoid fingerprints and smudges.
■ Handle ceiling tiles carefully to protect the face and edges from damage.
■ Always cut ceiling tiles face up with a sharp utility knife.
■ For Adhesive Applications of mineral fiber only
tiles directly to existing
drywall or plaster ceilings: Ceiling tile adhesive recommended, such as
Henry #237B Acoustical Adhesive. Please follow adhesive manufacturer’s
instructions for application and usage. Armstrong does not guarantee the
performance of this or other adhesive products, either alone or in
conjunction with Armstrong products.
Maintenance
Hints
TOOLS &
MATERIALS
YOU MAY
NEED
Safety
■ Establish and maintain adequate ventilation in the work area. If high dust
levels are anticipated during installation, such as with the use of power tools,
use an appropriate NIOSH-designated dust respirator. All power cutting tools
must be equipped with dust collectors.
■ Wear long-sleeve, loose fitting clothing and gloves.
■ Persons who are sensitive to odor and / or chemicals should avoid the work
area during this process.
■ Wear safety glasses to minimize the risk of eye injury.
■ Use a sharp utility knife to ensure clean cuts. When not in use, store
properly.
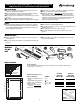
Safety Glasses
Tape Measure
Straight Edge
Hammer
Pencil
#6 Course Thread
Drywall Screws
4’ Carpenter's
Level
Utility Knife
Stud Finder
Hacksaw
Dust Mask
Drill/Screw Gun
Gloves
Tin
Snips
String
Chalk
Line
Screw Driver
1
Determine border tile size for a
balanced appearance:
1. Measure room width in feet and
inches
2. Disregard full feet measurement
3. Add 12” to the remaining inches
4. Divide result by 2
5. Record your border tile width
(side wall)
6. Repeat 1-5 for opposite walls
EXPOSED
JOISTS
PLASTER CEILING
OR DRYWALL
Locate ceiling joists
Tap on the plaster or drywall ceiling until you hear a solid thud, or use a stud finder. Generally, joists
are spaced 16" or 24" on center.
EXAMPLE:
10' 8"
10'– 8"
8"+12" = 20"
20"÷ 2"=10"
10"
CALCULATE
YOUR ROOM
(SIDE TO SIDE):
10"
10"
7"
7"
7"
7"
Begin Installation
Front Wall
10' 8"
S
I
D
E
W
A
L
L
HOW TO INSTALL YOUR ARMSTRONG 12" x 12" TILE CEILING USING THE
ARMSTRONG EASY UP
®
INSTALLATION SYSTEM OR ADHESIVE
CALCULATE
YOUR ROOM
(FRONT TO BACK):
Easy Up
Track
Easy Up
Clip
Item #1191
Item #1190
■ Remove dust and loose dirt with a soft brush or vacuum hose with a soft
brush attachment.
■ Remove pencil marks, small smudges, or clinging dirt with an ordinary art-
gum eraser.
■ Wash with a damp sponge, mild soap and lukewarm water if necessary.
Do not soak tiles with water.