
Instructions / Assembly


LA294998-1219
How to Install Your Armstrong
®
Suspended Ceiling
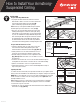
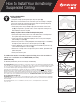
• To check that your grid is square, measure across
the diagonals of the 2' x 4' opening. The measurements
will be the same if the grid is square. If the
measurements are not the same, trim one of the
mains further until the diagonals are equal. (illus. B)
Installing Remaining Grid & Leveling the System
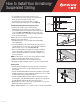
• Complete the first two rows of main beams by
hanging main beams from the hooks and joining their
ends together. Listen for an audible click to ensure a good
connection. (illus. C and illus. D). At the far end of each
of these first two rows, you’ll need to cut both main beams
to rest on the wall molding.
TIP: Use the left-over ends of the cut main beams to start
additional rows of main beams.
• Cut additional border cross tees between the wall and first
row of main beams.
• If you have additional rows of main beams to install, stretch a
second string from one side of the room to the other aligning it
with the first 4' cross tee as shown (D). (illus. B)
• This second string will be your guide for cutting the remaining
rows of main beams. Just measure from the end wall to the
string to determine the distance for the first rectangular cross
tee slot you will use.
NOTE: You must line up cross tee slots for the grid to be square!
• Install all remaining main beams and 4' cross tees.
• Measure and cut border cross tees along the last wall.
• Now that your grid is installed, it's time to check or do final leveling.
Final Leveling
• Start by attaching a magnetic level to the bottom of a main beam
located in a corner of the room. Note: Main beam should rest on
wall molding.
• Systems installed with traditional hanger wire should be level already.
If additional leveling is needed, untwist the hanger wires, raise or lower
the grid slightly, re-bend and twist the wires.
• Systems using QuickHang hardware, hold the main beam, squeeze
the spring tabs on the QuickHang bracket to allow the hook to slide up
or down (F). Releasing the tab will lock the hook in place.
• Working from the corner of your room, check and level cross tees and
main beams until the system is level.
TIP: For additional guidance, see our video online at ceilings.com/installation.
D
C
Full 4'
cross tees
Second string
Check diagonal
measurements
illus. B
Joist
illus. C
Traditional Wire Hanger
Insert
grid hook
Main beam
Existing
cross tee
Insert to
the RIGHT side
of existing tee
Align
center
of bracket
with vertical
mark
1" long
vertical
mark
Bracket
Hammer
tabs
Joist
illus. D
QuickHang Grid Hooks
Insert
grid hook
Main beam
Existing
cross tee
Insert to
the RIGHT side
of existing tee
Align
center
of bracket
with vertical
mark
1" long
vertical
mark
Bracket
Hammer
tabs
Joist
F
Joist