
Instructions / Assembly


How to Install Your Armstrong
®
Suspended Ceiling
LA294998-418
SAFETY TIPS:
• Safety glasses and gloves are recommended to be worn during installation. Metal grid components can be sharp.
• When working overhead, make sure your work area is clear of obstructions and that your ladder is stable.
IMPORTANT INFORMATION:
• Store and install panels in areas with temperature and humidity ranges that meet specific product warranty requirements.
• Remove panels from the cartons 24 hours before installation and allow them to adjust to normal interior conditions of the area
where installation will take place.
• Never install ceiling panels below an existing ceiling that contains embedded radiant-heat coils.
• Do not apply loose fill or batt insulation so that it rests directly on the panels.
• Keep hands clean to avoid smudges on the finished ceiling.
• Always cut mineral fiber or fiberglass ceiling panels face up with a sharp utility knife.
• Main beams should be installed perpendicular to the joists.
• Main beams are typically installed on 4' centers. If your room configuration is unusual, you may require additional components.
• To allow for ceiling tile installation and accessibility, the minimum drop is 3" with traditional hanger wire or 2.5" with
QuickHang
™
grid hooks. (QuickHang instructions are notated by a gray background)
NOTE: QuickHang hooks and brackets are available through select retailers. Visit ceilings.com/stores for where to buy.
• Installations with light fixtures will likely require additional clearance and support. Consult the light manufacturer’s instructions
for details.
• When installing below an existing drywall ceiling, a minimum 4" drop is required to install panels. Joists will need to be located
and marked.
NOTE: QuickHang hardware cannot be used below drywall ceilings.
TOOLS NEEDED TO INSTALL YOUR CEILING
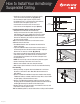
PLANNING YOUR ARMSTRONG CEILING
Main beams typically run perpendicular to the joists. If you have an existing
drywall ceiling you will need to locate and identify the joist direction.
LOCATE HIDDEN JOISTS TO INSTALL WIRE FASTENERS
Use either a stud finder or locate hidden joists by tapping on the ceiling until
you hear a solid thud. Drive a nail in here. Repeat this to locate other joists
and determine their direction. Mark the joist locations with chalk lines.
• Find joists (A).
• Drive nails to find exact center line of joists.
• Snap chalk line for each joist (B).
10' 6"
9'
Joist direction
Joist usually
16" on center
Snapped chalk lines
in center of joists
A
B
Sample Room