User Manual Smart Air Fryer Toaster Oven Questions or Concerns? Mon–Fri, 9:00 am–5:00 pm PST/PDT support@cosori.
Thank you for your purchase! (We hope you love your new smart air fryer toaster oven as much as we do) join explore enjoy the COSORI Cooks Community on Facebook facebook.com/groups/cosoricooks our recipe gallery www.cosori.com/recipes weekly, featured recipes made exclusively by our in-house chefs CONTACT OUR CHEFS Our helpful, in-house chefs are ready to assist you with any questions you might have! Email: recipes@cosori.
Table of Contents Specifications Package Contents Important Safeguards Getting to Know Your Smart Air Fryer Toaster Oven Display Controls Before First Use Cooking with Your Smart Air Fryer Toaster Oven Care & Maintenance Troubleshooting VeSync App Troubleshooting Warranty Information Customer Support Package Contents 3 3 4 7 8 9 11 12 28 29 30 32 33 1 1 1 1 1 1 1 x x x x x x x Smart Air Fryer Toaster Oven Wire Rack Food Tray Fry Basket Recipe Book User Manual Quick Reference Guide Specifications Model
READ AND SAVE THESE INSTRUCTIONS IMPORTANT SAFEGUARDS Follow basic safety precautions when using your smart air fryer toaster oven. Read all instructions. Key Safety Points • Do not touch hot surfaces. Use handle. • The outside of the oven, including the door, is hot during and after use. • Always use heat-resistant gloves, pads, or oven mitts when handling hot materials, and when placing items in or removing items from the oven, including trays, racks, accessories, or containers.
• This oven is not intended for use by persons (including children) with reduced physical, sensory, or mental capabilities, or lack of experience and knowledge, unless they have been given supervision or instruction concerning use of the oven by a person responsible for their safety. • Do not allow children to clean or perform maintenance on the oven. • Keep the oven and its cord out of reach of children. • Not for commercial use. Household use only.
Power & Cord Extension Cords • This oven uses a short power-supply cord to reduce the risk of entangling or tripping. • Your oven has a polarized plug (one prong is wider than the other), which fits into a polarized outlet only one way. If the plug does not fit, reverse the plug. If it still does not fit, do not use the plug in that outlet. Do not alter the plug in any way. • Do not let the power cord (or any extension cord) hang over the edge of a table or counter, or touch hot surfaces.
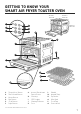
GETTING TO KNOW YOUR SMART AIR FRYER TOASTER OVEN 16.3 in / 41.3 cm A SLICES B SHADE 16.9 in / 42.8 cm 15.5 in / 39.3 cm D E C F G H SLICES SHADE I Q J K L N O P M A. B. C. D. E. F. Temp/Slices Button Time/Shade Button Menu Button Fan Button °F/°C Button Light Button G. H. I. J. K. Control Knob/Start/ Pause/Power Housing LED Display Heating Elements Door L. M. N. O. P. Q. Handle Crumb Tray* Fry Basket Wire Rack Food Tray Power Cord *Located in drawer below the door.
DISPLAY Wi-Fi® Icon* *Note: This indicates app configuration status. See the VeSync in-app instructions for more information. Celsius/Fahrenheit Indicators Fan Indicator Preheating Status Temperature Display Time Display Cooking Functions Minutes Seconds < 1 hour ≥ 1 hour Display Format < 1 hour Minutes : Seconds ≥ 1 hour Hours : Minutes Note: When you’re setting cook times, the oven display will use the Hours : Minutes format.
CONTROLS Control Knob/Start/Pause/ Power • Press the knob to turn on the oven. Press and hold for 3 seconds to turn off. • Press MENU and turn the knob to change the cooking function. The current function will blink on the display. • Press TEMP/SLICES and turn the knob to change temperature or number of slices. Turn clockwise to increase and counterclockwise to decrease. • Press TIME/SHADE and turn the knob to change time or toast darkness level. Turn clockwise to increase and counterclockwise to decrease.
MENU Button °F/°C Button • Press to change the cooking function. • Press to switch temperature units between Fahrenheit and Celsius. • Turn the control knob to cycle through cooking functions. • The current function will blink on the display. Light Button • Press to turn the interior light on/off. Fan Button • Press to turn the fan on/off. • The fan can be used with all cooking functions. • The fan is automatically set when cooking with Air Fry and Dehydrate.
BEFORE FIRST USE Setting Up Test Run 1. Remove all packaging around and inside the oven. A test run will help you become familiar with your oven, make sure it’s working correctly, and clean it of possible residues. 2. Place on a stable, level, heat-resistant surface, away from anything that can be damaged by heat. 3. Wash all accessories and clean the oven’s interior (see page 28). Dry and place accessories back in oven. 1. Make sure there is no food or packaging in the oven and plug it in. 2.
COOKING WITH YOUR SMART AIR FRYER TOASTER OVEN Using the Trays Note: You can use the VeSync app to control your smart air fryer toaster oven, follow in-app recipes, and more. CAUTION: • The outer surface of the oven, including the oven door, is hot during and after use. Temperature may be over 212°F (100°C). Do not touch hot surfaces. Use handle. • Always use heat-resistant gloves, pads, or oven mitts when handling hot materials, and when placing items in or removing items from the oven.
Cooking Functions Cooking functions are programmed with an ideal time and temperature for cooking certain foods. For more information on each cooking function, see its individual section, or the Cooking Functions Quick Reference Chart (see page 14). Customizing Cooking Functions • You can customize a cooking function’s default settings, including time and temperature. • To change a function’s default settings: 1.
Cooking Functions Quick Reference Chart Name AIR FRY BAKE 14 Use Suggested Accessory & Position Range • Cooks using intense heat and maximized airflow • Cook food such as french fries and chicken wings • Includes preheat Fry basket at top position • 150°–450°F / 65°–230°C • 1 min–2 hr • Cook food evenly throughout • Bake cakes, muffins, pastries • Includes preheat Food tray or wire rack at mid position • 150°–450°F / 65°–230°C • 1 min–2 hr TOAST • Toast or brown bread Wire rack at top positio
• Simmer food for long periods of time at low temperatures • Cook soup SLOW COOK Food tray or wire rack at low position • 150°–250°F / 65°–120°C • 30 min–12 hr • Reheat leftovers Food tray at mid position • 150°–400°F / 65°–205°C • 1 min–1 hr • Precisely hold low temperatures • Proof bread, rolls, pizza, and dough • Make yogurt Food tray or wire rack at low position • 80°–110°F / 25°–45°C • 30 min–12 hr Note: Usually requires placing cookware on top of tray or rack.
VeSync App Functions Preheating The VeSync app allows you to access additional smart functions, including those listed below. The following cooking functions automatically include preheat: Air Fry, Bake, Roast, Pizza, and Broil. Remote Control 1. Press MENU and turn the control knob to select a cooking function that includes preheat. 2. Press the control knob to start the cooking function. 3. PREHEATING will blink on the display and the oven will begin preheating. 4.
Air Fry Function (“AIR FRY”) This function is ideal for cooking a variety of food, including french fries and chicken wings. Uses intense heat and maximized airflow. 5. Heating Elements: Upper heating elements cycle on and off. Rack Position: Top 1. Press MENU and turn the control knob to “AIR FRY”, which will blink on the display. 2. Optionally, customize the temperature and time. You can do this anytime during cooking. a. Press TEMP/SLICES to adjust temperature.
Bake Function (“BAKE”) This function cooks food evenly throughout. Ideal for baking cakes, muffins, brownies, and pastries. Also ideal for cooking prepackaged frozen meals, including lasagna and pot pies. Heating Elements: 2 upper and all bottom heating elements cycle on and off. Rack Position: Mid 18 1. If using the wire rack, insert at mid position and close the oven door. 2. Press MENU and turn the control knob to “BAKE”, which will blink on the display. 3.
Toast Function (“TOAST”) This function browns the outside of your bread while keeping the inside soft. Also ideal for English muffins and frozen waffles. Note: • When setting the darkness level, consider the type, thickness, and freshness of the bread. Heating Elements: Top and bottom heating elements cycle on and off. • • Rack Position: Top 1. Place slices of bread on the wire rack. Insert the wire rack at top position and close the oven door. 2.
Roast Function (“ROAST”) This function is ideal for cooking a variety of meats and poultry. Food will be tender and juicy on the inside and well-roasted on the outside. Heating Elements: 2 upper and all bottom heating elements cycle on and off. Rack Position: Low 20 1. Press MENU and turn the control knob to “ROAST”, which will blink on the display. 2. Optionally, customize the temperature and time. You can do this anytime during cooking. a. Press TEMP/SLICES to adjust temperature.
Broil Function (“BROIL”) This function is ideal for cooking openfaced sandwiches, thin cuts of meat (such as bacon), poultry, fish, sausages, and vegetables. 5. Can also be used to brown the tops of casseroles, gratins, and desserts. Place food on the food tray. a. Optionally, lightly grease the enamel food tray or line with foil to prevent food from sticking. b. Use extreme caution when using foil, and always fit foil as securely as possible.
Keep Warm Function (“KEEP WARM”) This function is designed to keep food warm at the recommended temperature to prevent bacterial growth (160°F / 71°C or above). 4. Press the control knob to start the cooking function. MENU and the selected cooking function will light up, and the display will show the timer counting down. 5. The oven will stop heating and beep several times when finished. Heating Elements: Bottom heating elements cycle on and off. Rack Position: Low 22 1.
Dehydrate Function (“DEHYDRATE”) This function combines low and stable heat with steady airflow to evenly dry out foods without cooking. Ideal for drying fruit or vegetable chips. 4. Heating Elements: Bottom heating elements cycle on and off. Rack Position: Top 1. Place food on the wire rack or fry basket. a. When dehydrating foods that may drip, such as marinated jerky, place the food tray in the low rack position to catch drippings. b.
Pizza Function (“PIZZA”) This function melts and browns cheese and toppings while crisping crust. 6. Remove any cardboard, plastic, paper, or other flammable materials. Place pizza on a pan, and place the pan on the wire rack. 7. Close the oven door to start cooking. MENU and the selected cooking function will light up, and the display will show the timer counting down. Heating Elements: Top and bottom heating elements cycle on and off. Rack Position: Mid 1.
Slow Cook Function (“SLOW COOK”) This function is ideal for simmering food for long periods of time at low temperatures, such as when cooking soup. 2. Press MENU and turn the control knob to “SLOW COOK”, which will blink on the display. Heating Elements: Bottom heating elements cycle on and off. 3. Optionally, customize the temperature and time. You can do this anytime during cooking. Rack Position: Low 1. Place food in a heat-safe container. Cover and place on the food tray or wire rack.
Reheat Function (“REHEAT”) This function is designed to reheat leftovers. 4. Press the control knob to start the cooking function. MENU and the selected cooking function will light up, and the display will show the timer counting down. 5. The oven will stop heating and beep several times when finished. Heating Elements: 2 upper and all bottom heating elements cycle on and off. Rack Position: Mid 26 1. Place food on the food tray. Insert at mid position and close the oven door. 2.
Ferment Function (“FERMENT”) This function is designed to precisely hold low temperatures, providing an ideal environment for proofing bread, rolls, pizza, and dough. 3. Can also be used for making yogurt with an appropriate recipe (using 110°F / 45°C temperature and 12 hr time). Heating Elements: Bottom heating elements cycle on and off. Rack Position: Low 1. Place dough in a heat-safe container. Cover and place on the food tray or wire rack. Insert at low position and close the oven door. 2.
CARE & MAINTENANCE Clean oven accessories (including trays, etc.) and oven interior after every use. Cleaning the Accessories Note: Note: After each use, slide out the crumb tray and discard crumbs. • The walls on the inside of the oven have a nonstick coating for easy cleaning. • Do not use abrasive cleaners, metal scouring pads, or metal utensils on any part of the oven, including trays and other accessories. These will scratch or damage their surfaces.
TROUBLESHOOTING Problem Possible Solution The oven will not turn on. Make sure the oven is plugged in. Food is not completely cooked. Increase cooking temperature or time. Decrease cooking temperature or time. Food is overcooked or burned. Make sure food items are not too large and are not touching the heating elements. Food is cooked unevenly. Make sure food items are not too closely packed into a tray, rack, or other container. The oven may produce some white smoke or steam during cooking.
VESYNC APP TROUBLESHOOTING Problem Possible Solution During the setup process, you must be on a secure 2.4GHz Wi-Fi® network. Confirm that the network is working correctly. Make sure the Wi-Fi® password you entered is correct. Why isn’t my oven connecting to the VeSync app? Turn on Bluetooth® on your phone (for Android™ users, make sure Location is turned on as well). Make sure your oven and phone are within 30 ft / 10 m of each other.
FEDERAL COMMUNICATION COMMISSION INTERFERENCE STATEMENT - PART 15 This device complies with Part 15 of the FCC Rules. Operation is subject to the following two conditions: 1. This device may not cause harmful interference, and 2. This device must accept any interference received, including interference that may cause undesired operation. NOTE: This equipment has been tested and found to comply with the limits for a Class B digital device, pursuant to Part 15 of the FCC Rules.
WARRANTY INFORMATION Product Models Smart Air Fryer Toaster Oven CTO-R251S For your own reference, we strongly recommend that you record your order ID and date of purchase. Order ID Date of Purchase TERMS & POLICY Arovast Corporation (“Arovast”) warrants this product to the original purchaser to be free from defects in material and workmanship, under normal use and conditions, for a period of 2 years from the date of original purchase.
CUSTOMER SUPPORT If you have any questions or concerns about your new product, please contact our helpful Customer Support Team. Arovast Corporation 1202 N. Miller St., Suite A Anaheim, CA 92806 Support Hours Mon–Fri, 9:00 am–5:00 pm PST/PDT Email: support@cosori.com Toll-Free: (888) 402-1684 * Please have your invoice and order ID ready before contacting Customer Support. Attributions Apple App Store is a trademark of Apple Inc. Google, Android and Google Play are trademarks of Google LLC.
SHOW US WHAT YOU’RE MAKING We hope this has been helpful to you. We can’t wait to see your beautiful results, and we think you’ll want to share glam shots! Our community awaits your uploads—just pick your platform of choice below. Snap, tag, and hashtag away, COSORI chef! #LiveLifeTastefully #iCookCOSORI @COSORICooks @COSORI MORE COSORI RECIPES Considering what to cook? Many recipe ideas are available, both from us and the COSORI community. Scan the QR code to get the app.
NOTES 35
Questions or Concerns? Mon–Fri, 9:00 am–5:00 pm PST/PDT support@cosori.