
User's Manual
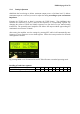
Exhibit 6 page 21 of 33
OM2500A will tune automatically to either TCVR frequency via CAT interface or by
frequency sampled by amplifier´s RF input.
4. Reduce the power output of your transceiver to the 0
5. Switch OPR/STBY to OPR position (OPR LED lights up)
6. Choose the TUNE position of multimeter
7. Transmit and increase driver power to 10W (OUTPUT power will be abt. 500W)
CAUTION
If the input power is higher than 15W and the power amplifier is not correctly tuned,
the safety devices will switch to STBY.
After switching the amplifier to STBY, the amplifier will automatically reset and switch back
to OPR mode after approximately 2 seconds.
8. Set TUNE knob in such a way, that the TUNE-LED lights up maximum left.
9. Set LOAD in such a way, that the TUNE LED on the TUNE scale lights up under
the “V” sign. If it is possible to obtain the LOAD in 2 positions, set the position
that is father to the right
10. Repeat tuning several times according to 8 and 9
11. Increase the input power until an output power of approximately 1500 W is reached.
12. Repeat steps 8 and 9
13. Set TUNE to maximum output power
After this procedure the amplifier is tuned correctly and ready to give 1500W output power in
all operation modes.
At optimal tuning and full output power a positive 50mA current goes through the second
grid. On 24 and 28 MHz bands optimal tuning can be achieved when one or two LEDs are lit
up to the left from the position “V”. If less output is desired you can simply decrease the load
of the transceiver.
CAUTION
Should the amplifier demonstrate any malfunctions during tuning or should it not
behave in accordance witch the description, interrupt the tuning procedure immediately
and check the amplifier! Be sure to have not done any mistakes in choosing bands or
TUNE/LOAD values!
NOTE
Be sure that SWR is not higher than 1:2 and input power is LOW!
After excluding possible human mistakes you will be able to work for long time with this
amplifier!