User Guide Wireless Notebook Adapter WN825G
WARNING: TO PREVENT FIRE OR SHOCK HAZARD, DO NOT EXPOSE THIS PRODUCT TO RAIN OR MOISTURE. THE UNIT MUST NOT BE EXPOSED TO DRIPPING OR SPLASHING. DO NOT PLACE OBJECTS FILLED WITH LIQUIDS, SUCH AS VASES, ON THE UNIT. CAUTION: TO ENSURE REGULATORY COMPLIANCE, USE ONLY THE PROVIDED POWER AND INTERFACE CABLES. CAUTION: DO NOT OPEN THE UNIT. DO NOT PERFORM ANY SERVICING OTHER THAN THAT CONTAINED IN THE INSTALLATION AND TROUBLESHOOTING INSTRUCTIONS. REFER ALL SERVICING TO QUALIFIED SERVICE PERSONNEL.
Canadian Compliance This Class B digital apparatus meets all requirements of the Canadian Interference Causing Equipment Regulations. Cet appareil numérique de la classe B respects toutes les exigences du Règlement sur le matériel brouilleur du Canada. FCC Declaration of Conformity Motorola, Inc.
Contents Section 1:Overview _______________________ 1-1 Features ................................................................................................................ 1-1 Understanding your User Guide ......................................................................... 1-2 Box Contents ........................................................................................................ 1-2 Simple Home Network Diagram ........................................................................
Section 1:Overview Congratulations on purchasing the Motorola Wireless Notebook Adapter WN825G. The WN825G complies with the 802.11b and the new nearly 5-times-faster 802.11g wireless standard. With Wi-Fi® Protected Access (WPA) included, your wireless connections are robust and secure, giving you the confidence to communicate without fear that the signal could be compromised.
OVERVIEW SECTION 1 Understanding your User Guide The User Guide is subdivided into the following sections: Overview Provides a general introduction for using your product, the type of technology used, and recommended practices for using it. Installation Provides instructions for installing the hardware and setting up the firmware to get your adapter up and running. Configuration and Status Provides details for using the Configuration and Status Utility to manage your unit.
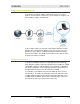
OVERVIEW SECTION 1 Simple Home Network Diagram Your wireless notebook adapter card, allows you to access files, printers, and an Internet connection on your network. A sample Local Area Network (LAN) is shown below: In the example above, the Internet communicates with the modem which in turn communicates with the router. The router acts as the gateway to your network, sending information to whichever device asks for information.
OVERVIEW SECTION 1 Adapter Card Physical Description Top of Adapter Card The following illustration shows the top of the WN825G: 1 2 POWER LINK HIGH PERFORMANCE RATE UPRATE TO 54/ Mbps / 802.11g HIGH PERFORMANCE 54 DATA Mbits/s DATA DRAFT 802.11GCOMPATIBLE COMPLIANT The WN825G has the following features: 1-4 Feature Description 1 Power LED Indicates that the card is powered.
OVERVIEW SECTION 1 Bottom of Adapter Card The following illustration shows the bottom of the WN825G: MODEL: WN825G PART NUMBER: 498518-001-00 S/N: PPPPMMYJJJSSSSSCAABBCCCC MAC address MAC: AB CD EF 01 23 45 Tested To Comply With FCC Standards For Home Or Office Use This device is approved as Motorola Model WN825G FCC ID: F2NWN825G Made in Taiwan The following describes the features on the bottom of the WN825G: Feature Description Label Includes the model number, part number, serial number, and MA
Section 2:Installation To install the software and hardware: 1 Insert the supplied CD-ROM into the CD-ROM drive. 2 The software automatically starts the Installation Wizard program. 3 Follow the prompts to setup your adapter card. If Windows 98SE prompts you for the original Windows CD-ROM, insert the CD-ROM, and direct Windows to its proper location (for example, D:\WIN98). 4 Locate an empty CardBus slot on your notebook PC.
Section 3:Configuration You can use the information in this section to: ! Discover available wireless networks ! Setup operation modes ! Create connectivity profiles ! Setup security ! Monitor the wireless network / environment ! Diagnostic discovery Connecting to an Existing Wireless Network After the adapter card is installed, a red antenna icon is displayed on your computer in the system tray.
CONFIGURATION SECTION 3 To connect to an existing wireless network: 1 Double-click the antenna icon. The Connect to Wireless Network window is displayed: The window displays any available wireless networks detected. 3-2 2 Highlight the network you want to access. 3 If prompted, enter a Network key. Enter the network key you used to set up security on your access point. 4 Click Connect.
CONFIGURATION SECTION 3 Configuring a New Wireless Network To configure a new wireless network: 1 Double-click the antenna icon in the system tray.
CONFIGURATION SECTION 3 2 3-4 Click Advanced.
CONFIGURATION SECTION 3 3 Click Add. The Wireless Network Properties window is displayed: 4 Enter information for the new wireless network. Field Description Network name (SSID) Enter a Network Name (SSID) of no more than 32 alphanumeric characters. This is the SSID for a particular wireless access point. Data encryption (WEP enabled) Select if the type of security encryption algorithm used on this network is WEP64 or WEP128.
CONFIGURATION SECTION 3 5 3-6 Field Description Key format Enter the format you used in the Network Key field – ASCII or hexadecimal. Key length Determines the strength of the network key. The options are 128-bit or 64-bit. Key index (advanced) There are four Keys (1, 2, 3, 4) that can be selected. The key selected must match the router’s key. The key is provided for me automatically Select if the key will automatically be provided.
CONFIGURATION SECTION 3 Configuring Properties for an Existing Wireless Network To configure network properties for an existing wireless network: 1 Double-click the antenna icon in the system tray.
CONFIGURATION SECTION 3 3-8 2 Click Advanced. The Motorola Wireless Configuration Utility window is displayed: 3 In the Available networks list or the Preferred networks list, highlight the network you want to configure. In the Available networks area, click Configure or in the Preferred networks area, click Properties.
CONFIGURATION SECTION 3 4 The Wireless Network Properties window is displayed: 5 If the network you want to configure is open (no encryption, no authentication), click OK and this network is added to the list of preferred networks. 6 If the network is not open and requires WEP data encryption, click Data encryption (WEP enabled). 7 If the network is not open and requires network authentication, click Network Authentication (Shared mode).
CONFIGURATION SECTION 3 Preferred Networks – Setting up the Connection Order There are two ways you can specify the order that the adapter will use to try to connect to an available network in your Preferred networks list: 3-10 ! Using the Move up and Move down buttons ! Using Advanced selection rules SECTION 3, CONFIGURATION
CONFIGURATION SECTION 3 Move up and Move down buttons Use the Move up and Move down buttons to move a network up and down in the list of Preferred networks. The adapter tries to connect to a wireless network in the order you specify in the Preferred networks list. To move a network within the list: 1 Highlight the network you want to move. 2 Click either the Move up or Move down button depending on where you want the selected network to appear in the list.
CONFIGURATION SECTION 3 Removing a Network From Your Preferred Network List To remove a wireless network from your preferred network list: 1 3-12 Double-click the antenna icon in the system tray.
CONFIGURATION SECTION 3 2 Click Advanced. The Motorola Wireless Configuration Utility window is displayed: 3 In the Preferred networks list, highlight the network you want to remove. 4 Click Remove. The network is removed from your preferred network list.
CONFIGURATION SECTION 3 Viewing Site Monitor Information To view site monitor information: 1 Double-click the antenna icon in the system tray. 2 On the Connect to Wireless Network window, click Advanced. 3 Click the Site Monitor tab. The Visible Networks list provides information about all of the detected networks. It lists the Network Name (SSID), Channel, Signal Strength, and Security.
CONFIGURATION 5 SECTION 3 To obtain more information about a selected network, click Advanced. The Advanced Site Monitor window is displayed: This window provides detailed information about the network you selected. 6 To start a log of network activity, click Start Log. The Save log file as window is displayed: 7 Select a drive and directory to store the networks.log file. 8 Click Save.
CONFIGURATION SECTION 3 9 The adapter saves a log of the information listed on the Advanced Site Monitor window to the networks.log file. The information is sent to the file approximately every six seconds. The log is a comma-delimited list that can be imported to a spreadsheet to enable you to view the activity on the network over an specific time period. 10 Click Stop Log to stop the log information from being sent to the networks.log file. 11 To freeze the display, click Freeze.
CONFIGURATION SECTION 3 Viewing Link Status To view link status: 1 Double-click the antenna icon in the system tray. 2 Click Advanced. 3 Click the Link Status tab.
CONFIGURATION SECTION 3 Viewing Network Statistics To view statistics for the network you are connected to: 1 Double-click the antenna icon in the system tray. 2 Click Advanced. The Motorola Wireless Configuration Utility window is displayed. 3 Click the Statistics tab. The Statistics tab provides information about the wireless network: Activating LEAP Lightweight Extensible Authentication Protocol (LEAP) is an authentication implementation of 802.
CONFIGURATION SECTION 3 2 Click Advanced. The Motorola Wireless Configuration Utility window is displayed. Click the LEAP tab. 3 Click Enable LEAP to activate the function. 4 To add a network, click Properties. The LEAP Network Properties window displays. 5 Enter the required information and click OK.
CONFIGURATION SECTION 3 6 To remove a network, highlight the network in the Leap Enabled Networks window and click Remove. 7 Click Apply and then OK to save your changes. Diagnostics This tab will help you, in conjunction with technical support, to isolate problems that might be occurring with your adapter. 3-20 1 Double-click the antenna icon in the system tray. 2 Click Advanced. The Motorola Wireless Configuration Utility window is displayed. 3 Click the Diagnostics tab.
CONFIGURATION SECTION 3 Viewing Adapter Product Information To view product information for the adapter installed in your PC: 1 Double-click the antenna icon in the system tray. 2 Click Advanced. The Motorola Wireless Configuration Utility window is displayed. 3 Click the Information tab.
CONFIGURATION SECTION 3 Removing the Wireless Adapter You can safely remove the Wireless Adapter while the PC is operating. To remove the adapter: 3-22 1 Locate the Device Eject icon located in your system tray. In the illustration below, it is the third icon from the left; the picture of a card and a left-pointing arrow. 2 Double-click the Device Eject icon.
CONFIGURATION SECTION 3 3 Highlight the device you want to remove. 4 Click STOP. The Stop a Hardware device window is displayed: 5 Confirm that the device listed in the window is the device you want to stop. 6 Click OK. After you receive a message telling you the device is stopped, you can safely remove the Wireless Adapter.
Section 4:Troubleshooting This section details possible solutions to common problems that might occur in using the WN825G. Contact Us If you are unable to locate a solution here, please access our website at www.motorola.com/broadband/networking for the latest information. You can also reach us at 1-877-466-8646 7 days a week, 24 hours a day. Hardware Solutions My computer is experiencing difficulty connecting to the wireless network. ! Ensure that your PC and wireless access point is powered on.
SECTION 4 TROUBLESHOOTING I would like to test to see if my Internet connection is alive. For this, you will use the ping command to test the connection. Before attempting, determine the IP Address of your adapter. 1 Open a command prompt by clicking Start and Run. For Windows 98 and ME, in the Open field, type command and press Enter or OK. For Windows 2000 and XP, type cmd. Or, navigate using your Start button to Programs>Accessories>Command Prompt. 2 In the Command window, type “ipconfig”.
Section 5:Glossary A Access Point (AP) A device that provides wireless LAN connectivity to wireless clients (stations). Adapter A device or card that connects a computer, printer, or other peripheral device to the network or to some other device. A wireless adapter connects a computer to the wireless LAN. Address translation See NAT. Ad-Hoc Network A temporary local area network connecting AP clients together, usually just for the duration of the communication session.
GLOSSARY SECTION 5 C Client In a client/server architecture, a client is a computer that requests files or services such as file transfer, remote login, or printing from the server. On an IEEE 802.11b/g wireless LAN, a client is any host that can communicate with the access point. Also called a CPE. A wireless client is also called a “station.” Also see server. Coaxial Cable A type of cable consisting of a center wire surrounded by insulation and a grounded shield of braided wire.
GLOSSARY SECTION 5 you access the world-wide web, a DNS server translates the URL displayed on the browser to the destination website IP address. The DNS lookup table is a distributed Internet database; no one DNS server lists all domain name to IP address matches. Domain Name A unique name, such as motorola.com, that maps to an IP address. Domain names are typically much easier to remember than are IP addresses. See DNS. Download To copy a file from one computer to another.
GLOSSARY SECTION 5 Each Ethernet port has a physical address called the MAC address. Also see MAC address. Event A message generated by a device to inform an operator or the network management system that something has occurred. F Firewall A security software system on the some devices that enforces an access control policy between the Internet and the LAN for protection. Firmware Code written onto read-only memory (ROM) or programmable read-only memory (PROM).
GLOSSARY SECTION 5 ! A company that provides this service ! In IBM environments, a mainframe computer I ICMP Internet Control Message Protocol is a protocol used for error, problem, and informational messages sent between IP hosts and gateways. ICMP messages are processed by the IP software and are not usually apparent to the end-user. IEEE The Institute of Electrical and Electronics Engineers, Inc. (http://www.ieee.
GLOSSARY SECTION 5 LEAP Lightweight Extensible Authentication Protocol (LEAP) is an authentication implementation of 802.1X by Cisco, which provides a challenge-response authentication mechanism and dynamic WEP key assignment. M MAC Address The Media Access Control address is a unique, 48-bit value permanently saved in the ROM at the factory to identify each Ethernet network device. It is expressed as a sequence of 12 hexadecimal digits printed on the unit’s label.
GLOSSARY SECTION 5 NIC A Network Interface Card converts computer data to serial data in a packet format that it sends over the LAN. A NIC is installed in an expansion slot or can be built-in. Every Ethernet NIC has a MAC address permanently saved in its ROM. P Packet The unit of data that is routed between the sender and destination on the Internet or other packet-switched network.
GLOSSARY SECTION 5 Protocol A formal set of rules and conventions for exchanging data. Different computer types (for example PC, UNIX, or mainframe) can communicate if they support common protocols. Public IP Address The IP address assigned by the service provider. A public IP address is visible to devices on the Internet. See also Private IP Address. R RJ-11 The most common type of connector for household or office phones.
GLOSSARY SECTION 5 Service Provider A company providing Internet connection services to subscribers. SMTP Simple Mail Transfer Protocol is a standard Internet protocol for transferring e-mail. Static IP Address An IP address that is permanently assigned to a host. Normally, a static IP address must be assigned manually. The opposite of Dynamic IP Address. Station IEEE 802.11b term for wireless client. Subscriber A user who accesses television, data, or other services from a service provider.
GLOSSARY SECTION 5 Tunneling requires the following protocol types: ! A carrier protocol, such as TCP, used by the network that the data travels over ! An encapsulating protocol, such as IPSec, L2F, L2TP, or PPTP, that is wrapped around the original data ! A passenger protocol, such as IP, for the original data U UDP User Datagram Protocol. A method used along with the IP to send data in the form of message units (datagram) between network devices over a LAN or WAN.
GLOSSARY SECTION 5 W WAN A wide-area network provides a connection over a large geographic area, such as a country or the whole world. The bandwidth depends on need and cost, but is usually much lower than for a LAN. WAP Wireless Access Point or Wireless Access Protocol. See also Access Point. WEP Wired Equivalent Privacy encryption protects the privacy of data transmitted over a wireless LAN. WEP uses keys to encrypt and decrypt transmitted data.
Visit our website at: www.motorola.