
Install Guide
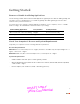
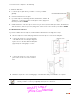
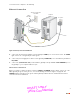
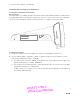
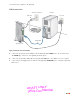
Table Of Contents
- Remove or Disable Conflicting Applications
- Check Your Computer’s Browser and System Requirements
- Choose a Computer and Connection Type
- Install the DSL Filter
- Ethernet Connection
- Wireless Connection
- Non-2Wire Wireless Adapter Configuration
- a. The network name is the word “2WIRE” (in all capital letters), followed by the last three digits of the gateway serial number (for example, 2WIRE110).
- b. The encryption key is a 64-bit hex value, located beneath the bar code on the bottom of the 2Wire gateway. In the example, it is 4119627022.
- c. For Mac OS X users, you may need to enter the “$” character at the beginning of the encryption key (for example, $4119627022).
- Non-2Wire Wireless Adapter Configuration
- USB Connection
- Windows XP/2K/ME/98SE
- Macintosh OS 10.1.4/10.1.5/10.2.0 - 10.2.8/10.3.3 - 10.3.8
- Ethernet Connection
- USB Connection
- Wireless Connection
- Ethernet Connection
- USB Connection

Connect the First Computer to the Gateway
4
Ethernet Connection
Figure 1. Gateway Connected Via Ethernet
1.
Connect the provided power adapter from the gateway’s POWER port to an electrical outlet. The POWER
light on the front of the gateway should be green.
2. Connect the provided gray phone cable from the gateway’s PHONE LINE port to the DSL filter jack labeled
DSL/HPNA.
3. Connect the yellow Ethernet cable provided with the gateway from any available LOCAL ETHERNET port on
the gateway to your computer’s Ethernet port.
Check Your Connections
With your computer completely started, verify the POWER and ETHERNET indicator lights on the front of the
2Wire gateway are green. If they are not, see “Understanding the Indicator Lights” on page 18. The
INTERNET indicator light will not turn green until the gateway software has been installed and an Internet
connection has been established.
DSL
PHONE LINES
POWER
RESET
Gateway
2Wire
DSL lter
AC power
Telephone wall jack
with DSL
Computer
DRAFT ONLY
2Wire Confidential