
User's Manual


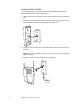

Table Of Contents
Chapter 2 Installing the Gateway 9
Connecting the power adapter
The power adapter supplies power to the gateway. Always use the power adapter that
was packaged with the gateway because it matches the power requirements of the
gateway and it complies with local requirements.
1. Connect one end of the power adapter to the POWER port on the gateway.
2. Connect the cable’s other end to an electrical outlet.
After the gateway is powered on, the power light blinks green for a moment and then
turns steady green.
Connecting the gateway to the Internet
Connect the gateway to the Internet using the DSL Broadband port.
1. Connect one end of the green DSL cable to the green DSL Broadband port on the
gateway.
2. Connect the other end of the DSL cable to the wall jack.
After the gateway recognizes the connection, the Broadband light blinks green for a
moment and then turns steady green.
Connecting computers to the gateway
You can connect your computers and devices to the gateway using a wired
connection or a wireless connection. With either type of connection, you can use the
first computer that you connect to the network to set up the gateway.
Connecting devices using a wired connection
The gateway has four wired Ethernet ports that you can use to connect computers or
other devices.
1. Connect one end of the yellow Ethernet cable to one of the yellow Ethernet ports
on the gateway.
2. Connect the other end of the cable to the Ethernet port on the computer.
You can connect up to four computers to the gateway using the wired Ethernet ports.
Note: A 6-foot yellow Ethernet cable is provided with the gateway. If you need an
additional or longer cable, use a Cat 5 or Cat 5e Ethernet cable.
After the gateway recognizes the computer, the Ethernet light turns steady green, and
blinks when the computer starts transferring data with the gateway.