
User's Manual


Instructions
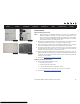
Wall-mounting instructions
Note: When mounting the Telephony Modem on drywall, try to position the
Telephony Modem so at least one of the screws is fastened to a stud.
This may prevent the Telephony Modem from pulling out of the wall in
the future. To prevent overheating of the Telephony Modem, do not block
the ventilation holes on the sides of the unit.
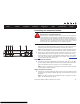
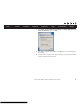
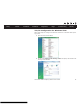
1 Position the mounting template on the surface where you intend to mount
the Telephony Modem and secure in place with transparent tape.
2 Drill holes through the template in the specified locations for the mounting
screws. After drilling holes, remove the template from the surface.
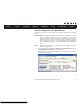
3 If using drywall anchors, set them into the wall. Then, drive the screws into
the wall leaving a gap of about 1/8” (3 mm) between the screw head and
the wall. If not using anchors, just drive the screws.
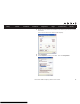
4 Orient the Telephony Modem with the indicator lights facing up or right, as
desired. Slip both mounting slots (in the back of the Telephony Modem) over
the screws, then slide the case down until the narrow end of the keyhole slot
contacts the screw shaft.
5 Proceed to Connecting the Telephony Modem
.
Desktop mounting instructions
1 Position the Telephony Modem so that:
• air flows freely around it
• the back faces the nearest wall
• it will not fall to the floor if bumped or moved
• the ventilation holes on the side of the unit are not blocked
2 Proceed to Connecting the Telephony Modem
.
Touchstone TM822 Telephony Modem User’s Guide
Safety
Getting
Started
Battery
Installation
Installation
Ethernet
Configuration Usage Troubleshooting Glossary
22
Step 1
Step 2
Step 4
Step 3