400mm Prodigy Operating Manual www.arrowshobby.
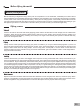
WARNING:This manual contains important information that will help you maintain and operate your model aircraft in a reliable and safe manner. Please read the instructions and warnings carefully prior to assembly, setup or use. As this model aircraft is a sophisticated hobby product, it must be flown with safety and common sense in mind, failure in doing so may result in injury or property damage. This product is not intended for use by children without direct adult supervision.
Introduction The 1400mm Prodigy features quick assembly and stable flight control. A great choice for novice pilots, and also fun for experienced pilots. Built with ultralight tough EPO foam, the large wing area and high-winged airframe configuration gives the Prodigy low wing-loading and extraordinary amounts of lift, even at slow speeds. Unless the aircraft lands upside down, it is almost impossible to damage the pusher propeller. The pusher propeller design also facilitates FPV setups.
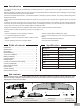
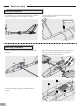
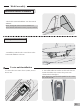
Model assembly Fuselage installation 1. Lead the two servo wires into front fuselage, and then install rear fuselage to front fuselage as shown. 2. Secure the joint of the front and rear fuselage using included screw. HKM3.0*10mm Main wing installation 1.Slide the wing spar into the pass through of fuselage as shown 2.Apply the left and right wing halves onto wing spar, pass the servo wires into fuselage and then have them connected with a 2Y harness. 3.
Model assembly Horizontal stabilizer installation 1. Slide the horizontal stabilizer onto the vertical stabilizer. NOTE: Gently pull on the horizontal stabilizer to ensure that the stabilizer has been properly installed. Linkage rod installation 1. Install the pushrod to the control horn on the horizontal stabilizer as shown. Vector unit installation 1. Connect the servo wires of CH-1, CH-2, CH-4 to Vector unit. 2.
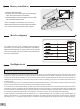
Battery installation 1. Remove the battery hatch. 2. Remove the hook and loop tape from the fuselage. Apply the looped surface to the battery. 3. Install the battery into the fuselage- securing it with the preinstalled battery straps. Note: The weight of each battery may vary due to different manufacturing techniques. Move the battery fore or aft to achieve the optimal center of gravity. Receiver diagram The cables from the servo connector board should be connected to your receiver in the order shown.
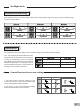
Preflight check transmitter and model setup After assembly and prior to your first flight, make sure all control surfaces respond correctly to your transmitter by referring to the diagram below. Control throws The suggested control throw setting for the 1400mm Prodigy are as follows (dual rate setting): Tips: The maiden flight should always be flown using low rates, fly the aircraft until you are familiar with its characteristics prior to trying high rates.
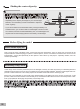
Finding the center of gravity Finding the correct center of gravity is critical in ensuring that the aircraft performs in a stable and responsive manner. Please adjust the weight distribution so the aircraft balances in the range stated on the diagram. 70mm-80mm • Depending on the capacity and weight of your choosen flight batteries, move the battery forward or backward to adjust the center of gravity.
Before flying the model Monitor your flight time Monitor and limit your flight time using a timer (such as a stopwatch or on the transmitter, if available). As modern Lithium Polymer batteries are not designed to discharge completely, when the battery runs low, the ESC will lower then completely cut the power to the motors to protect the battery. Often (but not always) power can be briefly restored after the motor cuts off by holding the throttle stick all the way down for a few seconds.
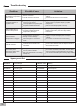
Troubleshooting Problem Possible Cause Solution Aircraft will not respond to the throttle but responds to other controls. ESC is not armed. Throttle channel is reversed. Lower throttle stick and throttle trim to lowest settings. Reverse throttle channel on transmitter. Excessive vibration or propeller noise. Damaged spinner, propeller, motor or motor mount. Loose propeller and spinner parts. Propellor installed backwards. Replace damaged parts.
重要提示: 1. 在组装、调整及飞行前请务必认真阅读产品说明书以熟知产品的特性。请严格按照说明书提示进行飞机的组装、 调整及飞行。 2. 模型不是玩具,具有一定的危险性,操作者需要具备一定的飞行经验,初学者请在专业人士指导下操作。 3.
飞机简介 Arrows Hobby 的诚意之作,1400mm 滑翔机 Prodigy ( 奇迹 ) 来了! 1400mm Prodigy ( 奇迹 ) 因其易安装、易操控、稳定、好飞的特征,既是新手玩家入门飞行的优选之作,也是老玩家探索更多 玩法的优选之作。 轻量化 EPO 材质、上单翼布局、大机翼面积,带来低翼载荷、高升阻比的飞行特性,使玩家即使在低速飞行时也能够操控自如。 背推式桨的设计极大便利 FPV 的玩法,并且除非将飞机完全倒置,否则几乎不可能破坏螺旋桨。快拆快装结构,在电池充满的情况下, 玩家只需耗费一分钟拧紧数颗螺丝即可畅享飞行。 在动力配置方面,高性能 2212-KV1500 电机、20A 电调,配以 3S 1300mAh - 2200mAh 25C 电池,能迸发出足够的动力或慢 速翱翔或疾驰天空。值得一提的是,在收油滑翔飞行的情况下,飞行时间可长达 15 分钟。 Prodigy ( 奇迹 ) 是典型的 4 通道飞机:油门、升降、方向、副翼。于新手玩家来说一目了然,于老玩家来说大道至简。 给 Prodigy ( 奇迹 ) 一个契机,感受他带给你的奇迹。 特征: 1.
组装过程 机身安装 1.如图所示, 将两条舵机线穿入前机身,后机身对接安装。 2.如图所示,使用螺丝固定前后机身对接处。 HKM3.0*10mm 主翼安装 1.如图所示,将主翼对接管装入机身槽位。 2.
组装过程 3.如图所示,使用附属螺丝固定主翼至机身,注意锁螺 丝不要过紧。 HKM3.0*10mm 平尾安装 1. 如图所示,将平尾安装到对应滑槽位。 连接钢丝安装 1.
维翼安装 1.将1.2.4通舵机线连接到维翼插口。 2.撕开维翼背面胶贴,按图示位置粘牢。 注:维翼要和飞机的中心线平行。 电池安装 如图所示,安装厂家推荐型号电池至电池舱,使用所附魔 术带或魔术贴固定。 注意: 1. 电池与电调连接前,务必确定油门杆处于低位。 2. 启动油门前,务必确定没有任何人或物体处于螺旋 桨的转动直径以内。 3.
重心 70mm-80mm 本产品的重心在机翼前缘向后 70-80mm 的位置。玩家需 要通过移动电池在电池舱里的前后位置或者使用配重块来 调整重心。请务必确保,在调整飞机重心的时候,飞机处 于组装完毕待飞的状态。 重要产品相关信息 1. 本产品随附的电调处在安全启动模式。安全启动模式,意即如果电机、电池已连接至电调,但油门杆不在低油门 位置或关闭位置,电机不会启动,只有将油门杆移至低油门位置或关闭位置,电机才会启动。油门杆移至低油门位 置或关闭位置时,电机将发出一系列哔声。几声相同的哔声表示电调已检测到电池。哔声的数量等于电池的节数。 此时,电机已准备就绪,并将随着油门移动开始启动。 2. 电机和电调已预连接,需要观察电机转动方向是否正确,如方向不正确,只需换插三条电机与电调连接线中的任 意两条,即可改变电机转动方向。 3.
舵面测试 在计划飞行之前,需要使用遥控器测试每个舵面的工作情况,确保摇杆动作与各个舵面动作的对应关系如下图所示 : 注意:在舵面调试中,请务必将油门摇置于最低位,并将桨拆下,以免电机意外启动发生事故。 副翼 副翼摇杆 向左运动 副翼摇杆 向右运动 升降舵 升降摇杆 向上运动 升降摇杆 向下运动 方向舵 方向摇杆 向左运动 方向摇杆 向右运动 17
舵角和舵机摇臂安装 舵角 图示是出厂设置,首飞建议直接使用出厂 设置,完成首飞以后,根据个人情况以及 对模型飞机的熟知程度自行调整。 摇臂 大舵面 平尾 小舵面 垂尾 副翼 舵面行程 本产品舵面行程参数如右图所示: 请注意,舵量越大,模型飞机的动作响应 越快,动作幅度越大。首飞建议使用小舵 量。然后根据个人情况以及对模型飞机的 熟知程度调整舵量。 18 升降舵 方向舵 副翼舵 大 14mm 上 / 下 18mm 左 / 右 16mm 上 / 下 小 10mm 上 / 下 16mm 左 / 右 12mm 上 / 下
故障检修指导 问题 问题原因 解决方式 油门推杆无响应,但舵机 有响应 ——电调未连接电机 ——油门通道反向 ——降低油门推杆和油门微调设定 ——反过来重新装油门通道 桨的噪音过大或者震动过大 ——桨罩、桨、电机、电机架坏了 ——桨或者桨罩的小部件松动了 ——桨装反了 ——更换损坏的配件 ——把桨、桨夹和桨罩的小部件拧紧 ——反过来重新装桨 飞行时间变短,飞机无力 ——电池电量低 ——桨装反了 ——电池坏了 ——重新给电池充电 ——依照电池说明书更换新的电池 飞舵面不动,或者动作响 应较慢 ——舵面、舵角、连接杆、舵机坏了 ——连接线坏了或者接头松了 舵面反向 ——遥控器发射机通道反向 ——检查通道控制(舵面)方向,调试飞机舵面 和遥控器的舵面控制杆 电机无力 ——电机或电池坏了 ——电调用了不合适的低压保护装置 ——检查电池、发射机、接收机、电调、电机是 否有损坏(如有,请及时更换) ——立刻操控飞机降落,重新给电池充电 ——更换或者维修坏了的配件 ——检查所有连接线,确保所有接头无松动现象 配件列表 AHAW101 AHAW102 AHAW103 AHAW104