
User Manual Prodigy RTF Motorglider with Vector Stabilization (1400mm)
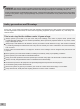
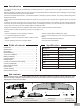
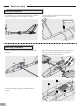
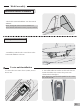
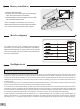
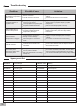
Table Of Contents

1. The ESC included with the model has a safe start. If the motor battery is connected to the ESC and the throttle stick is not in the low
throttle or off position, the motor will not start until the throttle stick is moved to the low throttle or off position. Once the throttle stick is
moved to the low throttle or off position, the motor will emit a series of beeps. Several beeps with the same tune means the ESC has
detected the cells of the battery. The count of the beeps equals the cells of the battery. The motor is now armed and will start when the
throttle is moved.
2. The motor and ESC come pre-connected and the motor rotation should be correct. If for any reason the motor is rotating in the wrong
direction, simply reverse two of the three motor wires to change the direction of rotation.
3. The motor has an optional brake setting. The ESC comes with brake switched off and we recommend that the model be flown with
the brake off. However, the brake could be accidentally switched on if the motor battery is connected to the ESC while the throttle stick
is set at full throttle. To switch the brake off, move the throttle stick to full throttle and plug in the motor battery. The motor will beep one
time. Move the throttle stick to low throttle or the off position. The motor is ready to run and the brake will be switched off.
4. Battery Selection and Installation. We recommend the
11.1V 1300mAh-2200mAh 25C
Li-Po battery. If using another battery, the
battery must be at least a
11.1V 1300mAh-2200mAh 25C
battery. Your battery should be approximately the same capacity, dimension
and weight as the
11.1V 1300mAh-2200mAh 25C
Li-Po battery to fit the fuselage without changing the center of gravity significantly.
Receiver diagram
Preflight check
Important ESC and model information
Flap
Spare
Flap
Landing gear
6
The cables from the servo connector board should be
connected to your receiver in the order shown. Note that the
LEDs can be powered by any spare channel on the receiver.
Tuck the wire leads into the recessed cavity towards the
rear of the battery hatch.
Battery installation
1. Remove the battery hatch.
2. Remove the hook and loop tape from the fuselage.
Apply the looped surface to the battery.
3. Install the battery into the fuselage- securing it with
the preinstalled battery straps.
Note: The weight of each battery may vary due to
different manufacturing techniques. Move the battery
fore or aft to achieve the optimal center of gravity.
5
6
06