620mm Pioneer Operating Manual
Warning: This manual contains important information that will help you maintain and operate your model aircraft in a reliable and safe manner. Please read the instructions and warnings carefully prior to assembly, setup or use. As this model aircraft is a sophisticated hobby product, it must be flown with safety and common sense in mind, failure in doing so may result in injury or property damage. This product is not intended for use by children without direct adult supervision.
Introduction Any skill level Any terrain Anywhere! Introducing the Arrows Hobby 620mm Pioneer Modern beginner pilots are often faced with a daunting task: learning to fly in a limited space without an instructor. For those pilots, Arrows Hobby has the answer! Introducing the Arrows Hobby 620mm Pioneer- a micro bush-plane with BIG performance! As a proper "all-rounder", the Pioneer has a classic high-winged tail-dragger design- allowing for predictable handling characteristics.
Battery installation 1. Remove the battery hatch. 2. Remove the hook and loop tape from the fuselage. Apply the looped surface to the battery. 3. Install the battery into the fuselage- securing it with the preinstalled battery straps. Note: The weight of each battery may vary due to different manufacturing techniques. Move the battery fore or aft to achieve the optimal center of gravity. Receiver diagram Aileron Elevator Rudder Preflight check Important ESC and model information 1.
Preflight check transmitter and model setup After assembly and prior to your first flight, make sure all control surfaces respond correctly to your transmitter by referring to the diagram below. Control throws The suggested control throw setting for the Pioneer are as follows (dual rate setting): Tip: The maiden flight should always be flown using low rates, fly the aircraft until you are familiar with its characteristics prior to trying high rates.
Before flying the model Find a suitable flying site Find a flying site clear of buildings, trees, power lines and other obstructions. Until you know how much area will be required and have mastered flying your plane in confined spaces, choose a site which is at least the size of two to three football fields - a flying field specifically for R/C planes is best. Never fly near people - especially children, who can wander unpredictably.
Flight tips Landing Land the aircraft when you start to feel sluggish motor response. If using a transmitter with a timer, set the timer so you have enough flight time to make several landing approaches.The model’s three point landing gear allows the model to land on hard surfaces. Align model directly into the wind and fly down to the ground. Fly the airplane down to the ground using 1/4-1/3 throttle to keep enough energy for proper flare.
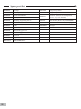
Spare parts list AHAM101 AHAM102 AHAM103 AHAM104 AHAM105 AHAM106 AHAM107 AHAM108 AHAM109 AHAM110 AHAM111 AHPROP010 AHKV3000 08 Fuselage Mainwing set Horizontal stabilizer Battery Door Mainwing supporting bar set Steel set Cowl Spinner Main landing gear set Rear landing gear set Decal set Propeller 1608-KV3000 Motor AH1.9GP AH3.7GP AHRX01 AHTX01 AHBAT01 AHCHR01 1.9g servo positive 3.
4 channel transmitter user manual Mode Toggle NO Power switch (NO/OFF) THROTTLE TRIM (LEFT HAND THROTTLE) ELEVATOR TRIM (LEFT HAND THROTTLE) ELEVATOR TRIM (RIGHT HAND THROTTLE) THROTTLE TRIM (RIGHT HAND THROTTLE) AILERON TRIM RUDDER TRIM POWER STATUS LED BIND 1,5V LR6 AA 1,5V LR6 AA 1,5V LR6 AA Stability 1,5V LR6 AA Dynamic Remove the battery hatch cover, place 4x “AA” cells into the battery hatch, then replace the battery hatch cover.
User Manual Basic parameters 1.Transmitting power: less than or equal to 70mW 2.Transmission frequency: 2401 MHZ---2479 MHZ 3.Ground control range: greater than 300 meters 4.Transmitter power supply requirements: DC+6V (4 AAbatteries) 5.Receiver power supply requirements: DC+6V Functionality 1. This aircraft is equipped with Vector, an advanced flight control system.
重要提示: 1. 在组装、调整及飞行前请务必认真阅读产品说明书以熟知产品的特性。请严格按照说明书提示进行飞机的组装、 调整及飞行。 2. 模型不是玩具,具有一定的危险性,操作者需要具备一定的飞行经验,初学者请在专业人士指导下操作。 3.
飞机简介 一款不挑场地的初学者飞机! 一款轻易玩转的初学者飞机! 一款里程碑式的初学者飞机! Arrows Hobby 620mm 拓荒者,来了! 初学者往往面临这样的烦恼:片刻的娱乐时间,有限的场地环境,生疏的操作技术……拓荒者带着他的飞行控制系统,让你烦恼一扫而光。 这是一款“内外兼修”的飞机。在外型上,拓荒者采用上单翼布局,后三点起落架,使起降更易上手;接收机模块集成电调和飞行控制系统, 免除复杂的接线问题,使飞机在自动校平 ( 自稳 )、优化 ( 增稳 ) 两种模式之间自由切换,可以满足新手玩家常需的飞行需求; EPP 耐摔泡沫材料,比重轻、韧性强,超大尺寸轮胎便于粗糙路面起降,出厂完成全部组装工作,玩家在保证电池电量充足的情况下,只需 通电完成自检(3 秒),即可爽飞。 这是一款“小材大用”的飞机。Arrows Hobby 在研发专业级桨机、涵道机的路上做了个急转弯,以大道至简的设计思路,孵化出这款 小比例初学者飞机。其研发的重要意义,就是给航模爱好者,尤其是青少年爱好者,展露浩瀚航模世界的一角,这是航模领域当之无愧的“敲 门砖”,也是通往更高级别航模必不可少的跳板。 Arrows Hobby 6
产品包装清单 A. B. C. B : 遥控器 A: 飞机 C: 电池 D. D: 充电线 电池安装 如图所示,安装厂家推荐型号电池至电池舱,使用所附魔 术带或魔术贴固定。 注意: 1. 电池与电调连接前,务必确定油门杆处于低位。 2. 启动油门前,务必确定没有任何人或物体处于螺旋 桨的转动直径以内。 3.
重心 35mm 本产品的重心在机翼前缘向后 35mm 的位置。玩家需要通 过移动电池在电池舱里的前后位置或者使用配重块来调整 重心。请务必确保,在调整飞机重心的时候,飞机处于组 装完毕待飞的状态。 重要产品相关信息 1. 本产品随附的电调处在安全启动模式。安全启动模式,意即如果电机、电池已连接至电调,但油门杆不在低油门 位置或关闭位置,电机不会启动,只有将油门杆移至低油门位置或关闭位置,电机才会启动。油门杆移至低油门位 置或关闭位置时,电机将发出一系列哔声。几声相同的哔声表示电调已检测到电池。哔声的数量等于电池的节数。 此时,电机已准备就绪,并将随着油门移动开始启动。 2. 电机和电调已预连接,需要观察电机转动方向是否正确,如方向不正确,只需换插三条电机与电调连接线中的任 意两条,即可改变电机转动方向。 3.
舵面测试 在计划飞行之前,需要使用遥控器测试每个舵面的工作情况,确保摇杆动作与各个舵面动作的对应关系如下图所示 : 注意:在舵面调试中,请务必将油门摇置于最低位,并将桨拆下,以免电机意外启动发生事故。 副翼 副翼摇杆 向左运动 副翼摇杆 向右运动 升降舵 升降摇杆 向上运动 升降摇杆 向下运动 方向舵 方向摇杆 向左运动 方向摇杆 向右运动 舵面行程 本产品舵面行程参数如右图所示: 请注意,舵量越大,模型飞机的动作响应 越快,动作幅度越大。首飞建议使用小舵 量。然后根据个人情况以及对模型飞机的 熟知程度调整舵量。 大 小 方向舵 12mm 左 / 右 10mm 左 / 右 副翼舵 10mm 上 / 下 8mm 上 / 下 升降舵 12mm 上 / 下 10mm 上 / 下 15
故障检修指导 问题 问题原因 解决方式 油门推杆无响应,但舵机 有响应 ——电调未连接电机 ——油门通道反向 桨的噪音过大或者震动过大 ——桨罩、桨、电机、电机架坏了 ——桨或者桨罩的小部件松动了 ——桨装反了 飞行时间变短,飞机无力 飞舵面不动,或者动作响 应较慢 舵面反向 ——电池电量低 ——桨装反了 ——电池坏了 ——降低油门推杆和油门微调设定 ——反过来重新装油门通道 ——更换损坏的配件 ——把桨、桨夹和桨罩的小部件拧紧 ——反过来重新装桨 ——重新给电池充电 ——依照电池说明书更换新的电池 ——舵面、舵角、连接杆、舵机坏了 ——更换或者维修坏了的配件 ——连接线坏了或者接头松了 ——检查所有连接线,确保所有接头无松 动现象 ——遥控器发射机通道反向 ——检查通道控制(舵面)方向,调试飞机舵 面和遥控器的舵面控制杆 ——检查电池、发射机、接收机、电调、电 机是否有损坏(如有,请及时更换) ——电机或电池坏了 ——电调用了不合适的低压保护装置 ——立刻操控飞机降落,重新给电池充电 电机无力 配件列表 AHAM101 AHAM102 AHAM103 AHAM104 AH
4 通道遥控器使用说明 模式切换 开关 NO 升降舵微调(左手油门) 油门微调(右手油门) 油门微调(左手油门) 升降舵微调(右手油门) 副翼微调 方向舵微调 电源指示灯 对频按键 1,5V LR6 AA 1,5V LR6 AA 1,5V LR6 AA 自动校平模式 1,5V LR6 AA 优化模式 取下电池盖, 并把 4 节 AA 电池, 按极性装入电池盒内,然后把遥 控器电池盖盖上。 17
用户手册 遥控器基本参数 1. 发送功率:小于或等于 70mW 2. 发送频率:2401 MHz---2479MHz 3. 地面控制范围 :大于 300 米 4. 发射机供电要求:DC+ 6V (4 节 AA 电池 ) 5. 接收机供电要求:DC+ 6V 功能介绍 1. 飞控系统配有自动校平、优化 2 种飞行模式,使用遥控器上的一个 2 段开关来切换模式。 自动校平模式——此飞行模式是专为初学者设计的,但也可用作更高级飞行员的紧急模式。在未有新指令输入的情况下,自动校平模 式通过机载传感器,来使飞机保持水平的飞行姿态。遥控器油门摇杆在 50% 位置飞机保持平飞状态,摇杆高于 50% 的位置,飞机 的爬升角度会随着摇杆位置的高度变大。 优化模式——此飞行模式利用高精度陀螺仪,可在不干预摇杆操作的前提下,有效消除阵风和湍流的影响,以保持稳定的飞行姿态。 操作步骤 飞机对频操作 1. 飞机接上电池后,打开遥控器,同时长按遥控器面板上的两个对频键约 3 秒进入对频,对频成功(已经完成对频的可忽略此步骤)。 遥控器提醒功能 1. 遥控器开启以后,每分钟 “滴” 一声为计时功能,电源指示灯绿色常亮。 2.