
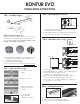
Installation Guide

1
2 3
4
5
STEP 4 - Mount rail onto supports
Step 5 - Hand draw system
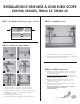
1. Install Endcaps and then click in carriers.
2. Attach baton to side of drape you wish to operate from by clipping
it into the fi rst carrier.
3. Use plastic plug to lock last carries into place so end of drape
dose not move then the drape is fully closed.
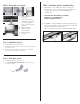
1. Slide Outside Posts over
Inside Posts.
2. Once all Outside Posts
including Center Supports
are in place, tighten
posts securely by turning
clockwise.
3. Tighten set screws.
4. Finished result for
Center Supports.
5. Finished result for
side posts.
Step 6 - Cord draw system
1. Install Endcaps and then click in carriers.
2. For center opening tracks greater than 84”, click in plastic plug
at center point of rail.
PLUG
STEP 6 - Cord Draw Systems, Installing Pulley
1. Attach pulley to cord. Stretch pulley until cord is tight. It is
not necessary to use excessive tension. Mark spot with pencil
on wall or fl oor. Remove cords and install pulley then
re-install cords.
• THE PULLEY MUST BE INSTALLED. IT IS THE LAW.
FAILURE TO DO SO CAN RESULT IN
INJURY TO CHILDREN OR PETS!
2. IF NEEDED - To adjust CONTROL cord drop, pull cord through
master carrier until pulley is at desired height. Pull cord an extra
few inches and knot cord at proper spot.
When you install the pulley the cord will slide back into place.